一元化されたパッチコンプライアンスレポート
パッチコンプライアンスとは何ですか?
パッチコンプライアンスとは、組織のポリシーに従って、すべてのコンピューティングリソースに最新のセキュリティアップデートとバグ修正が適用されていることを確認するプロセスです。パッチベースラインで定義されたすべての必須パッチが正常に適用されている場合、システムは「パッチコンプライアント」とみなされます。コンプライアンスに準拠していないシステムには、重要なセキュリティアップデートが適用されていない可能性があり、悪意のある攻撃者に悪用される可能性のあるセキュリティ脆弱性に組織がさらされるリスクがあります。
複数の AWS アカウントとリージョンにまたがる現代のクラウド環境では、分散化されたパッチ管理により、可視性のギャップ、一貫性のないレポート、脆弱性への対応の遅延、複雑な監査プロセス、チーム間での作業の重複など、重大な課題が生じます。これらの課題は、組織全体でセキュリティリスクへの露出が長期化し、リソースの非効率な使用につながる可能性があります。
集中型パッチコンプライアンスレポートは、すべてのアカウントとリージョンのデータを単一の場所に統合し、セキュリティ体制の包括的なビューを提供することで、これらの課題に対処します。このアプローチは、コンプライアンスステータスの単一の信頼できる情報源、脆弱性のリアルタイム把握、環境全体にわたる一貫したメトリクス、簡素化された監査、トレンド分析機能、リソース効率の向上、および自動修復ワークフローの基盤など、多くのメリットをもたらします。
AWS Systems Manager は、パッチプロセスを自動化する Patch Manager、コンプライアンスデータを中央の S3 バケットに集約するリソースデータ同期、そしてデータを変換・クエリ・可視化する AWS Glue、Amazon Athena、Amazon QuickSight などの分析サービスを通じて、この一元化の基盤を提供します。このレシピで説明するソリューションは、これらのコンポーネントを活用して、AWS 組織全体にわたる包括的なレポートシステムを構築し、より効率的な運用と迅速な脆弱性修復を実現します。
リソースデータ同期は、JSON ファイルの形式でインベントリおよびパッチコンプライアンスのメタデータを提供します。Athena と QuickSight を使用する代替手段として、S3 バケットからデータを取得できる任意の BI またはアナリティクスツールを使用することができます。
目的
このレシピの目的は、集中型パッチコンプライアンスレポートに必要なリソースをプロビジョニングするために使用できる CloudFormation テンプレートのサンプルを提供することです。このレシピでは、パッチスキャンまたはインストール操作のデプロイについては説明しません。
マネージドノードのパッチ適用の準備方法の詳細については、AWS Systems Manager とタグ付けを使用したマネージドノードのパッチ適用を参照してください。
前提条件
デプロイを開始する前に、以下を確認してください。
- AWS Organizations のセットアップ: 管理アカウントとメンバーアカウントを持つ、適切に設定された AWS Organization。
- マネージドノードの設定: パッチ操作を実行してパッチコンプライアンスをレポートするには、Amazon Elastic Compute Cloud (EC2) インスタンス、AWS Internet of Things (IoT) Greengrass コアデバイス、オンプレミスサーバー、エッジデバイス、および VM が Systems Manager マネージドノードである必要があります。
- パッチ操作の実装: 少なくとも、パッチスキャン操作を設定して 1 回以上実行する必要があります。これを行わないと、レポートするコンプライアンスデータが存在しません。さまざまな種類のパッチ適用とその実装方法の詳細については、パッチ管理ベストプラクティスガイドおよびさまざまな種類のパッチ適用のセクションを参照してください。
- IAM アクセス許可: CloudFormation テンプレートをデプロイし、中央レポートアカウントとメンバーアカウントの両方で必要なリソースを作成するための適切なアクセス許可。
- Amazon QuickSight: QuickSight を使用してパッチコンプライアンス情報を可視化するには、QuickSight にサインアップする必要があります。
- Amazon QuickSight の S3 へのアクセス許可: フェーズ 1: 中央アカウントのセットアップで作成された S3 バケットへのアクセス許可が QuickSight に付与されていることを確認する必要があります。詳細については、QuickSight 用 CloudFormation テンプレートをデプロイする前に完了すべき前提条件を参照してください。
考慮事項
リソースデータ同期
現在、AWS CloudFormation の AWS::SSM::ResourceDataSync リソースは、S3Destination プロパティ内の DestinationDataSharing プロパティをサポートしていません。このプロパティは、簡略化された S3 バケットポリシーをサポートするインベントリリソースデータ同期を作成するために必要です。
このため、このレシピでは 組織リソースデータ同期のサンプル CloudFormation テンプレート セクションのカスタム CloudFormation リソースを使用して、Lambda 関数でリソースデータ同期を作成します。
リソースデータ同期を作成するためのカスタムリソース使用の代替手段:
- CloudFormation でサポートされている標準のリソースデータ同期を使用します。
- これを実現するには、AWS アカウント ID に基づいてアクセス許可を付与するバケットポリシーを作成して使用する必要があります。詳細とS3 バケットポリシーの例については、始める前にを参照してください。
- Athena を使用した集中レポートのサンプル CloudFormation テンプレートの S3 バケットポリシーを更新して、AWS アカウント ID を列挙した新しいポリシーを使用します。
- CloudFormation StackSets を使用して
AWS::SSM::ResourceDataSyncリソースをデプロイします。CloudFormation リソーススニペットの例については、SyncToDestination リソースデータ同期の作成を参照してください。
- AWS CLI やその他の SDK を使用したスクリプトなど、別の方法を使用して組織リソースデータ同期を作成します。
コストに関する考慮事項
集中型パッチコンプライアンスレポートの実装には、複数の AWS サービスが関与し、それぞれにコストが発生します。
- Amazon S3 の料金:
- インベントリおよびパッチコンプライアンスデータの標準ストレージコスト
- 複数のアカウントおよびリージョンからデータを同期するためのデータ転送コスト
- コストは管理対象ノード数とスキャン頻度に比例して増加します
- AWS Glue の料金:
- クローラーのコスト
- デフォルト設定(毎日のクローラー実行)の場合
- Amazon Athena の料金:
- クエリのコスト
- コストはクエリの複雑さと頻度によって異なります
- パーティション分割とフィルタリングを使用することでコストを大幅に削減できます
- AWS Lambda の料金:
- カスタムリソース Lambda 関数の最小コスト
- ほとんどの実装では、無料利用枠でこの使用量をカバーできます
- Amazon QuickSight の料金(オプション):
- 作成者ライセンスおよびリーダーライセンス
アーキテクチャの概要
集中レポートアカウント
以下の図では、Central Reporting アカウントは、パッチおよびインベントリメタデータの保存、クエリ、または可視化専用の AWS Organization 内の AWS アカウントです。
AWS Organization 管理アカウントをセントラルレポートアカウントとして使用することは推奨されません。管理アカウントの AWS ベストプラクティスでは、管理アカウントとそのユーザーおよびロールは、そのアカウントのみが実行しなければならないタスクに使用することを推奨しています。すべての AWS リソースは組織内の他の AWS アカウントに保存し、管理アカウントには含めないようにしてください。
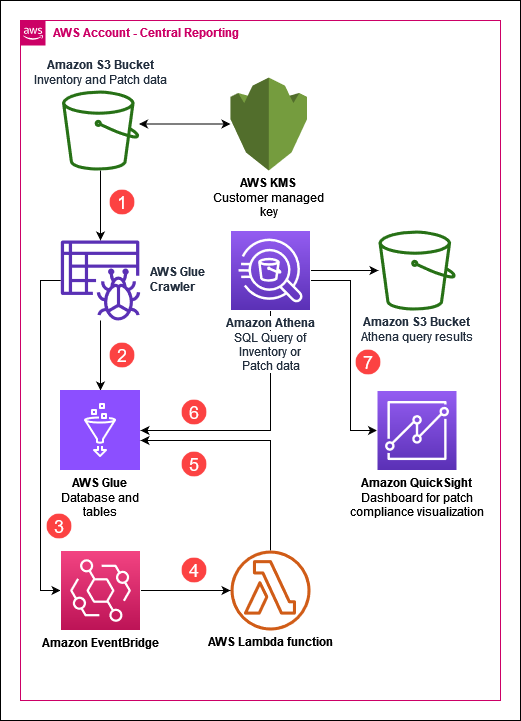
- Glue クローラーは 1 日 1 回実行され、リソースデータ同期が提供するメタデータをホストする S3 バケットをクロールします。
- Glue クローラーは、S3 バケット内のメタデータに基づいてデータベースとテーブルを更新します。
- Glue クローラーの実行が完了すると、EventBridge にイベントが送信されます。
- EventBridge ルールが Lambda 関数を呼び出します。
- Lambda 関数は、AWS:InstanceInformation テーブルの重複列を削除します。
備考
The
AWS:InstanceInformationという名前の列を含むテーブルresourcetype、これはパーティションキーでもあり、Athena クエリが失敗する原因となります。EventBridge ルールは Glue クローラーの実行によってトリガーされ、その後 Lambda 関数を呼び出してその列を削除します。 - Athena は、実行するクエリに基づいて Glue データベースとテーブルにクエリを実行します。
- (オプション)QuickSight ダッシュボードを作成して、パッチコンプライアンス情報を視覚化できます。注: QuickSight はサンプルの CloudFormation テンプレートには含まれていません。
マネージドノードを持つメンバーアカウント/リージョン
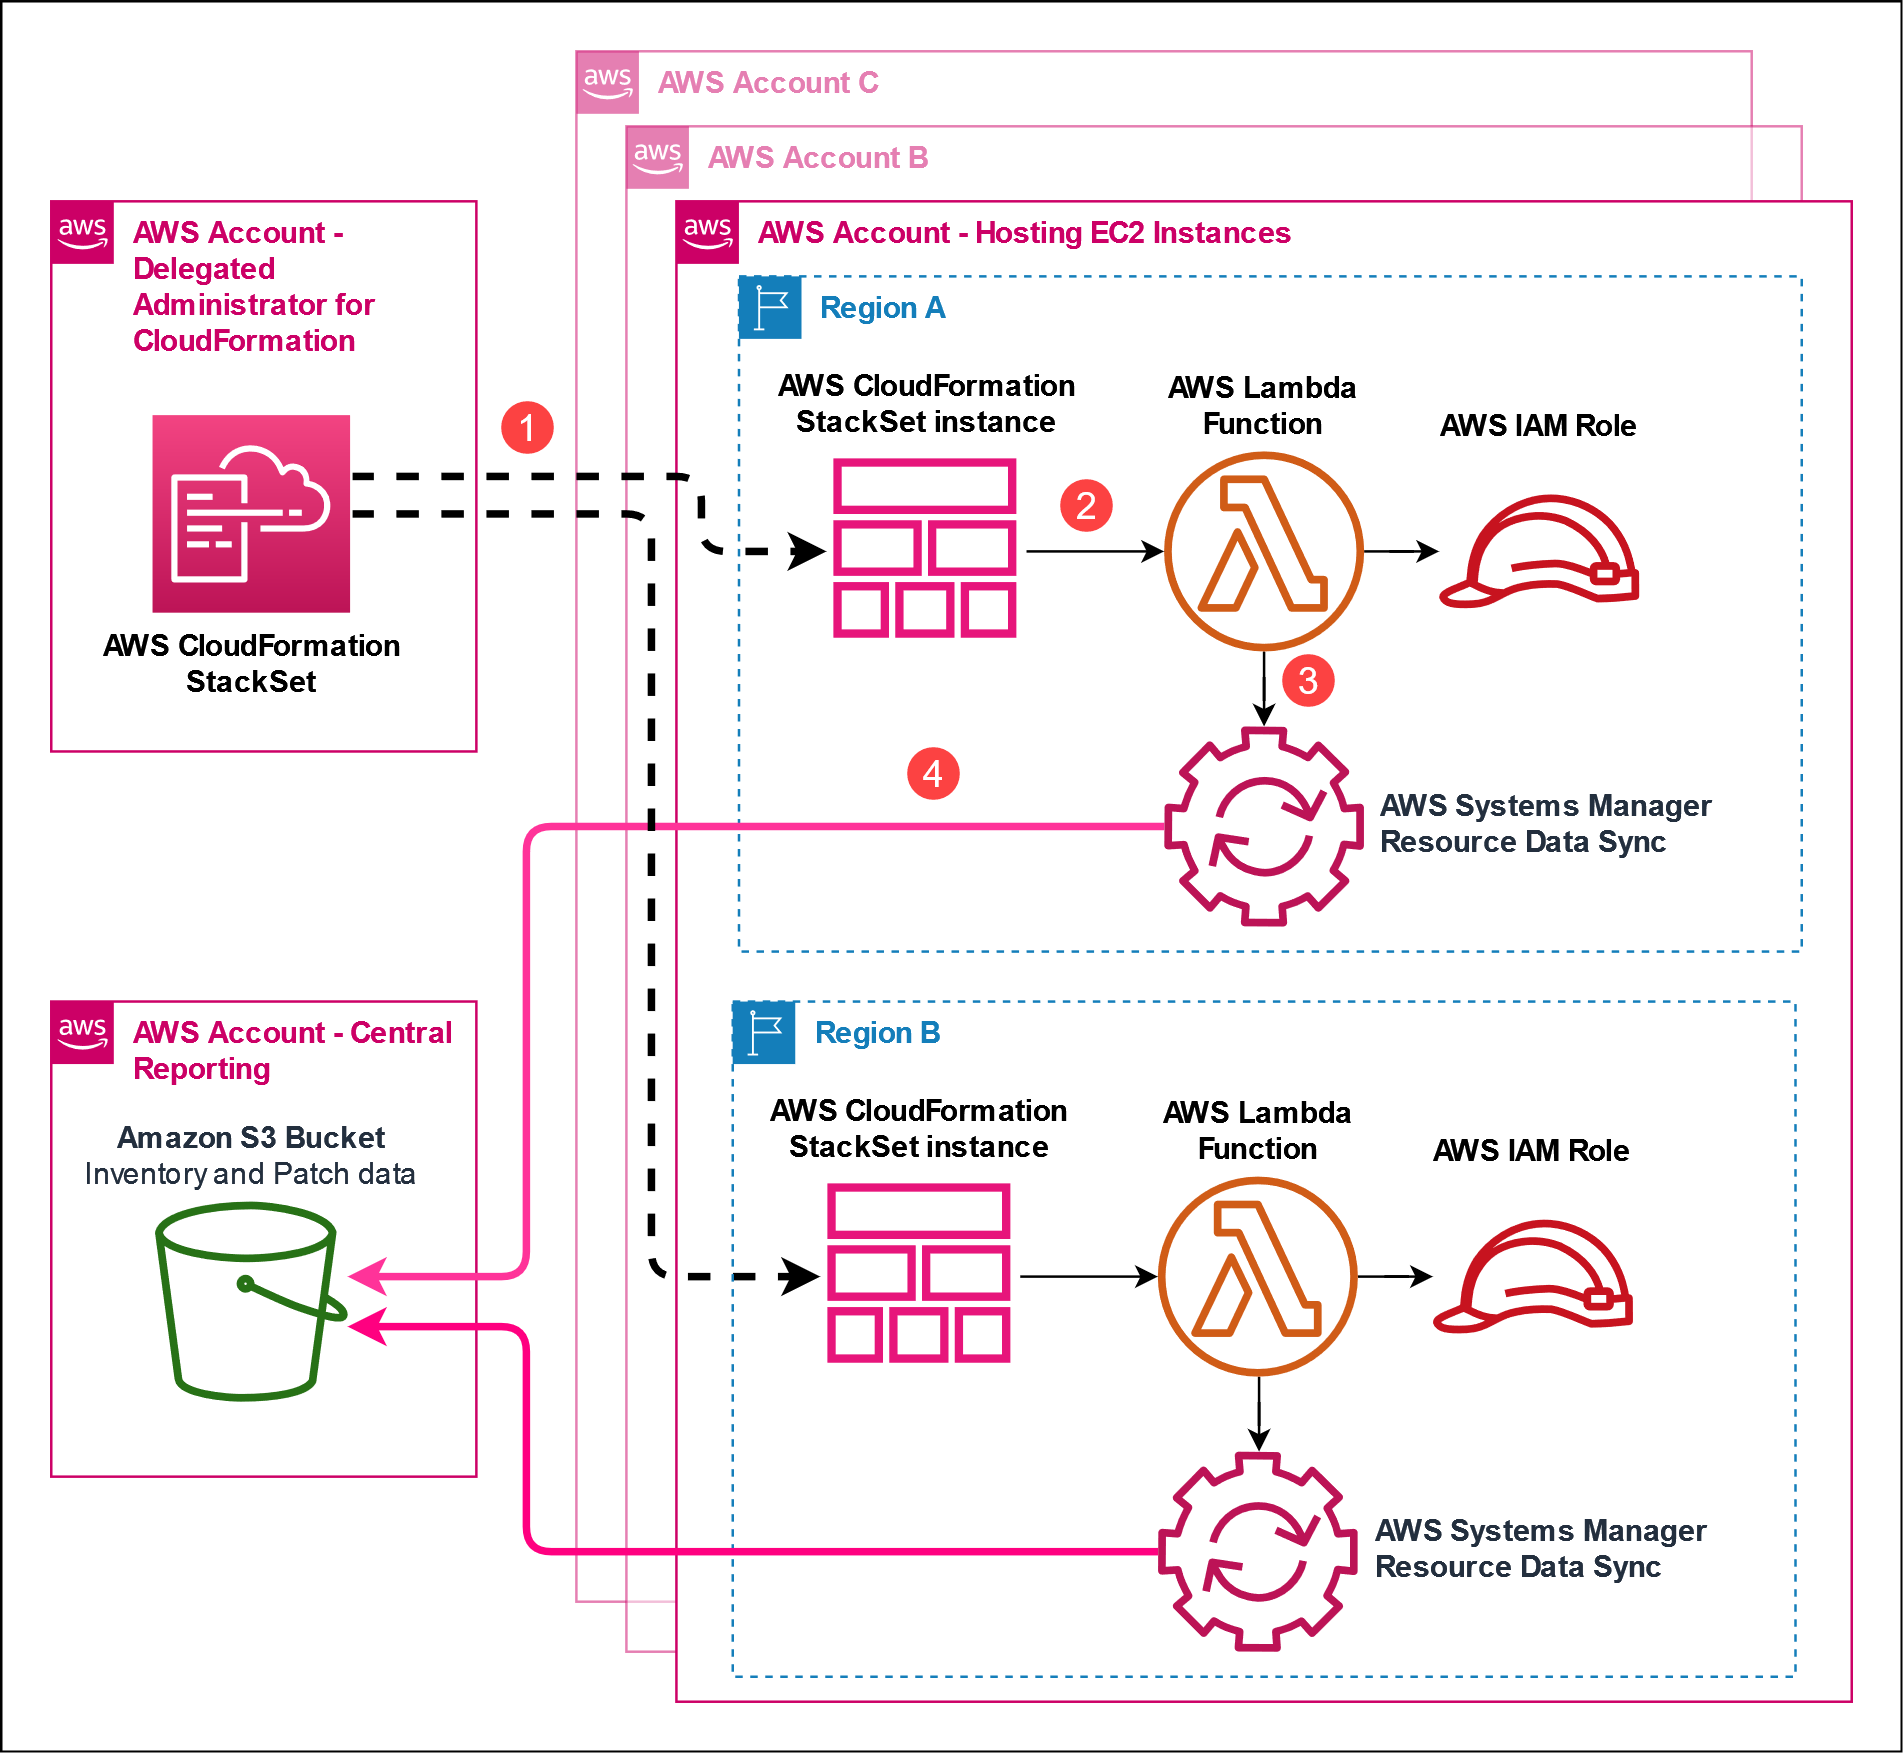
- 委任された管理者アカウントの CloudFormation StackSet は、必要なリソースを作成するために、ターゲットの AWS アカウント/リージョンにスタックインスタンスを作成します。
- スタックインスタンスは、IAM サービスロール、Lambda 関数、およびカスタム CloudFormation リソースを作成します。
- Lambda 関数は、AWS Organizations 用の Systems Manager リソースデータ同期を作成します。
- リソースデータ同期は、インベントリおよびパッチコンプライアンスメタデータを中央レポートアカウントで指定された S3 バケットに送信します。
プロセスタイムライン
次の図は、マネージドノードのパッチコンプライアンスをクエリするプロセスのタイムラインを示しています。
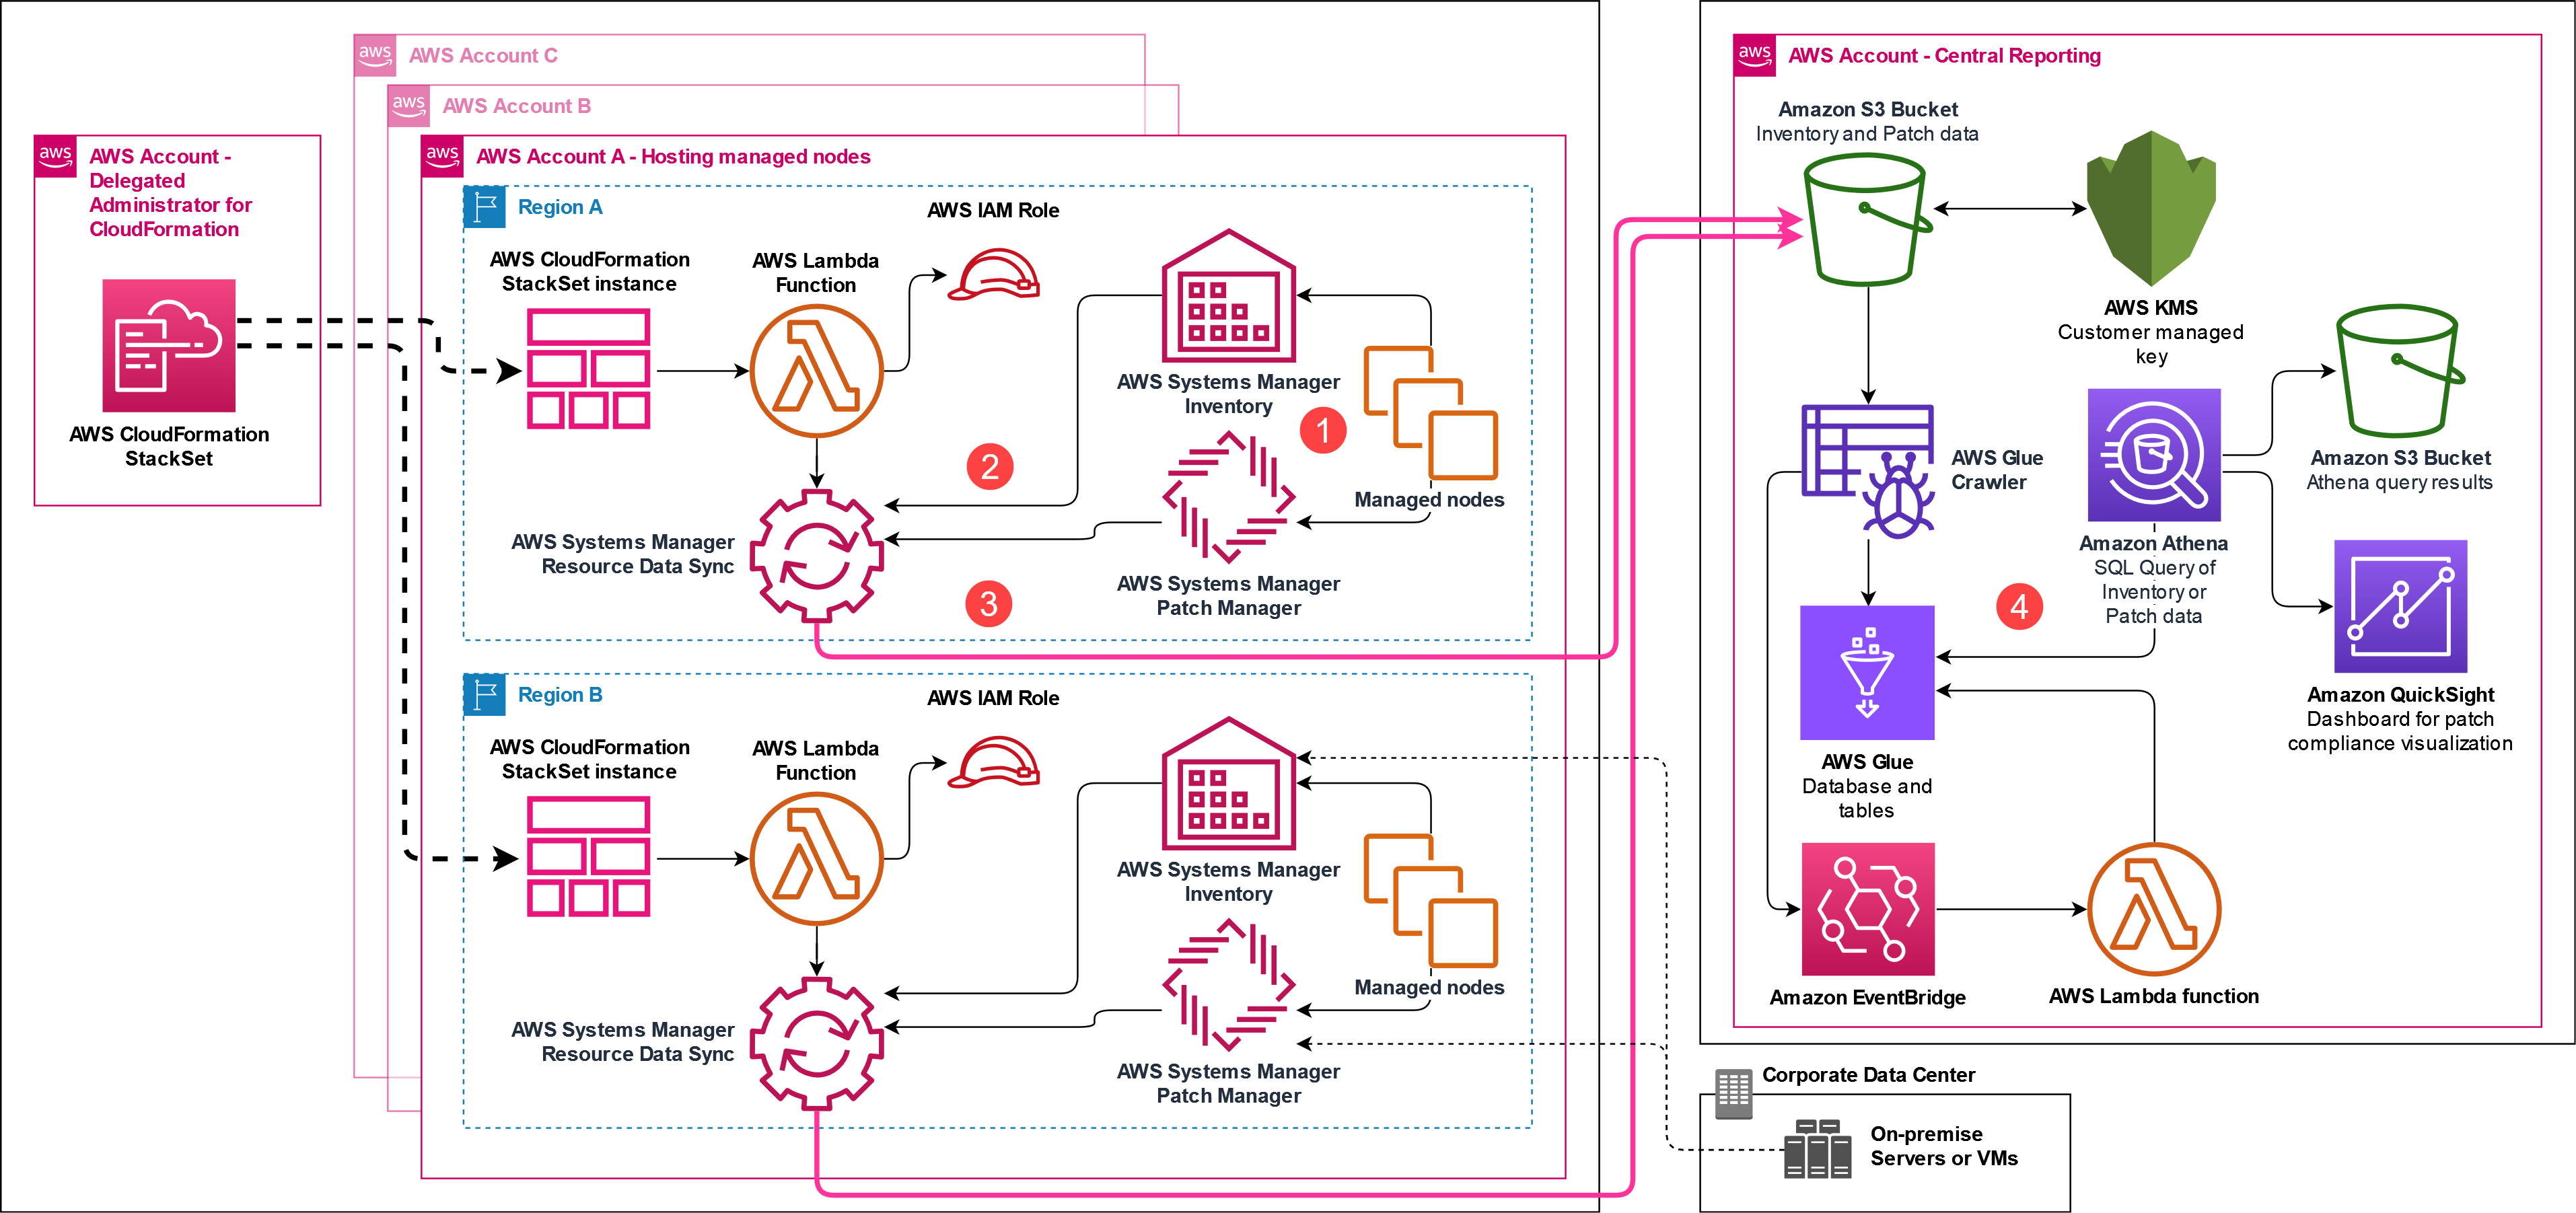
- パッチスキャン、インストール、またはインベントリメタデータ収集操作の後、マネージドノード上の SSM エージェントが Systems Manager にデータを報告します。
- パッチおよびインベントリメタデータの更新は、実行されたアクションに基づいてリソースデータ同期によって識別されます。
- リソースデータ同期は、中央レポートアカウントで指定された S3 バケットにメタデータを送信します。
- その後、操作の結果を Athena を使用してクエリできます。
上記の図に示されているように、パッチ適用またはインベントリメタデータ収集のためにハイブリッドマネージドノードを登録でき、データは EC2 インスタンスと同じ S3 バケットに流れ込みます。
デプロイ手順
デプロイチェックリスト
このレシピに含まれるデプロイ手順のチェックリストを以下に示します。
集中レポートアカウントのタスク
- Athena リソース用の CloudFormation スタックをデプロイする
- スタックの出力から S3 バケット名を記録する
- S3 バケットの QuickSight 権限を設定する
- QuickSight 可視化用の CloudFormation スタックをデプロイする
- QuickSight 分析へのアクセスを確認する
メンバーアカウントのタスク (StackSets 経由)
- 組織リソースデータ同期 CloudFormation StackSet をデプロイする
- メンバーアカウントにリソースデータ同期が作成されていることを確認する
フェーズ 1: 中央アカウントのセットアップ
Athena を使用した集中レポートのサンプル CloudFormation テンプレート
以下に、CloudFormation テンプレートによって作成されるリソースとその目的についての詳細を示します。
Athena を使用した集中レポートのサンプル CloudFormation テンプレート
| リソース名 | 目的 |
|---|---|
| KMS リソース | |
| ManagedInstanceDataEncryptionKey | リソースデータ同期 S3 バケット内のマネージドノードメタデータを暗号化するためのカスタマーマネージドキー (CMK)。 |
| ManagedInstanceDataEncryptionKeyAlias | CMK のエイリアス。 |
| S3 リソース | |
| AthenaQueryResultsBucket | Athena のクエリ結果を保存する S3 バケット。 |
| ResourceSyncBucket | リソースデータ同期によって提供されるマネージドノードメタデータを保存するために使用される S3 バケット。 |
| ResourceSyncBucketPolicy | リソースデータ同期 S3 バケットの S3 バケットポリシー。 |
| Glue リソース | |
| GlueDatabase | リソースデータ同期メタデータ用の Glue データベース。 |
| GlueCrawler | データベースとテーブルを作成する Glue クローラー。 |
| GlueCrawlerRole | Glue クローラーが使用する IAM ロール。 |
| DeleteGlueTableColumnFunctionRole | DeleteGlueTableColumnFunction Lambda 関数用の IAM ロール。 |
| DeleteGlueTableColumnFunction | 重複した resourcetype パーティションキーを削除する Lambda 関数。 |
| DeleteGlueTableColumnFunctionEventRule | DeleteGlueTableColumnFunction Lambda 関数を呼び出す Amazon EventBridge ルール。 |
| DeleteGlueTableColumnFunctionCloudWatchPermission | EventBridge に DeleteGlueTableColumnFunction Lambda 関数を呼び出すアクセス許可を付与します。 |
| Athena リソース | |
| AthenaWorkGroup | 名前付きクエリ用の Athena ワークグループ。 |
| AthenaQueryCompliantPatch | パッチ適用に準拠しているマネージドノードを一覧表示するクエリの例。 |
| AthenaQueryNonCompliantPatch | パッチ適用に非準拠のマネージドノードを一覧表示するクエリの例。 |
| AthenaQueryComplianceSummaryPatch | マネージドノードのパッチコンプライアンスサマリーを提供するクエリの例。 |
| AthenaQueryPatchSummary | マネージドノードのパッチサマリーを提供するクエリの例。 |
| AthenaQueryInstanceList | 終了していないマネージドノードのリストを返すクエリの例。 |
| AthenaQueryInstanceApplications | 終了していないマネージドノードとそれらにインストールされているアプリケーションのリストを返すクエリの例。 |
| AthenaQuerySSMAgent | マネージドノードにインストールされている SSM Agent のバージョンを一覧表示するクエリの例。 |
| S3 クリーンアップリソース | |
| S3CleanupLambdaExecutionRole | S3 バケットをクリーンアップする IAM ロール |
| S3BucketCleanup | S3 バケットをクリーンアップする Lambda 関数 |
| S3Cleanup | S3 バケットをクリーンアップするカスタムリソース |
中央レポートアカウントに Athena 用の CloudFormation スタックをデプロイする
- Athena を使用した中央レポート作成用のサンプル CloudFormation テンプレートをローカルマシンにダウンロードします。
- 中央レポートアカウントとリージョンで、AWS CloudFormation コンソールに移動します。
- 左側のナビゲーションペインで、スタックを選択し、スタックの作成を選択します。
- ドロップダウンリストから、**新しいリソースを使用 (標準)**を選択します。
- スタックの作成ページで、テンプレートファイルのアップロードを選択し、ファイルの選択を選択して、
patch-reporting.yamlファイルを選択し、次へを選択します。 - スタックの詳細を指定ページで、次の手順を実行します。
- スタック名に、次のような説明的な名前を入力します。
patch-reporting. - Organization ID には、AWS Organization の AWS Organization ID を入力します。例えば、
o-abcde12345.
ヒントAWS Organization ID の取得方法の詳細については、管理アカウントから組織の詳細を表示するを参照してください。
- Enable Glue Crawler Schedule で、Glue クローラーのスケジュール実行を有効または無効にするかを選択します。
- Glue Crawler Schedule (cron) で、Glue クローラーの cron スケジュール式を入力します。
- Enable KMS permissions for QuickSight service role で、QuickSight IAM サービスロールの KMS 権限を有効または無効にするかを選択します。注意: KMS 権限を付与しない場合、QuickSight を使用してパッチコンプライアンスデータを視覚化できません。
- Next を選択します。
- スタック名に、次のような説明的な名前を入力します。
- Configure stack options ページで、必要なタグを追加し、I acknowledge that AWS CloudFormation might create IAM resources with custom names を選択してから、Next を選択します。
- Review and create ページで、すべての情報を確認してから Submit を選択してスタックを作成します。
ページを更新すると、スタックのステータスが次のようになります。 CREATE_IN_PROGRESSステータスが次に変わったとき CREATE_COMPLETE、QuickSight のビジュアライゼーションをデプロイできます。
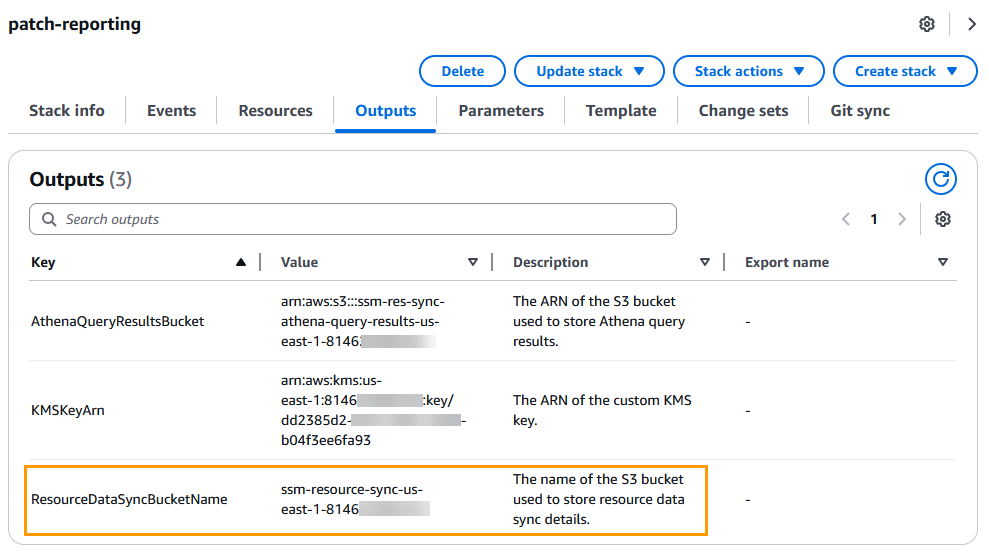
CloudFormation スタックの Outputs タブで確認できる AthenaQueryResultsBucket と ResourceDataSyncBucketName の Amazon S3 バケット名をメモしておいてください。次のセクションで QuickSight をデプロイする際に、これら 2 つの値が必要になります。
Amazon QuickSight 可視化のサンプル CloudFormation テンプレート
以下に、CloudFormation テンプレートによって作成されるリソースとその目的についての詳細を示します。
Amazon QuickSight 可視化のサンプル CloudFormation テンプレート
| リソース名 | 目的 |
|---|---|
| SSMDataSyncSource | Athena ワークグループ patch-workgroup を指す QuickSight データソース。 |
| ApplicationDataSet | アプリケーションメタデータ用の QuickSight データセット |
| ComplianceItemDataSet | コンプライアンスアイテムメタデータ用の QuickSight データセット |
| ComplianceSummaryDataSet | コンプライアンスサマリーメタデータ用の QuickSight データセット |
| InstanceDetailedInformationDataSet | インスタンス詳細情報メタデータ用の QuickSight データセット |
| InstanceInformationDataSet | インスタンス情報メタデータ用の QuickSight データセット |
| TagDataSet | タグメタデータ用の QuickSight データセット |
| JoinedDataSet | aws_instanceinformation、aws_compliancesummary、aws_tag を結合する QuickSight データセット |
| ManagedNodeAnalysis | QuickSight 分析ダッシュボード |
サンプル CloudFormation テンプレートは、 DIRECT_QUERY データソースのほぼリアルタイムのクエリを可能にするメソッドです。代替手段として、SPICE を使用して QuickSight にデータをキャッシュする方法があります。SPICE を使用する場合、サンプルテンプレートには 551〜647 行目にリフレッシュスケジュールの例も含まれています。使用するモードの詳細については、Amazon QuickSight SPICE とダイレクトクエリモードのベストプラクティスを参照してください。
QuickSight の CloudFormation テンプレートをデプロイする前に完了すべき前提条件
QuickSight がパッチコンプライアンスおよびインベントリメタデータにアクセスできるようにするには、中央レポートアカウントで Athena 用の CloudFormation スタックをデプロイするで作成された S3 バケットへのアクセスを QuickSight に付与する必要があります。 ssm-res-sync-athena-query-results-us-east-1-$AccountId および ssm-resource-sync-us-east-1-$AccountId.
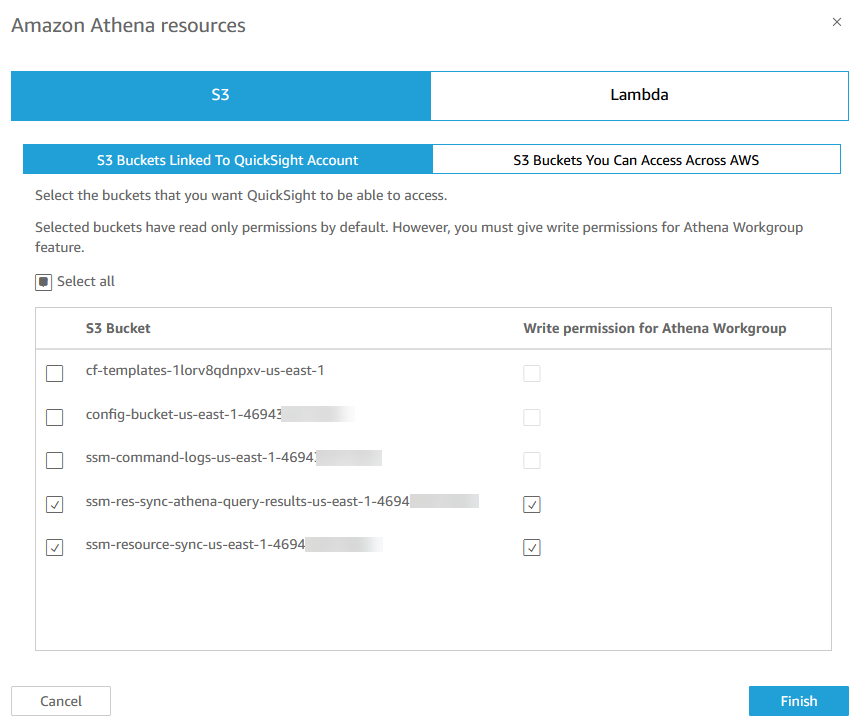
アクセスを許可する方法の詳細については、Amazon S3 に接続できないを参照してください。
中央レポートアカウントに QuickSight 用の CloudFormation スタックをデプロイする
- Amazon QuickSight 可視化用のサンプル CloudFormation テンプレートをローカルマシンにダウンロードします。
- 中央レポートアカウントとリージョンで、AWS CloudFormation コンソールに移動します。
- 左側のナビゲーションペインで、スタックを選択し、スタックの作成を選択します。
- ドロップダウンリストから、**新しいリソースを使用 (標準)**を選択します。
- スタックの作成ページで、テンプレートファイルのアップロードを選択し、ファイルの選択を選択して、
quicksight.yamlファイルを選択し、次へを選択します。 - スタックの詳細を指定ページで、次の手順を実行します。
- スタック名に、次のような説明的な名前を入力します。
quicksight - QuickSightUser には、QuickSight データソースおよび分析ダッシュボードへのアクセス許可を付与する QuickSight ユーザーの名前を入力します。
- Workgroup には、デフォルト値のままにします。
patch-workgroup. - 次へ を選択します。
- スタック名に、次のような説明的な名前を入力します。
- スタックオプションの設定 ページで、必要なタグを追加し、次へ を選択します。
- 確認と作成 ページで、すべての情報を確認し、送信 を選択してスタックを作成します。
ページを更新すると、スタックのステータスが次のようになります。 CREATE_IN_PROGRESSステータスが次に変わったとき CREATE_COMPLETE、メンバーアカウントおよびリージョンにリソースデータ同期をデプロイします。
フェーズ 2: メンバーアカウントの設定
組織リソースデータ同期のサンプル CloudFormation テンプレート
以下に、CloudFormation テンプレートによって作成されるリソースとその目的についての詳細を示します。
組織リソースデータ同期のサンプル CloudFormation テンプレート
| リソース名 | 目的 |
|---|---|
| リソースデータ同期リソース | |
| ResourceDataSyncLambdaRole | 組織リソースデータ同期を作成する Lambda 用の IAM サービスロール |
| ResourceDataSyncLambdaFunction | 組織リソースデータ同期を作成する Lambda 関数 |
| ResourceDataSyncCustomResource | Lambda 関数を呼び出す CFN カスタムリソース |
CloudFormation StackSet をデプロイする
以下のウォークスルーでは、CloudFormation の委任管理者アカウントを使用して、AWS Organization と互換性のあるリソースデータ同期をデプロイするために、サービス管理権限を持つ StackSet をデプロイします。
- 組織リソースデータ同期用のサンプル CloudFormation テンプレートをローカルマシンにダウンロードします。
- CloudFormation の委任管理者アカウントで、AWS CloudFormation コンソールに移動します。
- 左側のナビゲーションペインで StackSets を選択し、Create StackSet を選択します。
- Choose a template ページで、以下の手順を実行します。
- Permission model については、デフォルトのオプション Service-managed permissions をそのまま選択した状態にします。
- Prerequisite - Prepare template については、デフォルトのオプション Template is ready をそのまま選択した状態にします。
- Specify template については、Upload a template file を選択し、Choose file を選択して、ファイルを選択します。
organization-resource-data-sync.yamlファイルを選択し、次へを選択します。
- StackSet の詳細を指定ページで、次の手順を実行します。
- StackSet 名に、わかりやすい名前を入力します(例:
org-resource-data-sync. - Name of the resource data sync S3 bucket に、前のセクションで作成した S3 バケットの名前を入力します。
ヒント中央レポートアカウントでは、プロビジョニングされた CloudFormation スタックの Outputs で S3 バケット名を確認できます。
- リソースデータ同期 S3 バケットのプレフィックスに、S3 バケットに使用するプレフィックスの名前(例:
ResourceDataSync)を入力します。 - リソースデータ同期 S3 バケットの AWS Region には、リソースデータ同期 S3 バケットのリージョンを入力します。
- リソースデータ同期の名前 には、リソースデータ同期の名前を入力します。
- 次へ を選択します。
- StackSet 名に、わかりやすい名前を入力します(例:
- StackSet オプションの設定 ページで、必要なタグを追加し、AWS CloudFormation が IAM リソースを作成する可能性があることを承認します を選択してから、次へ を選択します。
- デプロイオプションの設定 ページで、次の手順を実行します。
- デプロイターゲット で、組織全体または特定の組織単位 (OU) へのデプロイを選択します。
ヒント利用可能なすべてのインベントリおよびパッチメタデータをクエリ、レポート、および可視化のために単一の S3 バケットに集約するため、AWS Systems Manager によって管理されるノードが存在するすべてのアカウントおよびリージョンにリソースデータ同期をデプロイすることをお勧めします。
- リージョンの指定 で、リソースデータ同期をデプロイするリージョンを選択します。
- その他のオプションはすべてデフォルトのままにして、次へ を選択します。
- レビュー ページで、すべての情報を確認し、送信 を選択して StackSet を作成します。
ページが更新されると、StackSet が表示されるようになります。ステータスは次のように変わります。 SUCCEEDED 作成された後。
フェーズ 3: 検証とテスト
リソースデータ同期 S3 バケットのメタデータを確認する
中央レポートアカウントで、Amazon S3 コンソールに移動し、CloudFormation によって作成された S3 バケットを選択します。バケット名は以下のような形式になっています。 ssm-resource-sync-${region}-${account-id}. S3 バケットで、CloudFormation StackSet をデプロイしたときに指定したバケットプレフィックスを選択します。
バケット内には、リソースデータ同期によって自動的に同期されるさまざまなデータタイプを確認できます。以前に Inventory メタデータの収集を設定し、少なくとも 1 回のパッチスキャン操作を実行している場合は、追加のフォルダーが表示されます(例: AWS:Application, AWS:AWSComponent) は S3 バケット内にあります。各フォルダはInventory によって収集されたメタデータを表しています。
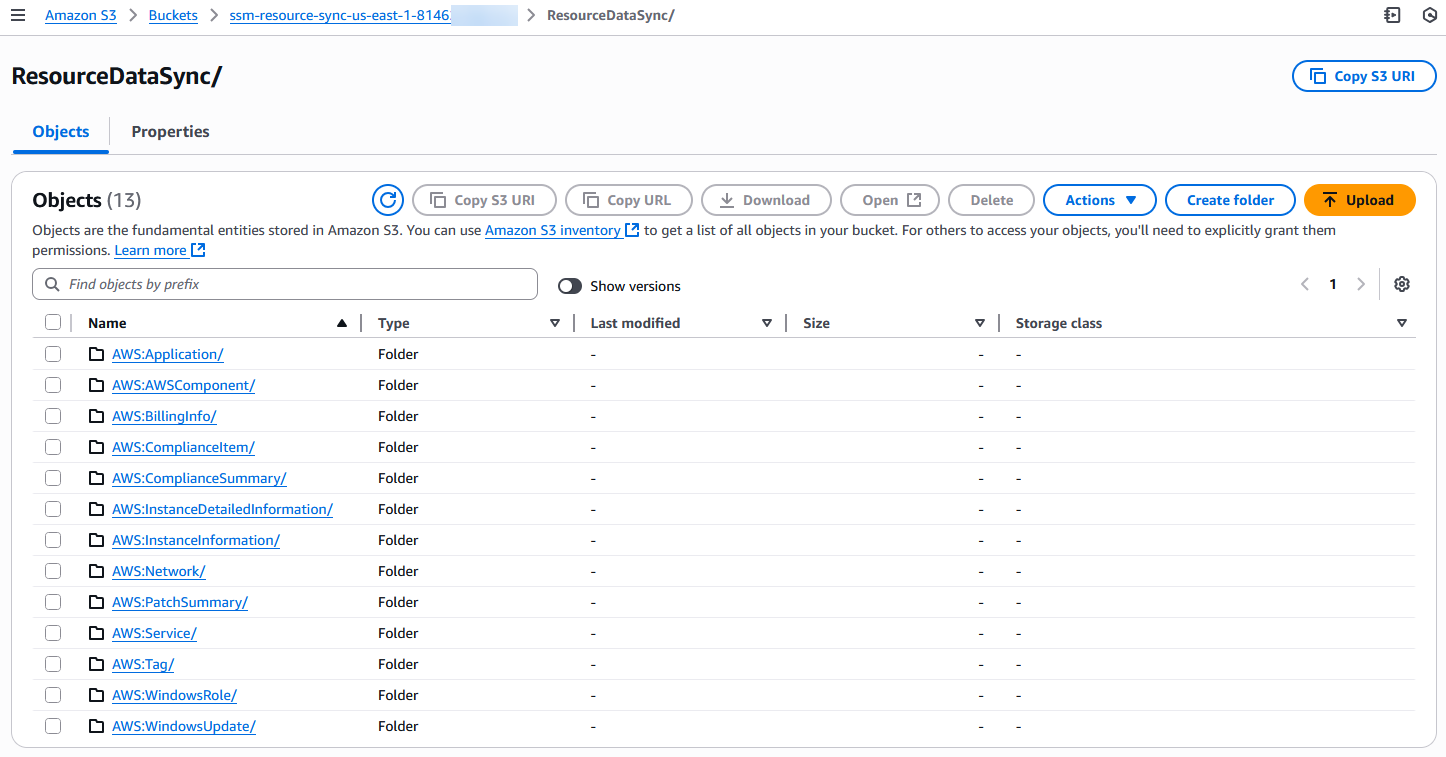
各データタイププレフィックス内には、この S3 バケットでリソースデータ同期を使用している各アカウントのプレフィックスが存在します。その後に、インベントリをレポートしている各リージョンのプレフィックス、そしてリソースタイプのプレフィックスが続きます。リソースタイプは通常、 ManagedInstanceInventoryそのプレフィックス内に、インベントリデータを報告する各インスタンスの JSON ファイルが存在します。
QuickSight 分析へのアクセスを確認する
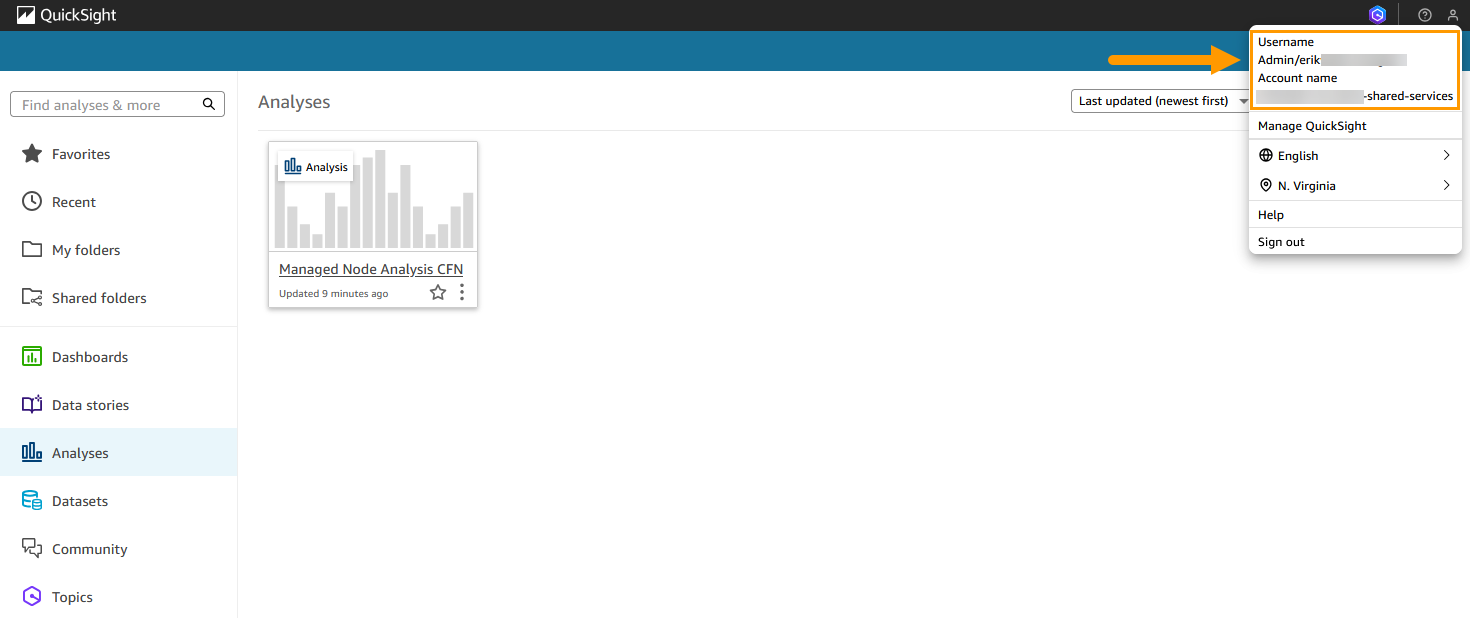
QuickSight コンソールに移動して、CloudFormation によって作成された QuickSight Analysis ダッシュボードへのアクセス権があることを確認します。
Managed Node Analysis CFN という名前の分析が表示されない場合は、CloudFormation パラメータで指定したのと同じユーザーとして QuickSight にログインしていることを確認してください。 QuickSightUserQuickSight にログインしているユーザーを確認するには、右上隅のプロフィールを選択してください。
パッチコンプライアンスのクエリ
Glue クローラーを確認する
リソースデータ同期によって Systems Manager のデータが S3 バケットに同期されたので、Glue クローラーを使用して JSON ファイルからテーブルを作成できます。Glue クローラーは毎日 00:00 UTC に実行されるように設定されています。Glue クローラーの実行を待つか、クローラーを手動で実行して Athena でクエリするテーブルを生成することができます。
- AWS Glue コンソールを開き、ナビゲーションペインで Data Catalog ヘッダーの下にある Crawlers を選択します。
- SSM-GlueCrawler を選択し、Run を選択します。
クローラーは停止するまで約 2〜4 分間実行されます。クローラーが準備完了状態に戻ったら、ナビゲーションペインで Tables を選択して、テーブルが結果のデータベースに追加されたことを確認します。
Athena を使用したクエリ
- KMS、S3、Glue、および Athena リソースをデプロイした中央レポート AWS アカウントにログインします。
- Amazon Athena コンソールを開き、ナビゲーションペインで Query editor を選択します。
- 右上隅の Workgroup で、patch-workgroup を選択します。
- Workgroup patch-workgroup settings で、Acknowledge を選択します。
- Saved queries タブを選択して、サンプルクエリを確認します。
- QueryNonCompliantPatch などの保存済みクエリを選択し、Run を選択します。
- 更新が不足しており、非準拠のマネージドノードに対してクエリ結果が返されることを確認します。
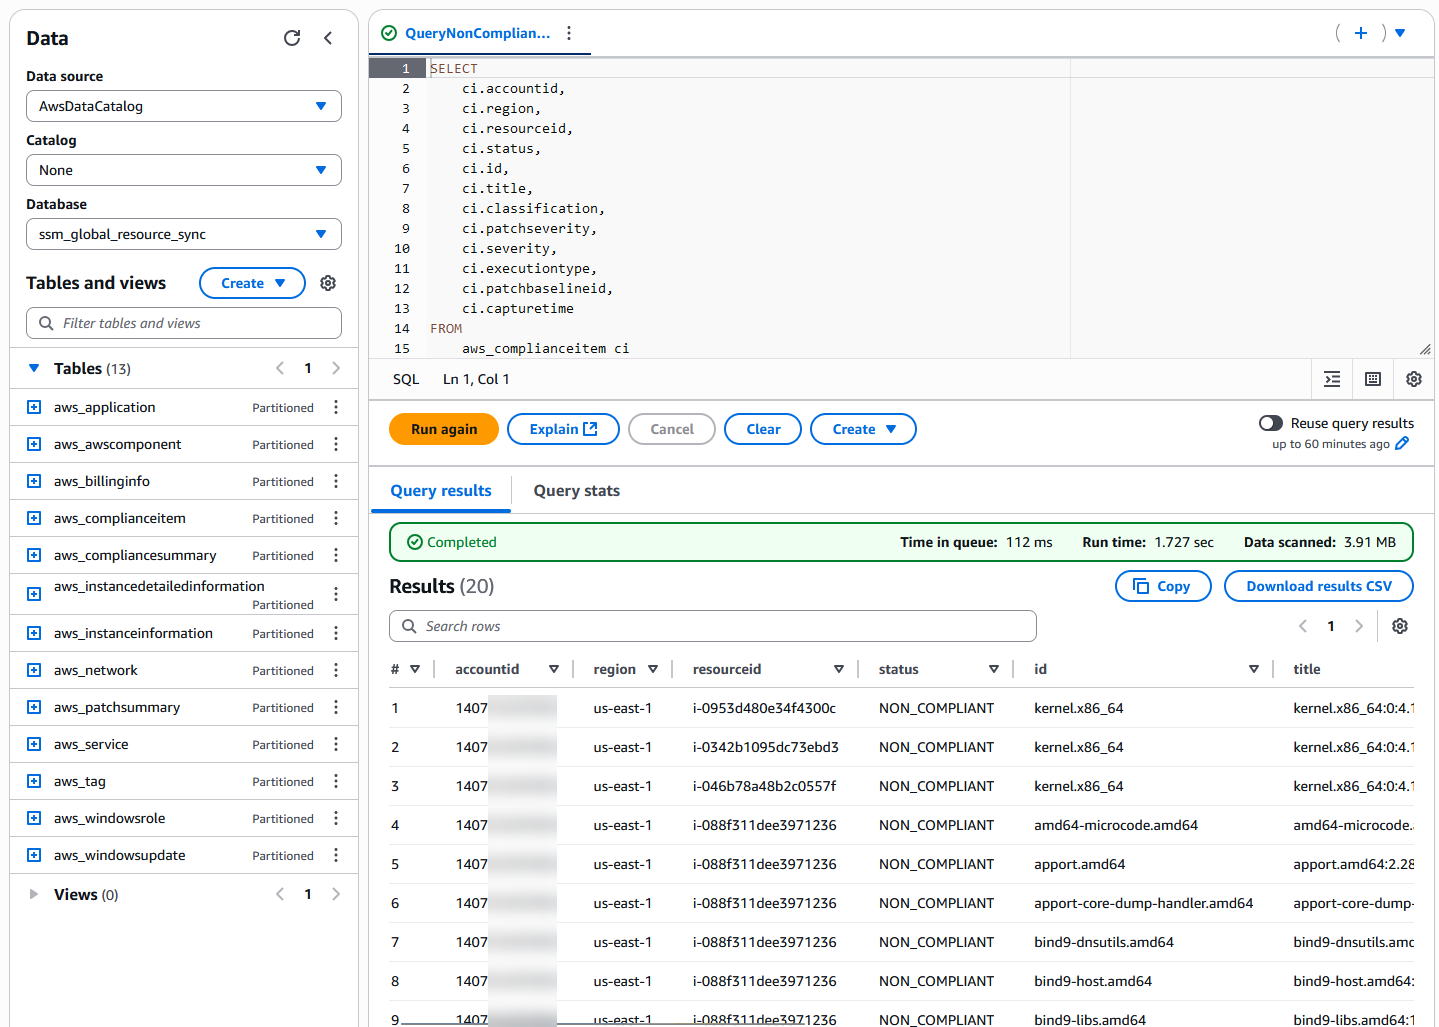
QuerySSMAgentVersion および QueryInstanceApplications という名前の保存済みクエリを使用するには、Systems Manager Inventory を有効にする必要があります。Systems Manager 統合コンソールへのオンボーディング時に、Systems Manager Inventory をすばやく有効にすることができます。
Athena のサンプルクエリの追加
非準拠のマネージドノードのグループ更新
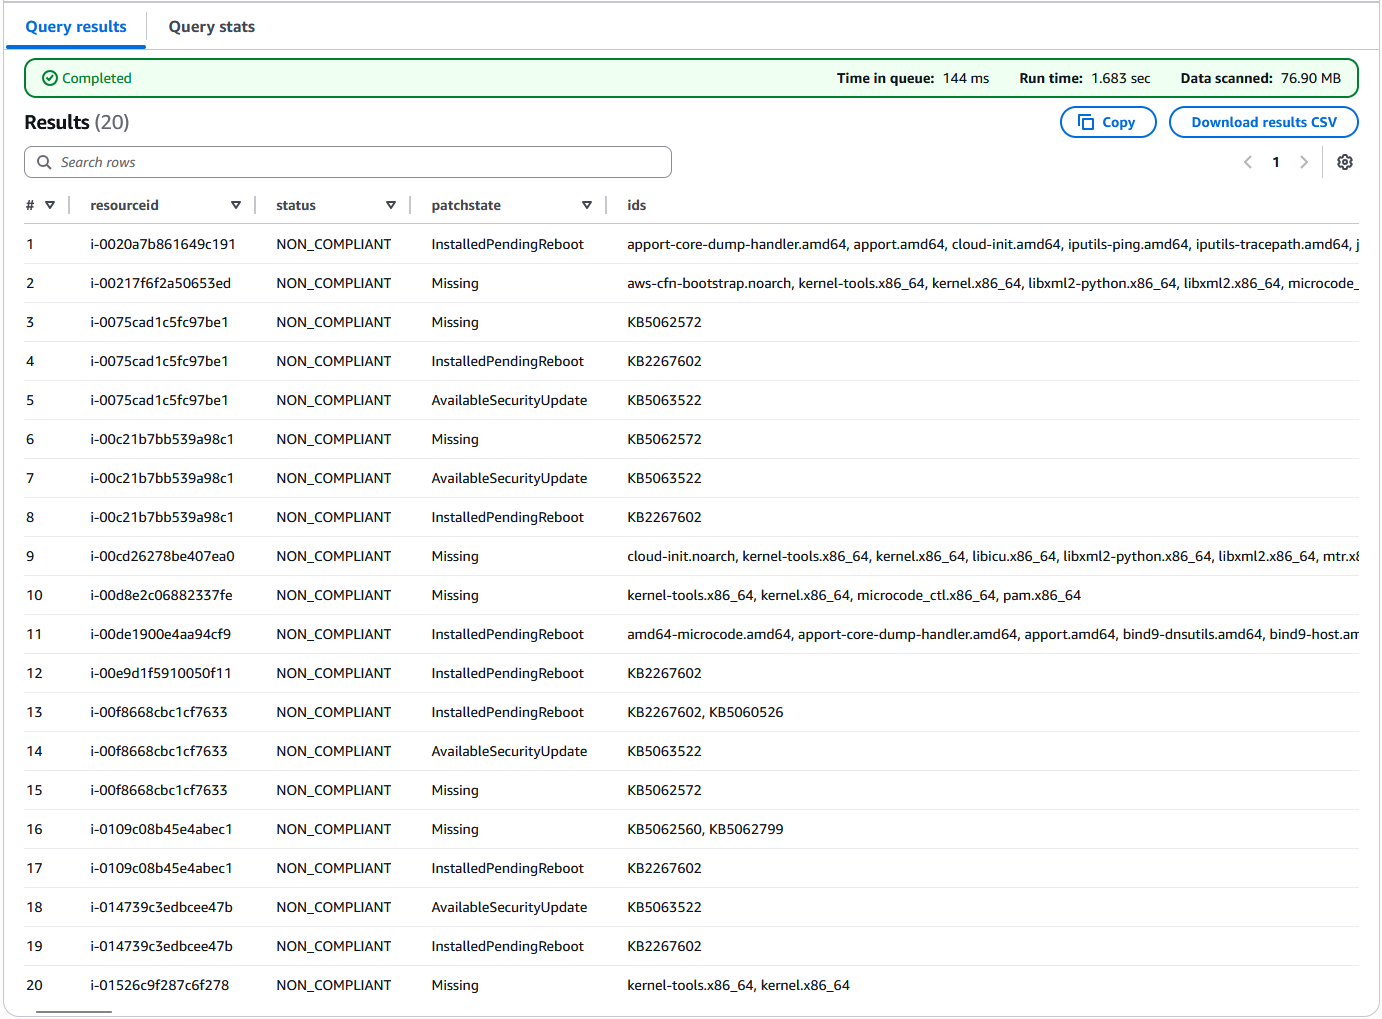
次の Athena クエリの例では、非準拠の更新をマネージドノード別にグループ化します。
- クエリ
- 結果
-- Query to aggregate non-compliant patch compliance items by resource (limited to 20 results)
SELECT
    ci.resourceid,
    ci.status,
    ci.patchstate,
    LISTAGG(DISTINCT ci.id, ', ') WITHIN GROUP (ORDER BY ci.id) AS ids
FROM
    aws_complianceitem ci
WHERE
    ci.compliancetype = 'Patch'
    AND ci.status = 'NON_COMPLIANT'
GROUP BY
    ci.resourceid,
    ci.status,
    ci.patchstate
ORDER BY
    ci.resourceid
LIMIT 20;
アクティブでないマネージドノードを除外する
リソースデータ同期は、インベントリとパッチコンプライアンスのメタデータを S3 バケットに送信します。管理対象の EC2 インスタンスが停止または終了されると、 AWS:InstanceInformation メタデータは新しい状態を反映するように更新されます。ハイブリッド管理ノードの場合、このステータスは SSM エージェントの接続状態に基づいて更新されます。これらの値は、 InstanceStatus 以下の値を持つことができるキー:
Active- SSM エージェント(EC2 またはハイブリッド管理ノード上)が正常に動作し、AWS Systems Manager と通信しています。Stopped- EC2 インスタンスがStopped状態。Terminated- EC2 インスタンスが終了(削除)されました。ConnectionLost- ハイブリッドマネージドノード上の SSM エージェントが AWS Systems Manager と通信できません。
リソースデータ同期は、指定された S3 バケットから JSON ファイルを削除しません。終了した EC2 インスタンスまたは登録解除されたハイブリッドマネージドノードのメタデータ JSON ファイルを自動的にクリーンアップするには、S3 ライフサイクルポリシーを使用してオブジェクトを自動的に削除できます。たとえば、60 日間更新されていない古いオブジェクトを期限切れにする S3 バケットポリシーを実装することができます。セクション「組織リソースデータ同期のサンプル CloudFormation テンプレート」のサンプル CloudFormation テンプレートには、コメントアウトされた LifecycleConfiguration 154 行目から始まります。
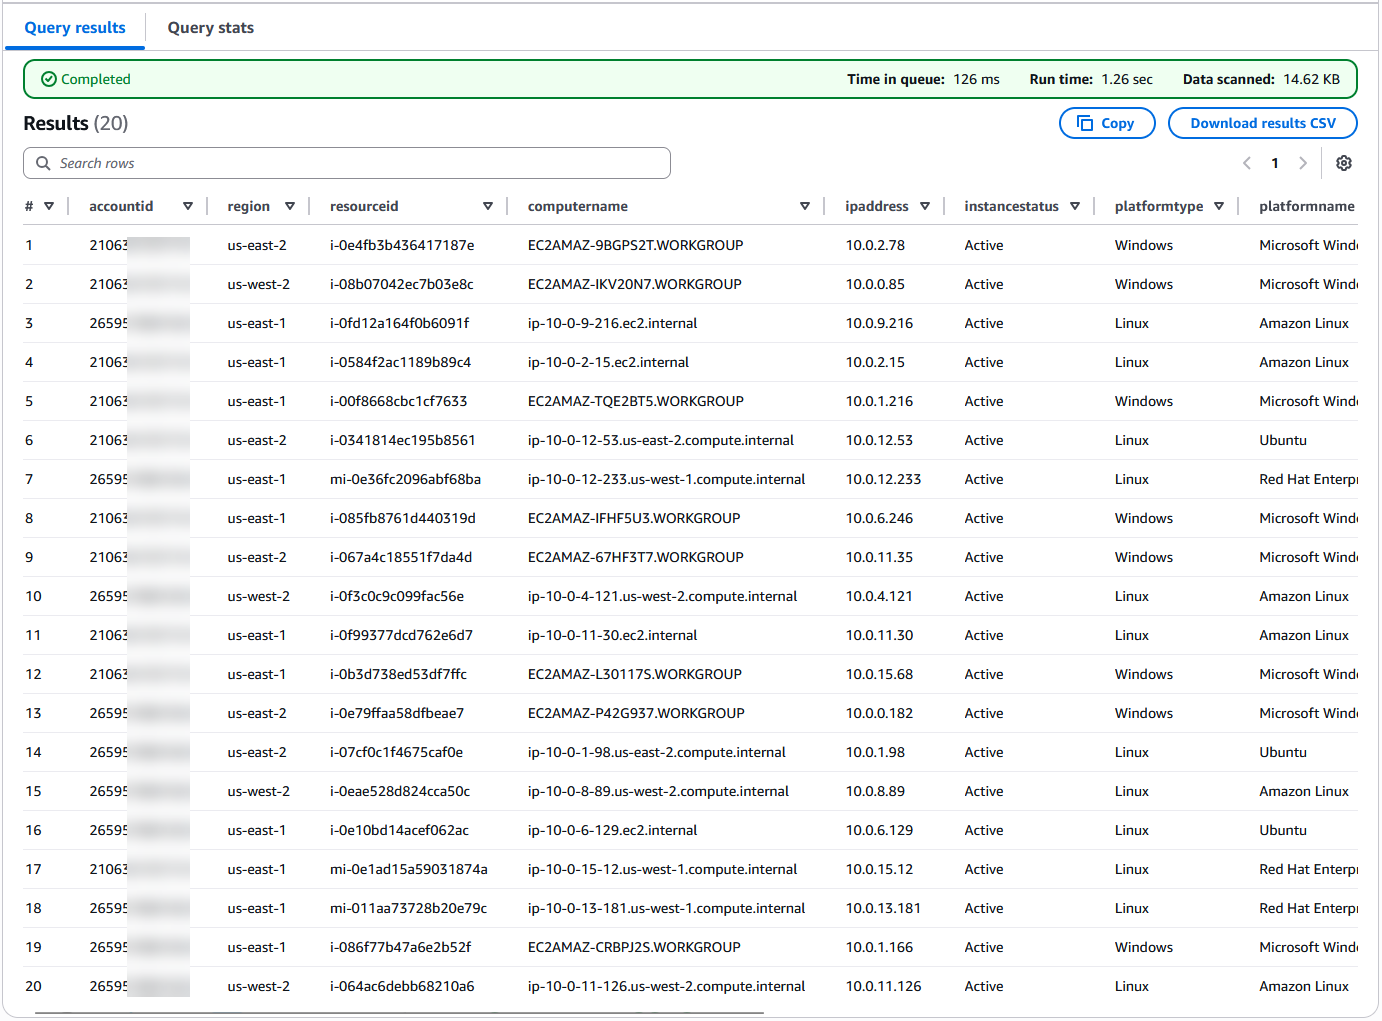
使用できます InstanceStatus Athena クエリで停止または終了したインスタンス、あるいは接続が切断された状態のハイブリッド管理ノードを除外するために使用します。たとえば、次のクエリは以下を返します。 AWS:InstanceInformation のメタデータのみ Active マネージドノード。
- クエリ
- 結果
-- Query to return only Active managed nodes
SELECT
    ii.accountid,
    ii.region,
    ii.resourceid,
    ii.computername,
    ii.ipaddress,
    ii.instancestatus,
    ii.platformtype,
    ii.platformname,
    ii.platformversion,
    ii.agenttype,
    ii.agentversion,
    ii.capturetime
FROM
    aws_instanceinformation ii
WHERE
    ii.instancestatus = 'Active'
LIMIT 20;
QuickSight を使用してパッチコンプライアンスを可視化する
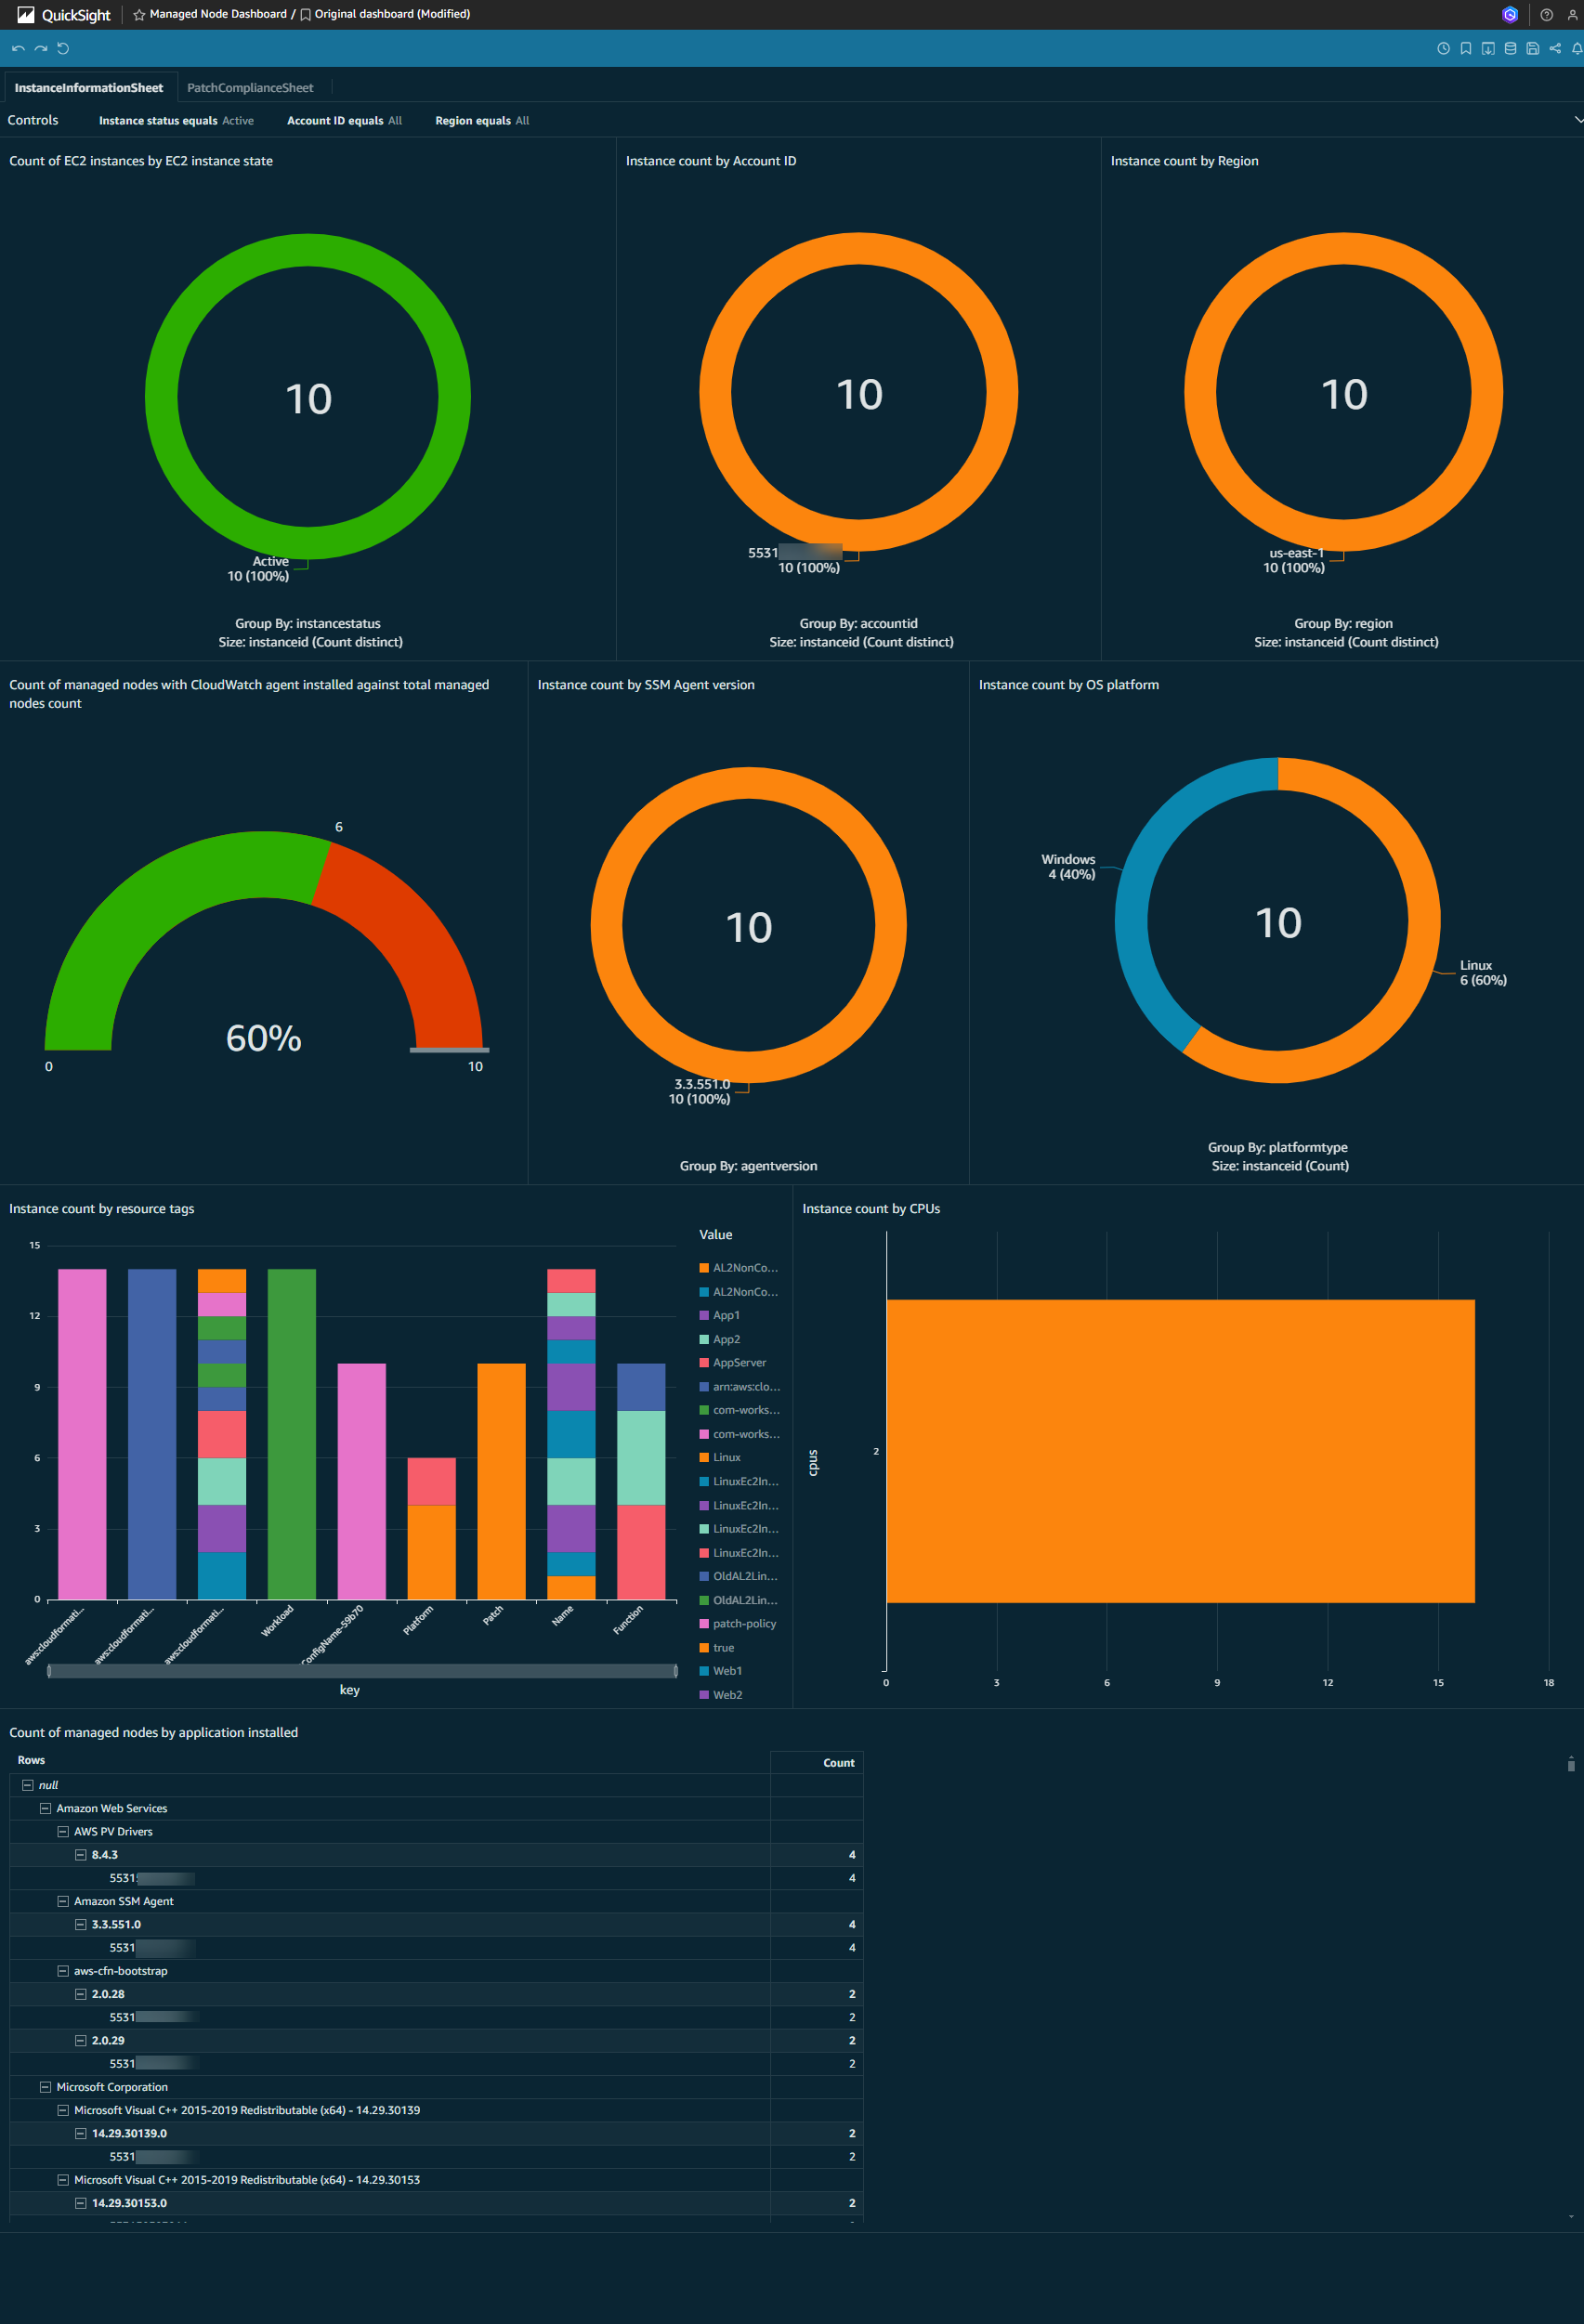
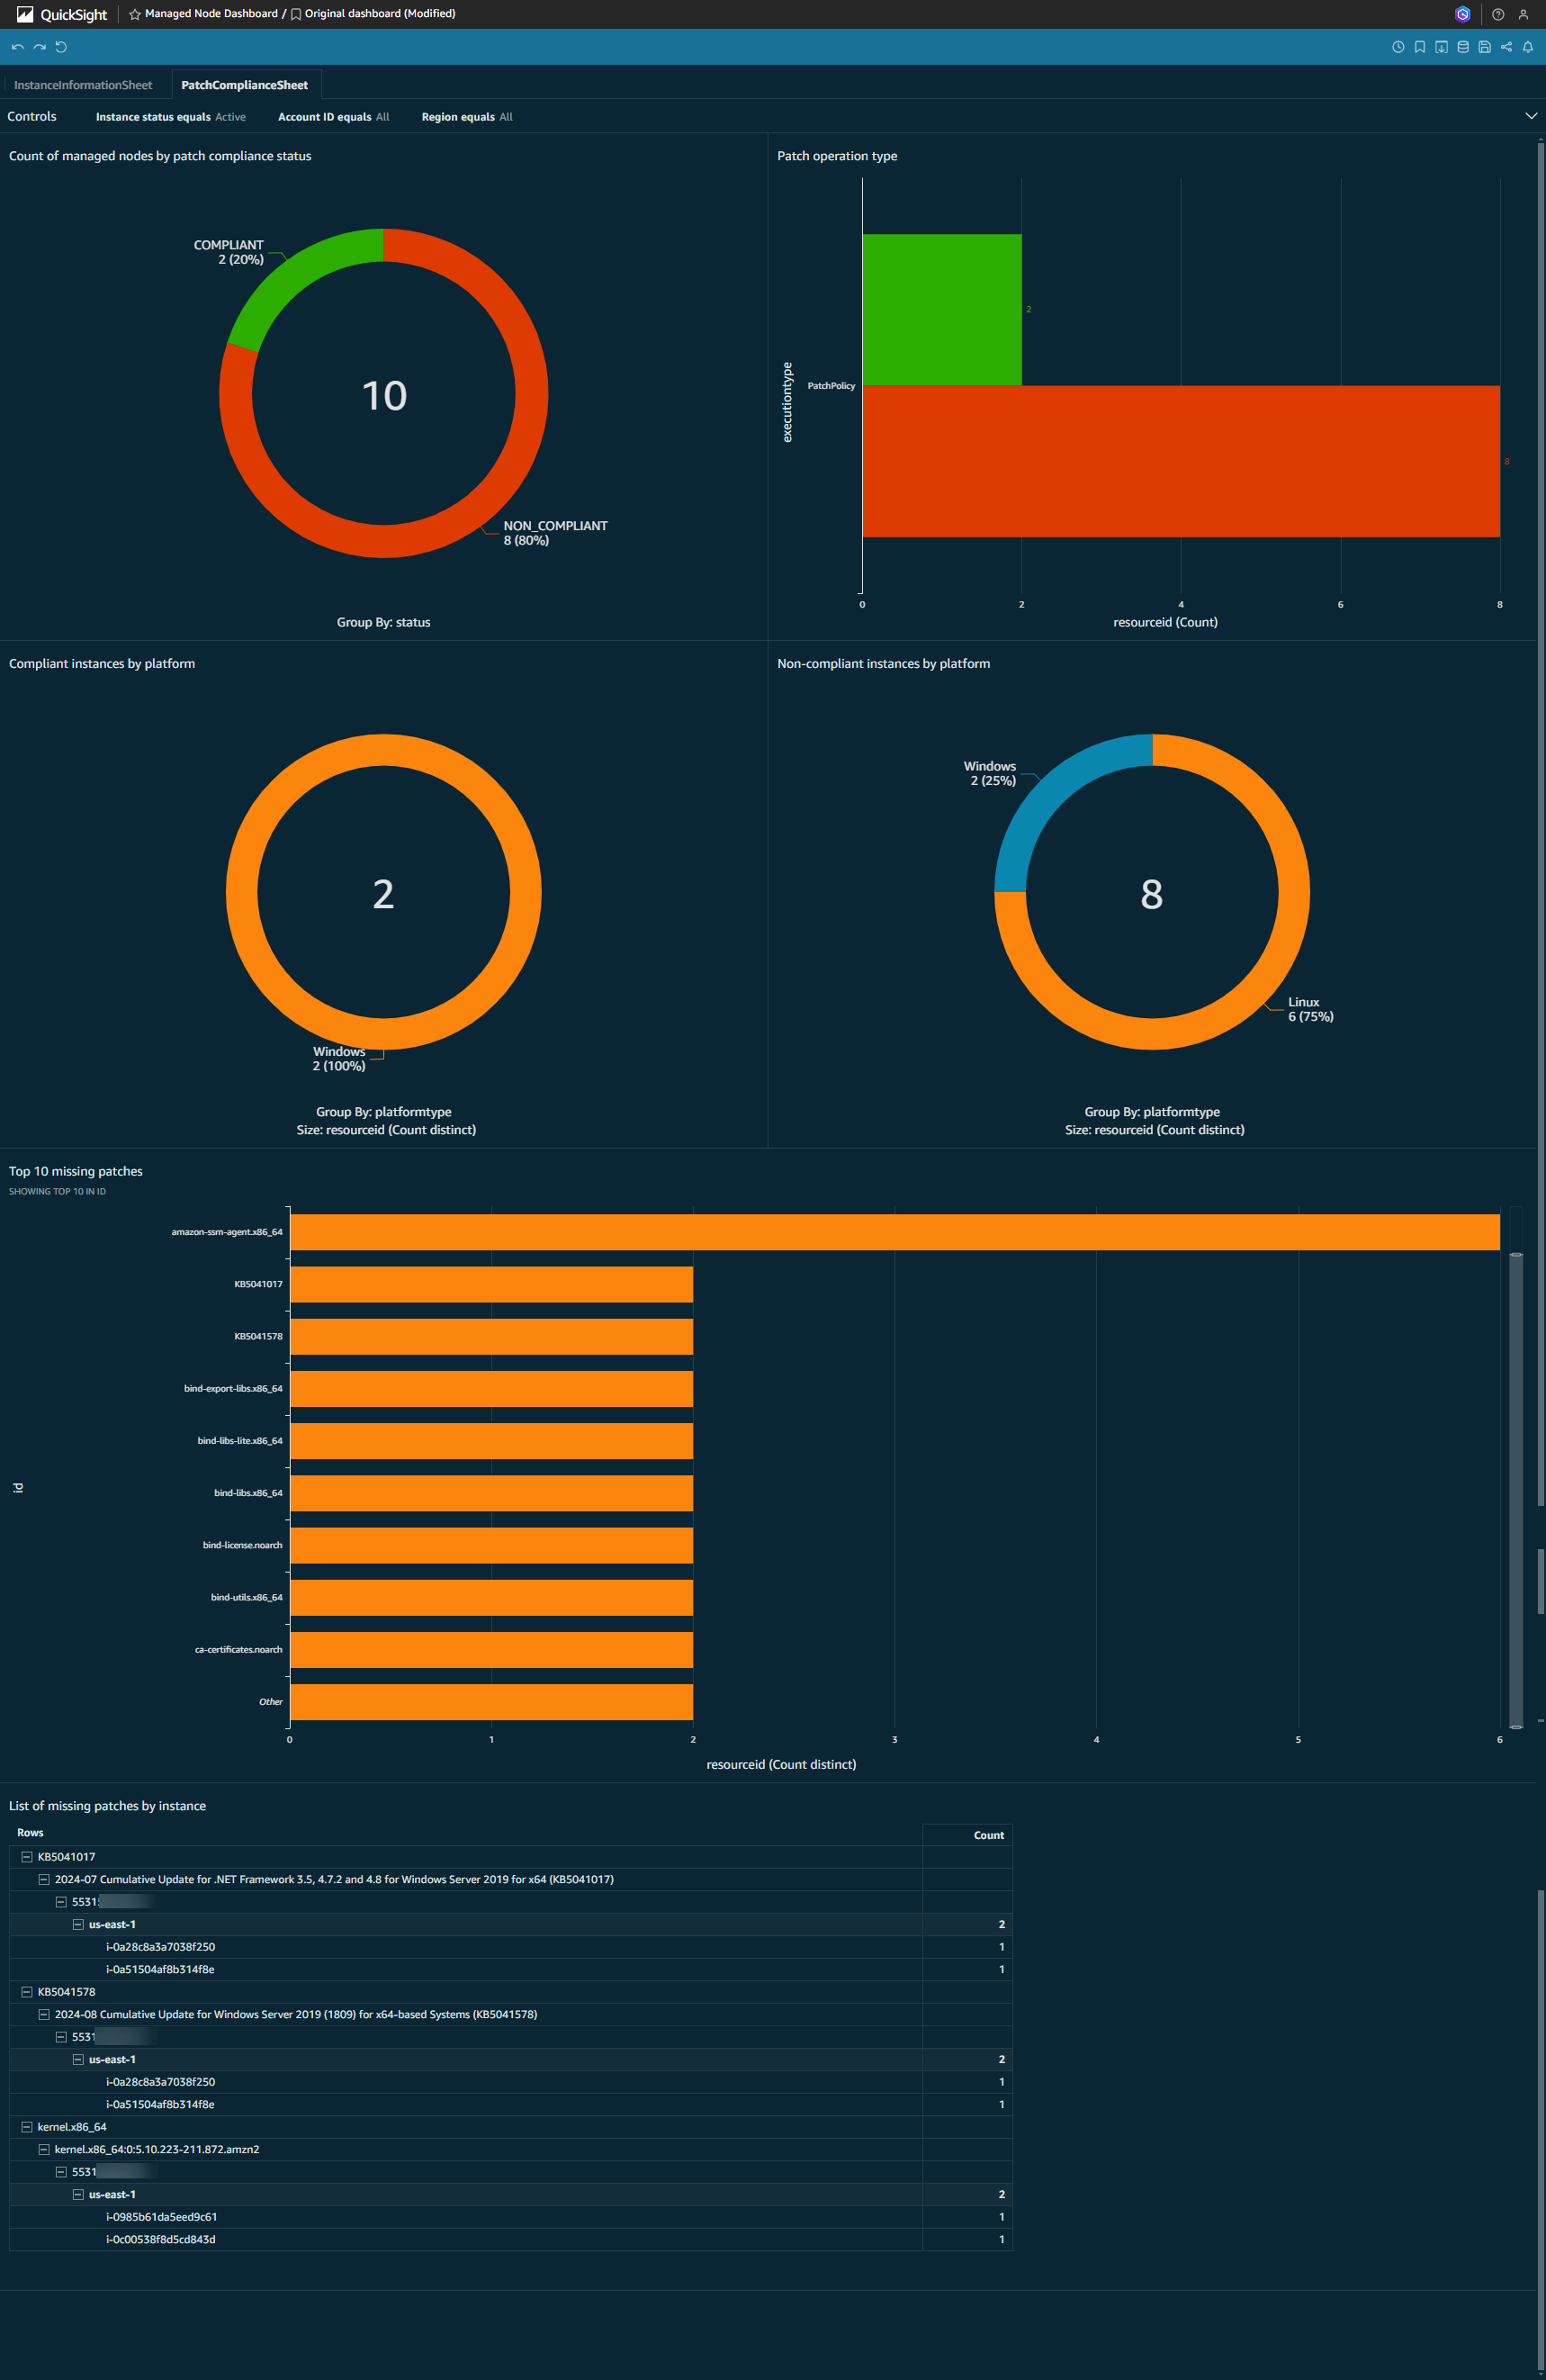
中央レポートアカウントに QuickSight 用の CloudFormation スタックをデプロイするでデプロイされた CloudFormation スタックにより、QuickSight データセットと空の分析ダッシュボードが作成され、パッチコンプライアンスとインベントリメタデータの可視化を開始できます。
QuickSight のビジュアルを作成するには、以下に示す 2 つのトピックの手順に従ってください。
- パート 1: マネージドノードのメタデータに基づいて QuickSight ビジュアルを作成する
- パート 2: パッチコンプライアンスに関する情報の AWS QuickSight ビジュアルを作成する
上記の 2 つのトピックに従うことで、次のような 2 つのシートを持つ QuickSight ダッシュボードを作成できます。
- インスタンス情報
- パッチコンプライアンス
デプロイされたリソースのクリーンアップ
このレシピのサンプル CloudFormation テンプレートは、セントラルレポートアカウントの CloudFormation スタックを削除する際に、S3 バケットの内容を削除します。
フェーズ 2: メンバーアカウントの設定で作成したサンプルリソースをクリーンアップするには、まずStackSet のスタックインスタンスを削除してから、StackSet を削除する必要があります。
フェーズ 1: 中央アカウントのセットアップで作成したサンプルリソースをクリーンアップするには、次の手順を実行します。
- スタック内のリソースを削除します。
quicksight、中央レポートアカウントに QuickSight 用の CloudFormation スタックをデプロイするセクションでデプロイされたものです。 - スタック内のリソースを削除します。
patch-reporting、中央レポートアカウントに Athena 用の CloudFormation スタックをデプロイするセクションでデプロイされます。
CloudFormation スタックの削除方法については、CloudFormation コンソールからスタックを削除するを参照してください。
次のステップ
以下に、パッチ操作とレポートメカニズムを改善するための参考として使用できる、関連する AWS ブログシリーズを紹介します。
- AWS Organization 内でメールと Slack 通知を使用して Systems Manager パッチレポートを自動化する
- このブログ記事では、パッチレポートの作成と配信を自動化し、パッチ適用操作の追跡プロセスを効率化する方法を説明します。AWS Lambda、Amazon EventBridge、AWS Step Functions、Amazon DynamoDB などの AWS サービスを活用することで、複数のアカウントから Systems Manager Patch Manager の実行詳細を統合し、包括的なレポートを生成して、メールと Slack 通知で配信できます。これにより、安全でコンプライアンスに準拠したインフラストラクチャを維持するために必要なインサイトをチームに提供できます。
- Amazon Bedrock の自動推奨機能で AWS Systems Manager パッチ適用のトラブルシューティングを簡単に
- この記事では、Amazon Bedrock が Systems Manager パッチ適用の失敗に対するトラブルシューティングプロセスをどのように簡素化できるかを説明します。Bedrock の自動分析および推奨機能を使用することで、パッチ適用の問題の根本原因を迅速に特定し、適切な解決策を実装できるため、貴重な時間と労力を節約できます。
- Amazon QuickSight を使用して AWS Systems Manager Patch Manager の情報を可視化する
- このブログ記事では、重要なパッチとインベントリ情報を可視化して MTTR を短縮するための Amazon QuickSight ダッシュボードの構築方法を説明します。また、フィルターを使用して特定の AWS アカウント、特定の AWS リージョン、Amazon Elastic Compute Cloud (Amazon EC2) 名を検索したり、インストール済み/未適用のパッケージを確認したりすることもできます。
- Amazon Inspector と AWS Systems Manager を使用して AWS での脆弱性管理と修復を自動化する – パート 1
- このシリーズのパート 1 では、複数の EC2 インスタンスに影響する特定の脆弱性に対する Inspector の検出結果を修復する方法を説明します。パート 2 では、リソースタグと Amazon Inspector の検出結果の重大度を使用して、EC2 インスタンスに対するすべての Amazon Inspector の検出結果を修復するために Systems Manager Automation ランブックを直接呼び出す方法を説明します。
技術用語集
| 用語 | 定義 |
|---|---|
| AWS Glue Crawler | データソースからメタデータを自動的に検出してカタログ化し、AWS Glue データカタログにテーブルを作成するサービス。 |
| AWS Organizations | 複数の AWS アカウントを単一の組織として一元的に管理・統制するためのサービス。 |
| Custom Resource | テンプレート内でカスタムのプロビジョニングロジックを記述できる CloudFormation のリソースタイプ。 |
| Delegated Administrator | AWS 組織を代理して特定の AWS サービスを管理するアクセス許可が付与された AWS アカウント。 |
| Managed Node | AWS Systems Manager による管理用に設定された任意のサーバー(EC2 インスタンス、またはオンプレミスや他のクラウド上の VM)。SSM Agent がインストールされ、適切に設定されている必要があります。 |
| Patch Baseline | マネージドノードにどのパッチをインストールすべきかを定義する一連のルール。重大度レベルごとの承認ルールを含みます。 |
| Patch Compliance | 必要なパッチに関するマネージドノードの状態。関連付けられたパッチベースラインに従って必要なすべてのパッチがインストールされている場合、ノードは準拠しています。 |
| Patch Group | マネージドノードを特定のパッチベースラインに関連付ける、タグベースのグループ化メカニズム。 |
| Resource Data Sync | マネージドノードからのインベントリデータを中央の S3 バケットに自動的に集約し、統合レポートを可能にする Systems Manager の機能。 |
| Service-Managed Permissions | AWS Organizations を使用して組織内のアカウントにスタックインスタンスをデプロイする StackSet のアクセス許可モデル。 |
| SSM Agent | マネージドノードにインストールされる AWS ソフトウェアで、Systems Manager がこれらのリソースを更新、管理、設定できるようにします。 |
| StackSet | 単一の操作で複数のアカウントとリージョンにまたがってスタックを作成、更新、削除できる CloudFormation の機能。 |