EKS 集群级 GPU 成本归因
本文介绍了在 Amazon EKS 上进行 GPU 切片成本分配的端到端概念验证 (PoC)。
问题描述
当多个租户共享 GPU 容量(例如 MIG 切片)时,您需要回答:
- 谁请求了多少 GPU 份额(按 pod / namespace / 业务单元)?
- 谁实际使用了 GPU(使用了多少)?
- 给定一个"公开"价格(如 每 GPU 小时 $12),我们如何计算:
- 分配成本(基于请求份额)
- 有效成本(基于观测到的利用率)
- 浪费(分配减去有效)
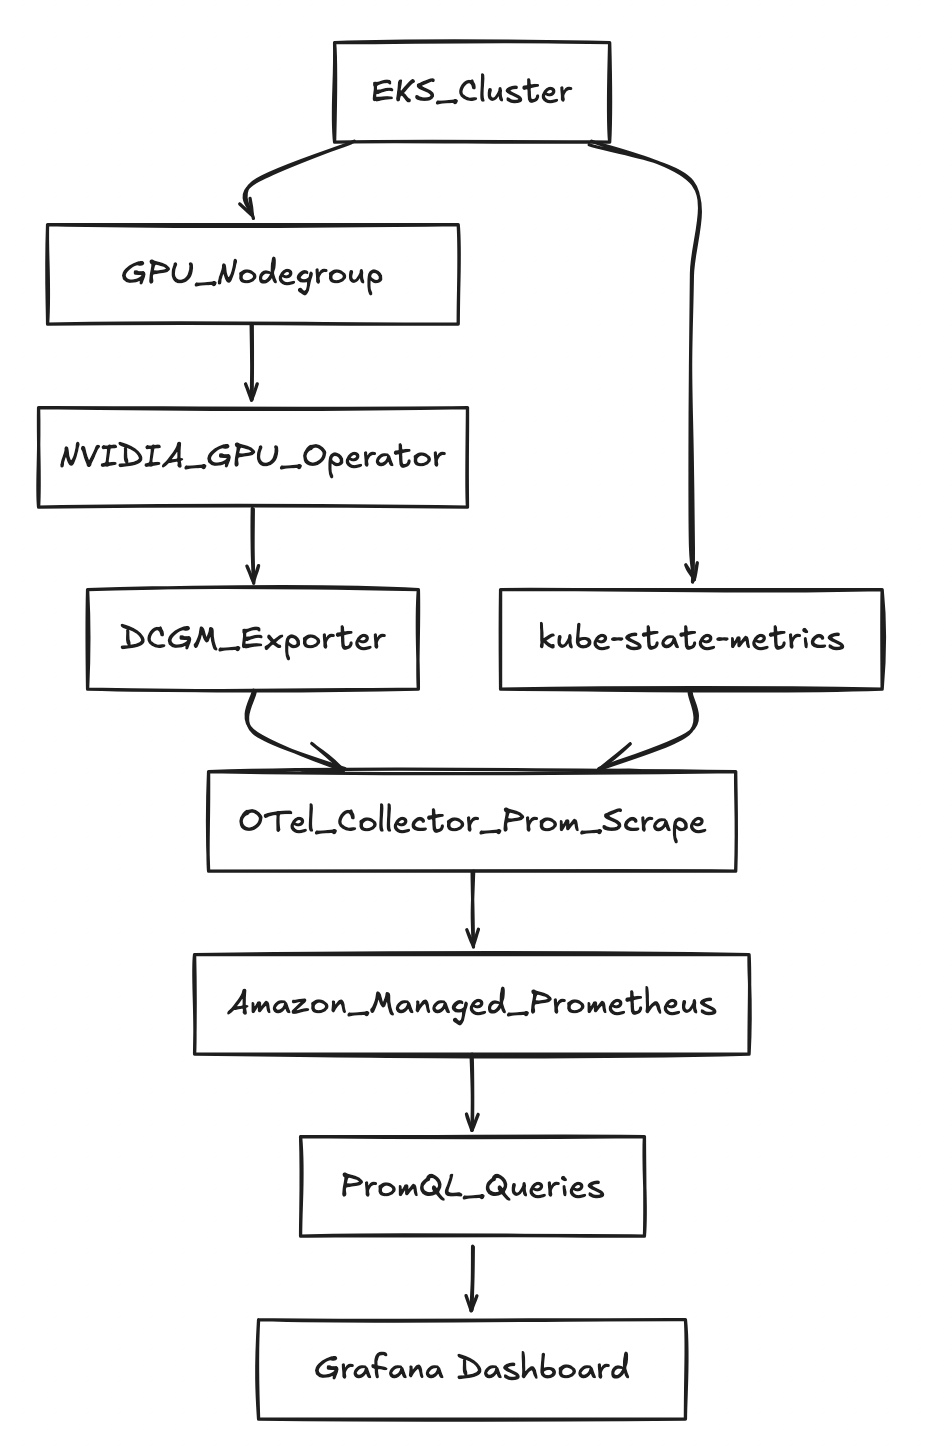
架构(高层级)
前提条件
AWS + EKS 前提条件
- 具有创建以下资源权限的 AWS 账户:
- EKS clusters + nodegroups
- IAM roles for service accounts (IRSA)
- AMP workspace
- 您所在区域具有运行 GPU 实例的配额和可用区容量
使用的变量
export AWS_REGION="us-west-2"
export CLUSTER_NAME="gpu-cost-poc"
export AMP_ALIAS="gpu-cost-poc"

# Public/benchmark price you want to demonstrate (not CUR yet)
export GPU_HOURLY_RATE="12"

# MIG profile for the PoC (eg: A100 40GB commonly supports 1g.5gb with 7 slices/GPU)
export MIG_PROFILE_LABEL="all-1g.5gb"

# IMPORTANT: in this PoC, MIG slices were exposed as nvidia.com/gpu (1 "gpu" == 1 MIG slice)
export MIG_RESOURCE_KEY="nvidia.com/gpu"

# For 1g.5gb on A100: typically 7 slices per physical GPU
export SLICES_PER_GPU="7"

# kube-state-metrics may "sanitize" extended resource names
export KSM_RESOURCE_REGEX='nvidia.*(gpu|mig).*'
分步操作说明
步骤 1 — 创建 EKS 集群
列出您的 eksctl 支持的版本:
eksctl utils describe cluster-versions
创建集群(省略 --version 让 eksctl 选择支持的默认版本):
eksctl create cluster \
  --name "$CLUSTER_NAME" \
  --region "$AWS_REGION" \
  --managed
步骤 2 — 添加"系统"节点组(推荐)
这可以将 CoreDNS 和运维组件与昂贵的 GPU 节点分开。
eksctl create nodegroup \
  --cluster "$CLUSTER_NAME" \
  --region "$AWS_REGION" \
  --name "system-ng" \
  --node-type "m5.large" \
  --nodes 2 --nodes-min 2 --nodes-max 3
步骤 3 — 添加 GPU 节点组
eksctl create nodegroup \
  --cluster "$CLUSTER_NAME" \
  --region "$AWS_REGION" \
  --name "gpu-ng-ubuntu" \
  --node-type "p4d.24xlarge" \
  --node-ami-family "Ubuntu2204" \
  --install-nvidia-plugin=false \
  --nodes 1 --nodes-min 1 --nodes-max 1 \
  --node-labels "workload=gpu"
应用污点,使只有 GPU 工作负载才能调度到该节点:
kubectl taint nodes -l workload=gpu nvidia.com/gpu=present:NoSchedule --overwrite
步骤 4 — 安装 NVIDIA GPU Operator(启用 MIG)
helm repo add nvidia https://helm.ngc.nvidia.com/nvidia
helm repo update

helm upgrade --install gpu-operator nvidia/gpu-operator \
  -n gpu-operator --create-namespace \
  --set mig.strategy=single
步骤 5 — 在 GPU 节点上启用 MIG 配置文件
检查当前 MIG 标签:
kubectl get nodes -l workload=gpu -o jsonpath='{range .items[*]}{.metadata.name}{"\t"}{.metadata.labels.nvidia\.com/mig\.capable}{"\t"}{.metadata.labels.nvidia\.com/mig\.config}{"\t"}{.metadata.labels.nvidia\.com/mig\.config\.state}{"\n"}{end}'
应用 MIG 几何配置:
kubectl label nodes -l workload=gpu nvidia.com/mig.config="$MIG_PROFILE_LABEL" --overwrite
等待成功:
kubectl get nodes -l workload=gpu -o jsonpath='{range .items[*]}{.metadata.name}{"\t"}{.metadata.labels.nvidia\.com/mig\.config}{"\t"}{.metadata.labels.nvidia\.com/mig\.config\.state}{"\n"}{end}'
步骤 6 — 创建 AMP workspace
aws amp create-workspace --alias "$AMP_ALIAS" --region "$AWS_REGION"

export AMP_WORKSPACE_ID="$(aws amp list-workspaces --region "$AWS_REGION" --query "workspaces[?alias=='$AMP_ALIAS'].workspaceId | [0]" --output text)"
export AMP_ENDPOINT="$(aws amp describe-workspace --workspace-id "$AMP_WORKSPACE_ID" --region "$AWS_REGION" --query "workspace.prometheusEndpoint" --output text)"

echo "$AMP_WORKSPACE_ID"
echo "$AMP_ENDPOINT"
步骤 7 — 用于采集和查询的 IRSA
eksctl utils associate-iam-oidc-provider \
  --cluster "$CLUSTER_NAME" \
  --region "$AWS_REGION" \
  --approve

eksctl create iamserviceaccount \
  --cluster "$CLUSTER_NAME" --region "$AWS_REGION" \
  --name amp-ingest --namespace observability \
  --attach-policy-arn arn:aws:iam::aws:policy/AmazonPrometheusRemoteWriteAccess \
  --approve --override-existing-serviceaccounts

eksctl create iamserviceaccount \
  --cluster "$CLUSTER_NAME" --region "$AWS_REGION" \
  --name amp-query --namespace observability \
  --attach-policy-arn arn:aws:iam::aws:policy/AmazonPrometheusQueryAccess \
  --approve --override-existing-serviceaccounts
步骤 8 — 安装 kube-state-metrics
helm repo add prometheus-community https://prometheus-community.github.io/helm-charts
helm repo update

helm upgrade --install kube-state-metrics prometheus-community/kube-state-metrics \
  -n kube-system
步骤 9 — 部署 OTel collector(Prometheus 抓取 → AMP remote_write)
kubectl -n observability patch configmap amp-scraper-otel-env --type merge -p "$(cat <<PATCH
{
  "data": {
    "AWS_REGION": "${AWS_REGION}",
    "AMP_ENDPOINT": "${AMP_ENDPOINT}"
  }
}
PATCH
)"

kubectl -n observability rollout restart deploy/amp-scraper-otel
kubectl -n observability rollout status deploy/amp-scraper-otel
步骤 10 — 部署三个业务单元工作负载(3/2/2 切片)
应用业务单元 namespaces 和 deployments。
关键细节: 每个 pod 请求 nvidia.com/gpu: 1(因为此处 MIG 切片以 nvidia.com/gpu 方式暴露)。
查询:分配、利用率、有效成本、浪费
1) 每个 namespace(业务单元)的请求切片数
Q='sum by (namespace) (kube_pod_container_resource_requests{resource=~"nvidia.*(gpu|mig).*",unit="integer"})'
ENCODED="$(python3 -c 'import urllib.parse,sys; print(urllib.parse.quote(sys.argv[1]))' "$Q")"

awscurl --service aps --region "$AWS_REGION" \
  -X POST "${AMP_ENDPOINT}api/v1/query" \
  -H "Content-Type: application/x-www-form-urlencoded" \
  -d "query=${ENCODED}"
观测到的输出:
{"namespace":"bu-a","value":[...,"3"]}
{"namespace":"bu-b","value":[...,"2"]}
{"namespace":"bu-c","value":[...,"2"]}
2) 查找 GPU 利用率 metric
列出 metric 名称:
awscurl --service aps --region "$AWS_REGION" \
  "${AMP_ENDPOINT}api/v1/label/__name__/values" \
| python3 -c 'import sys,json; j=json.load(sys.stdin); print("\n".join(j["data"]))' \
| egrep -i "dcgm.*util|DCGM.*UTIL|gr_engine_active|sm_active" \
| head -n 30
我们找到了:
DCGM_FI_PROF_GR_ENGINE_ACTIVE
3) 利用率分数(标量)
Q='scalar(avg(DCGM_FI_PROF_GR_ENGINE_ACTIVE)/100)'
ENCODED="$(python3 -c 'import urllib.parse,sys; print(urllib.parse.quote(sys.argv[1]))' "$Q")"

awscurl --service aps --region "$AWS_REGION" \
  -X POST "${AMP_ENDPOINT}api/v1/query" \
  -H "Content-Type: application/x-www-form-urlencoded" \
  -d "query=${ENCODED}"
示例观测值(低负载情况):
{"resultType":"scalar","result":[...,"0.0004539326785714286"]}
4) 分配计算(每小时)
每个业务单元每小时分配美元数:
allocated_usd_per_hr =
sum by (namespace) (kube_pod_container_resource_requests{resource=~"nvidia.*(gpu|mig).*",unit="integer"})
* (GPU_HOURLY_RATE / SLICES_PER_GPU)
使用常数 (12/7):
Q='sum by (namespace) (kube_pod_container_resource_requests{resource=~"nvidia.*(gpu|mig).*",unit="integer"}) * (12/7)'
ENCODED="$(python3 -c 'import urllib.parse,sys; print(urllib.parse.quote(sys.argv[1]))' "$Q")"

awscurl --service aps --region "$AWS_REGION" \
  -X POST "${AMP_ENDPOINT}api/v1/query" \
  -H "Content-Type: application/x-www-form-urlencoded" \
  -d "query=${ENCODED}"
结果符合预期:
- BU-A: (3/7 × 12 = 5.142857) $/hr
- BU-B: (2/7 × 12 = 3.428571) $/hr
- BU-C: (2/7 × 12 = 3.428571) $/hr
5) 有效 $/hr 和浪费 $/hr
关键点:利用率是一个标量,而分配是一个带 namespace 标签的向量。使用 scalar(...) 让 Prometheus 进行"广播"。
有效 $/hr:
Q='(sum by (namespace) (kube_pod_container_resource_requests{resource=~"nvidia.*(gpu|mig).*",unit="integer"}) * (12/7))
   * scalar(clamp_min(clamp_max(avg(DCGM_FI_PROF_GR_ENGINE_ACTIVE)/100, 1), 0))'
ENCODED="$(python3 -c 'import urllib.parse,sys; print(urllib.parse.quote(sys.argv[1]))' "$Q")"

awscurl --service aps --region "$AWS_REGION" \
  -X POST "${AMP_ENDPOINT}api/v1/query" \
  -H "Content-Type: application/x-www-form-urlencoded" \
  -d "query=${ENCODED}"
我们观测到的示例输出:
{"namespace":"bu-a","value":[...,"0.002325599081632653"]}
{"namespace":"bu-b","value":[...,"0.0015503993877551022"]}
{"namespace":"bu-c","value":[...,"0.0015503993877551022"]}
浪费 $/hr:
Q='(sum by (namespace) (kube_pod_container_resource_requests{resource=~"nvidia.*(gpu|mig).*",unit="integer"}) * (12/7))
 - (
    (sum by (namespace) (kube_pod_container_resource_requests{resource=~"nvidia.*(gpu|mig).*",unit="integer"}) * (12/7))
    * scalar(clamp_min(clamp_max(avg(DCGM_FI_PROF_GR_ENGINE_ACTIVE)/100, 1), 0))
   )'
ENCODED="$(python3 -c 'import urllib.parse,sys; print(urllib.parse.quote(sys.argv[1]))' "$Q")"

awscurl --service aps --region "$AWS_REGION" \
  -X POST "${AMP_ENDPOINT}api/v1/query" \
  -H "Content-Type: application/x-www-form-urlencoded" \
  -d "query=${ENCODED}"
我们观测到的示例输出:
{"namespace":"bu-a","value":[...,"5.14053154377551"]}
{"namespace":"bu-b","value":[...,"3.427021029183673"]}
{"namespace":"bu-c","value":[...,"3.427021029183673"]}
Amazon Managed Grafana (AMG):基于 AMP 的 dashboard
为了使此 PoC 易于分享,最快的可视化层是 Amazon Managed Grafana (AMG)。
1) 创建 AMG workspace(CLI)
aws grafana create-workspace \
  --name "${CLUSTER_NAME}-gpu-cost" \
  --region "${AWS_REGION}" \
  --authentication-providers AWS_SSO \
  --permission-type SERVICE_MANAGED \
  --workspace-data-sources PROMETHEUS
获取 workspace URL:
export AMG_WORKSPACE_ID="$(aws grafana list-workspaces --region "${AWS_REGION}" --query "workspaces[?name=='${CLUSTER_NAME}-gpu-cost'].id | [0]" --output text)"
aws grafana describe-workspace --region "${AWS_REGION}" --workspace-id "${AMG_WORKSPACE_ID}" \
  --query "workspace.{status:status,endpoint:endpoint,roleArn:iamRoleArn}" --output yaml
2) 允许 AMG 查询 AMP
export AMG_ROLE_ARN="$(aws grafana describe-workspace --region "${AWS_REGION}" --workspace-id "${AMG_WORKSPACE_ID}" --query "workspace.iamRoleArn" --output text)"
ROLE_NAME="$(basename "$AMG_ROLE_ARN")"
aws iam attach-role-policy --role-name "$ROLE_NAME" --policy-arn arn:aws:iam::aws:policy/AmazonPrometheusQueryAccess
3) 在 Grafana UI 中添加 AMP 作为 Prometheus 数据源
在 AMG UI 中:
- Connections → Data sources → Add data source → Prometheus
- URL:
https://aps-workspaces.${AWS_REGION}.amazonaws.com/workspaces/${AMP_WORKSPACE_ID} - SigV4: enabled
- Region:
${AWS_REGION} - Service:
aps
- Region:
- Save & test
4) 起步面板(PromQL)
按业务单元/namespace 请求的切片数
sum by (namespace) (
  kube_pod_container_resource_requests{resource=~"nvidia.*(gpu|mig).*",unit="integer"}
)
按业务单元/namespace 分配的 $/hr(12/7 常数)
sum by (namespace) (
  kube_pod_container_resource_requests{resource=~"nvidia.*(gpu|mig).*",unit="integer"}
) * (12/7)
利用率分数标量(集群级代理)
scalar(avg(DCGM_FI_PROF_GR_ENGINE_ACTIVE)/100)
有效 $/hr(代理)
(sum by (namespace) (
  kube_pod_container_resource_requests{resource=~"nvidia.*(gpu|mig).*",unit="integer"}
) * (12/7))
* scalar(clamp_min(clamp_max(avg(DCGM_FI_PROF_GR_ENGINE_ACTIVE)/100, 1), 0))
浪费 $/hr(代理)
(sum by (namespace) (
  kube_pod_container_resource_requests{resource=~"nvidia.*(gpu|mig).*",unit="integer"}
) * (12/7))
-
((sum by (namespace) (
  kube_pod_container_resource_requests{resource=~"nvidia.*(gpu|mig).*",unit="integer"}
) * (12/7))
* scalar(clamp_min(clamp_max(avg(DCGM_FI_PROF_GR_ENGINE_ACTIVE)/100, 1), 0)))
经验教训和后续改进
此 PoC 证明了什么
- 当请求被声明(每个业务单元的切片数)并以简单常数定价时,分配计算是直接的。
- 使用 MIG,请求的切片可以清晰地映射到成本份额。
- 您可以计算浪费(分配减去有效),以显示空闲切片的低 ROI。
此 PoC 中的"近似值"
- 使用 MIG 时,DCGM metrics 中可能不存在每个 pod 的 GPU 利用率标签,这取决于版本/配置。
- 此 PoC 使用了集群级利用率标量作为每个业务单元"实际使用量"的代理。
使其达到生产级别的后续步骤
- 真正的每 pod 归因:
- 添加每 pod GPU 使用导出器(读取分配的 MIG 设备并报告带 pod 标签的利用率),或
- 从 NVIDIA 设备插件/运行时集成调�度器/设备映射
- 真实定价:
- 用 AWS CUR 或按需价格 API 替换常数 $/GPU 小时
- Dashboard:
- 将 AMP 接入 Grafana,按业务单元绘制
allocated、effective和waste的时间序列图
- 将 AMP 接入 Grafana,按业务单元绘制
清理
完成 PoC 后,按照依赖关系的逆序删除所有资源,以避免孤立基础设施和持续产生费用。
1) 删除业务单元工作负载
kubectl delete namespace bu-a bu-b bu-c
2) 删除 OTel collector
kubectl delete namespace observability
3) 卸载 kube-state-metrics
helm uninstall kube-state-metrics -n kube-system
4) 卸载 NVIDIA GPU Operator
helm uninstall gpu-operator -n gpu-operator
kubectl delete namespace gpu-operator
5) 删除 Amazon Managed Grafana workspace
aws grafana delete-workspace \
  --workspace-id "$AMG_WORKSPACE_ID" \
  --region "$AWS_REGION"
6) 分离 AMG IAM 策略
ROLE_NAME="$(basename "$AMG_ROLE_ARN")"
aws iam detach-role-policy \
  --role-name "$ROLE_NAME" \
  --policy-arn arn:aws:iam::aws:policy/AmazonPrometheusQueryAccess
7) 删除 AMP workspace
aws amp delete-workspace \
  --workspace-id "$AMP_WORKSPACE_ID" \
  --region "$AWS_REGION"
8) 删除 IRSA 服务账户
eksctl delete iamserviceaccount \
  --cluster "$CLUSTER_NAME" --region "$AWS_REGION" \
  --name amp-ingest --namespace observability

eksctl delete iamserviceaccount \
  --cluster "$CLUSTER_NAME" --region "$AWS_REGION" \
  --name amp-query --namespace observability
9) 删除节点组
eksctl delete nodegroup \
  --cluster "$CLUSTER_NAME" --region "$AWS_REGION" \
  --name gpu-ng-ubuntu

eksctl delete nodegroup \
  --cluster "$CLUSTER_NAME" --region "$AWS_REGION" \
  --name system-ng
10) 删除 EKS 集群
eksctl delete cluster \
  --name "$CLUSTER_NAME" \
  --region "$AWS_REGION"
eksctl delete cluster 也会删除 OIDC 提供商和所有剩余的节点组(如果它们未被单独删除)。但是,先删除节点组可以确保更干净的清除过程,减少 CloudFormation 堆栈删除时的重试次数。