CloudWatch クロスアカウントオブザーバビリティ
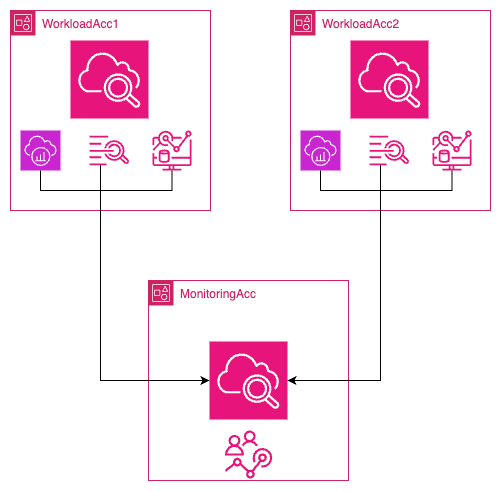
単一の AWS リージョン内で複数の AWS アカウントにデプロイされたアプリケーションのモニタリングは課題となる場合があります。Amazon CloudWatch のクロスアカウントオブザーバビリティ1 は、AWS リージョン2 内の複数のアカウントにまたがるアプリケーションのシームレスなモニタリングとトラブルシューティングを可能にすることで、このプロセスを簡素化します。このチュートリアルでは、2 つの AWS アカウント間でクロスアカウントオブザーバビリティを設定する手順をスクリーンショット付きで説明します。また、より広範なスケーラビリティのために AWS Organizations を通じたデプロイも可能です。
用語集
Amazon CloudWatch でクロスアカウントのオブザーバビリティを効果的に実現するには、以下の主要な用語を理解する必要があります:
| 用語 | 説明 |
|---|---|
| モニタリングアカウント | 複数のソースアカウントから生成されたオブザーバビリティデータを表示および操作できる中央の AWS アカウント |
| ソースアカウント | アカウント内のリソースからオブザーバビリティデータを生成��する個別の AWS アカウント |
| Sink | ソースアカウントがオブザーバビリティデータをリンクして共有するための接続ポイントとして機能する、モニタリングアカウント内のリソース。各アカウントは AWS リージョン ごとに 1 つの Sink を持つことができます2 |
| オブザーバビリティリンク | ソースアカウントとモニタリングアカウント間の接続を表すリソースで、オブザーバビリティデータの共有を可能にします。リンクはソースアカウントによって管理されます。 |
Amazon CloudWatch でクロスアカウントのオブザーバビリティを正常に設定および管理するには、これらの定義を理解してください。
AWS コンソールを使用したステップバイステップのチュートリアル
前提条件
-
このチュートリアルを完了するには、3 つの AWS アカウントが必要です:1 つのモニタリングアカウントと 2 つのソースアカウントです。
-
モニタリングアカウントとソースアカウント間のクロスアカウントリンクを作成するには、ユーザーまたはロールが AWS CloudWatch クロスアカウントセットアップガイド3 に記載されている権限を最低限持っている必要があります。
ステップ 1: モニタリングアカウントのセットアップ
モニタリングアカウント
モニタリングアカウントを設定するには、以下の手順に従ってください:
-
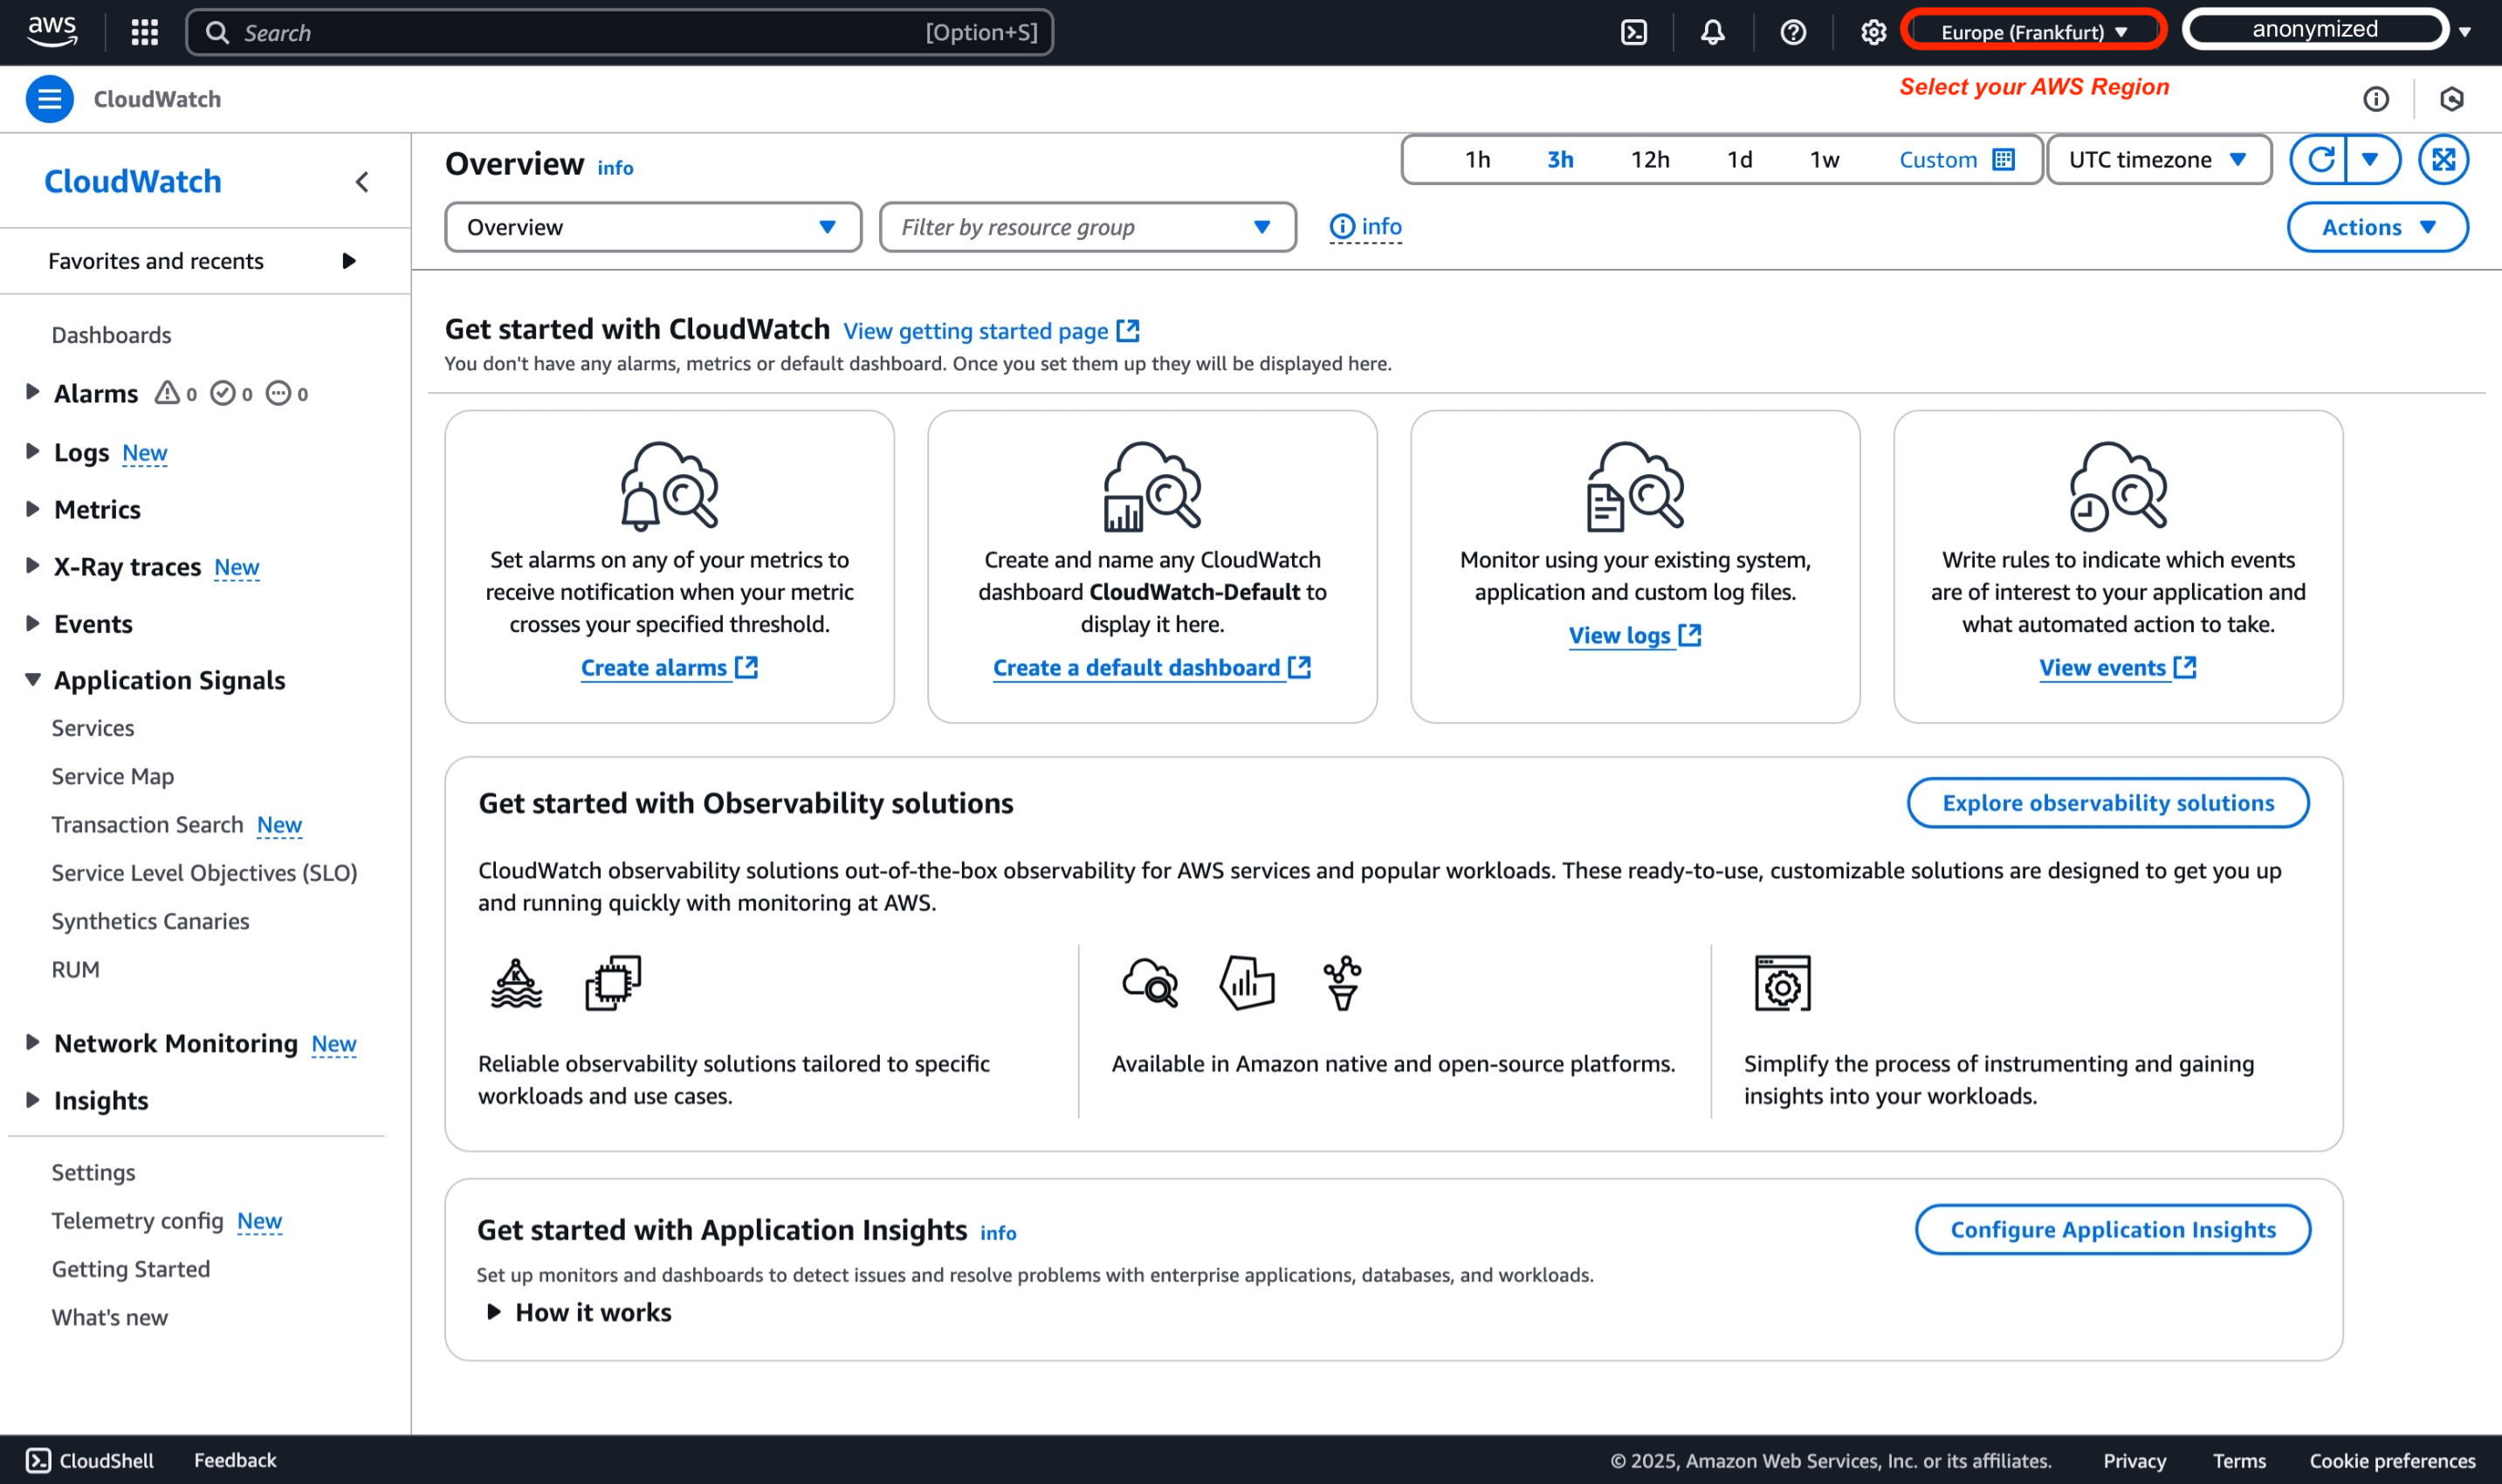
https://console.aws.amazon.com/cloudwatch で CloudWatch コンソールを開き、クロスアカウントモニタリングアカウントを設定する AWS リージョンを選択します。このデモでは、ヨーロッパ (フランクフルト) リージョン (eu-central-1) を使用します。
-
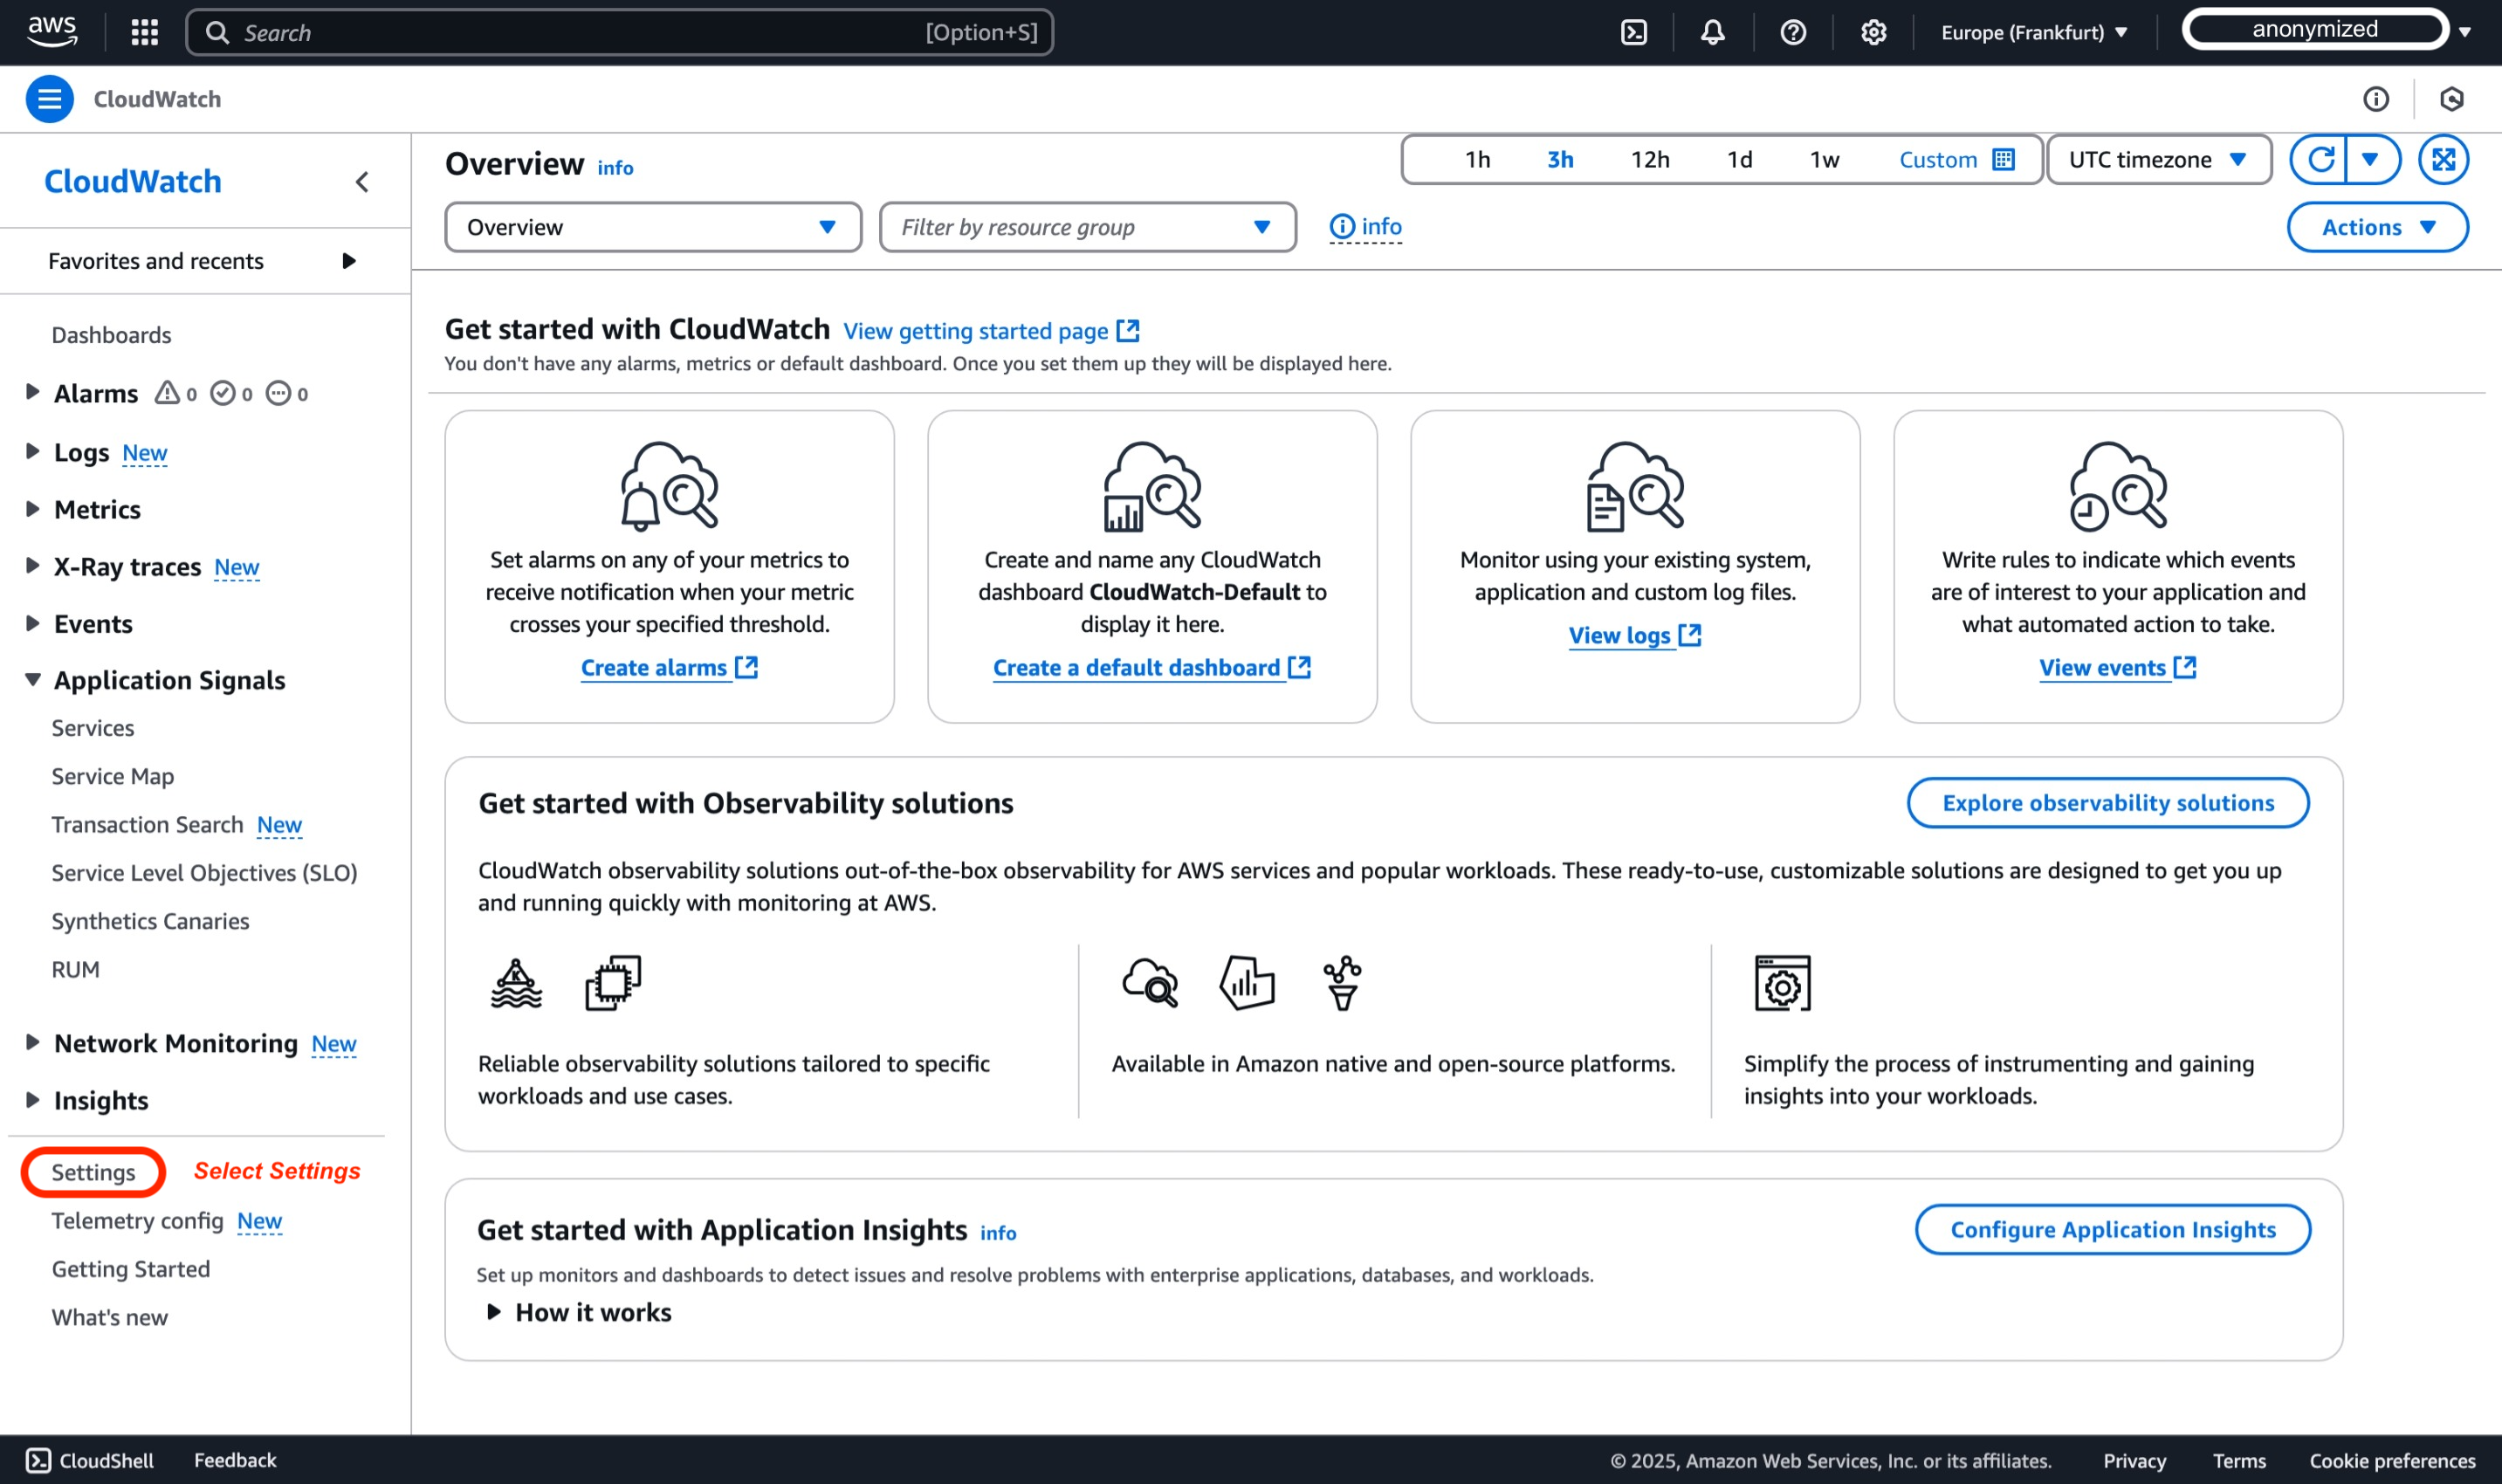
ナビゲーションペインで、設定 を選択します。
-
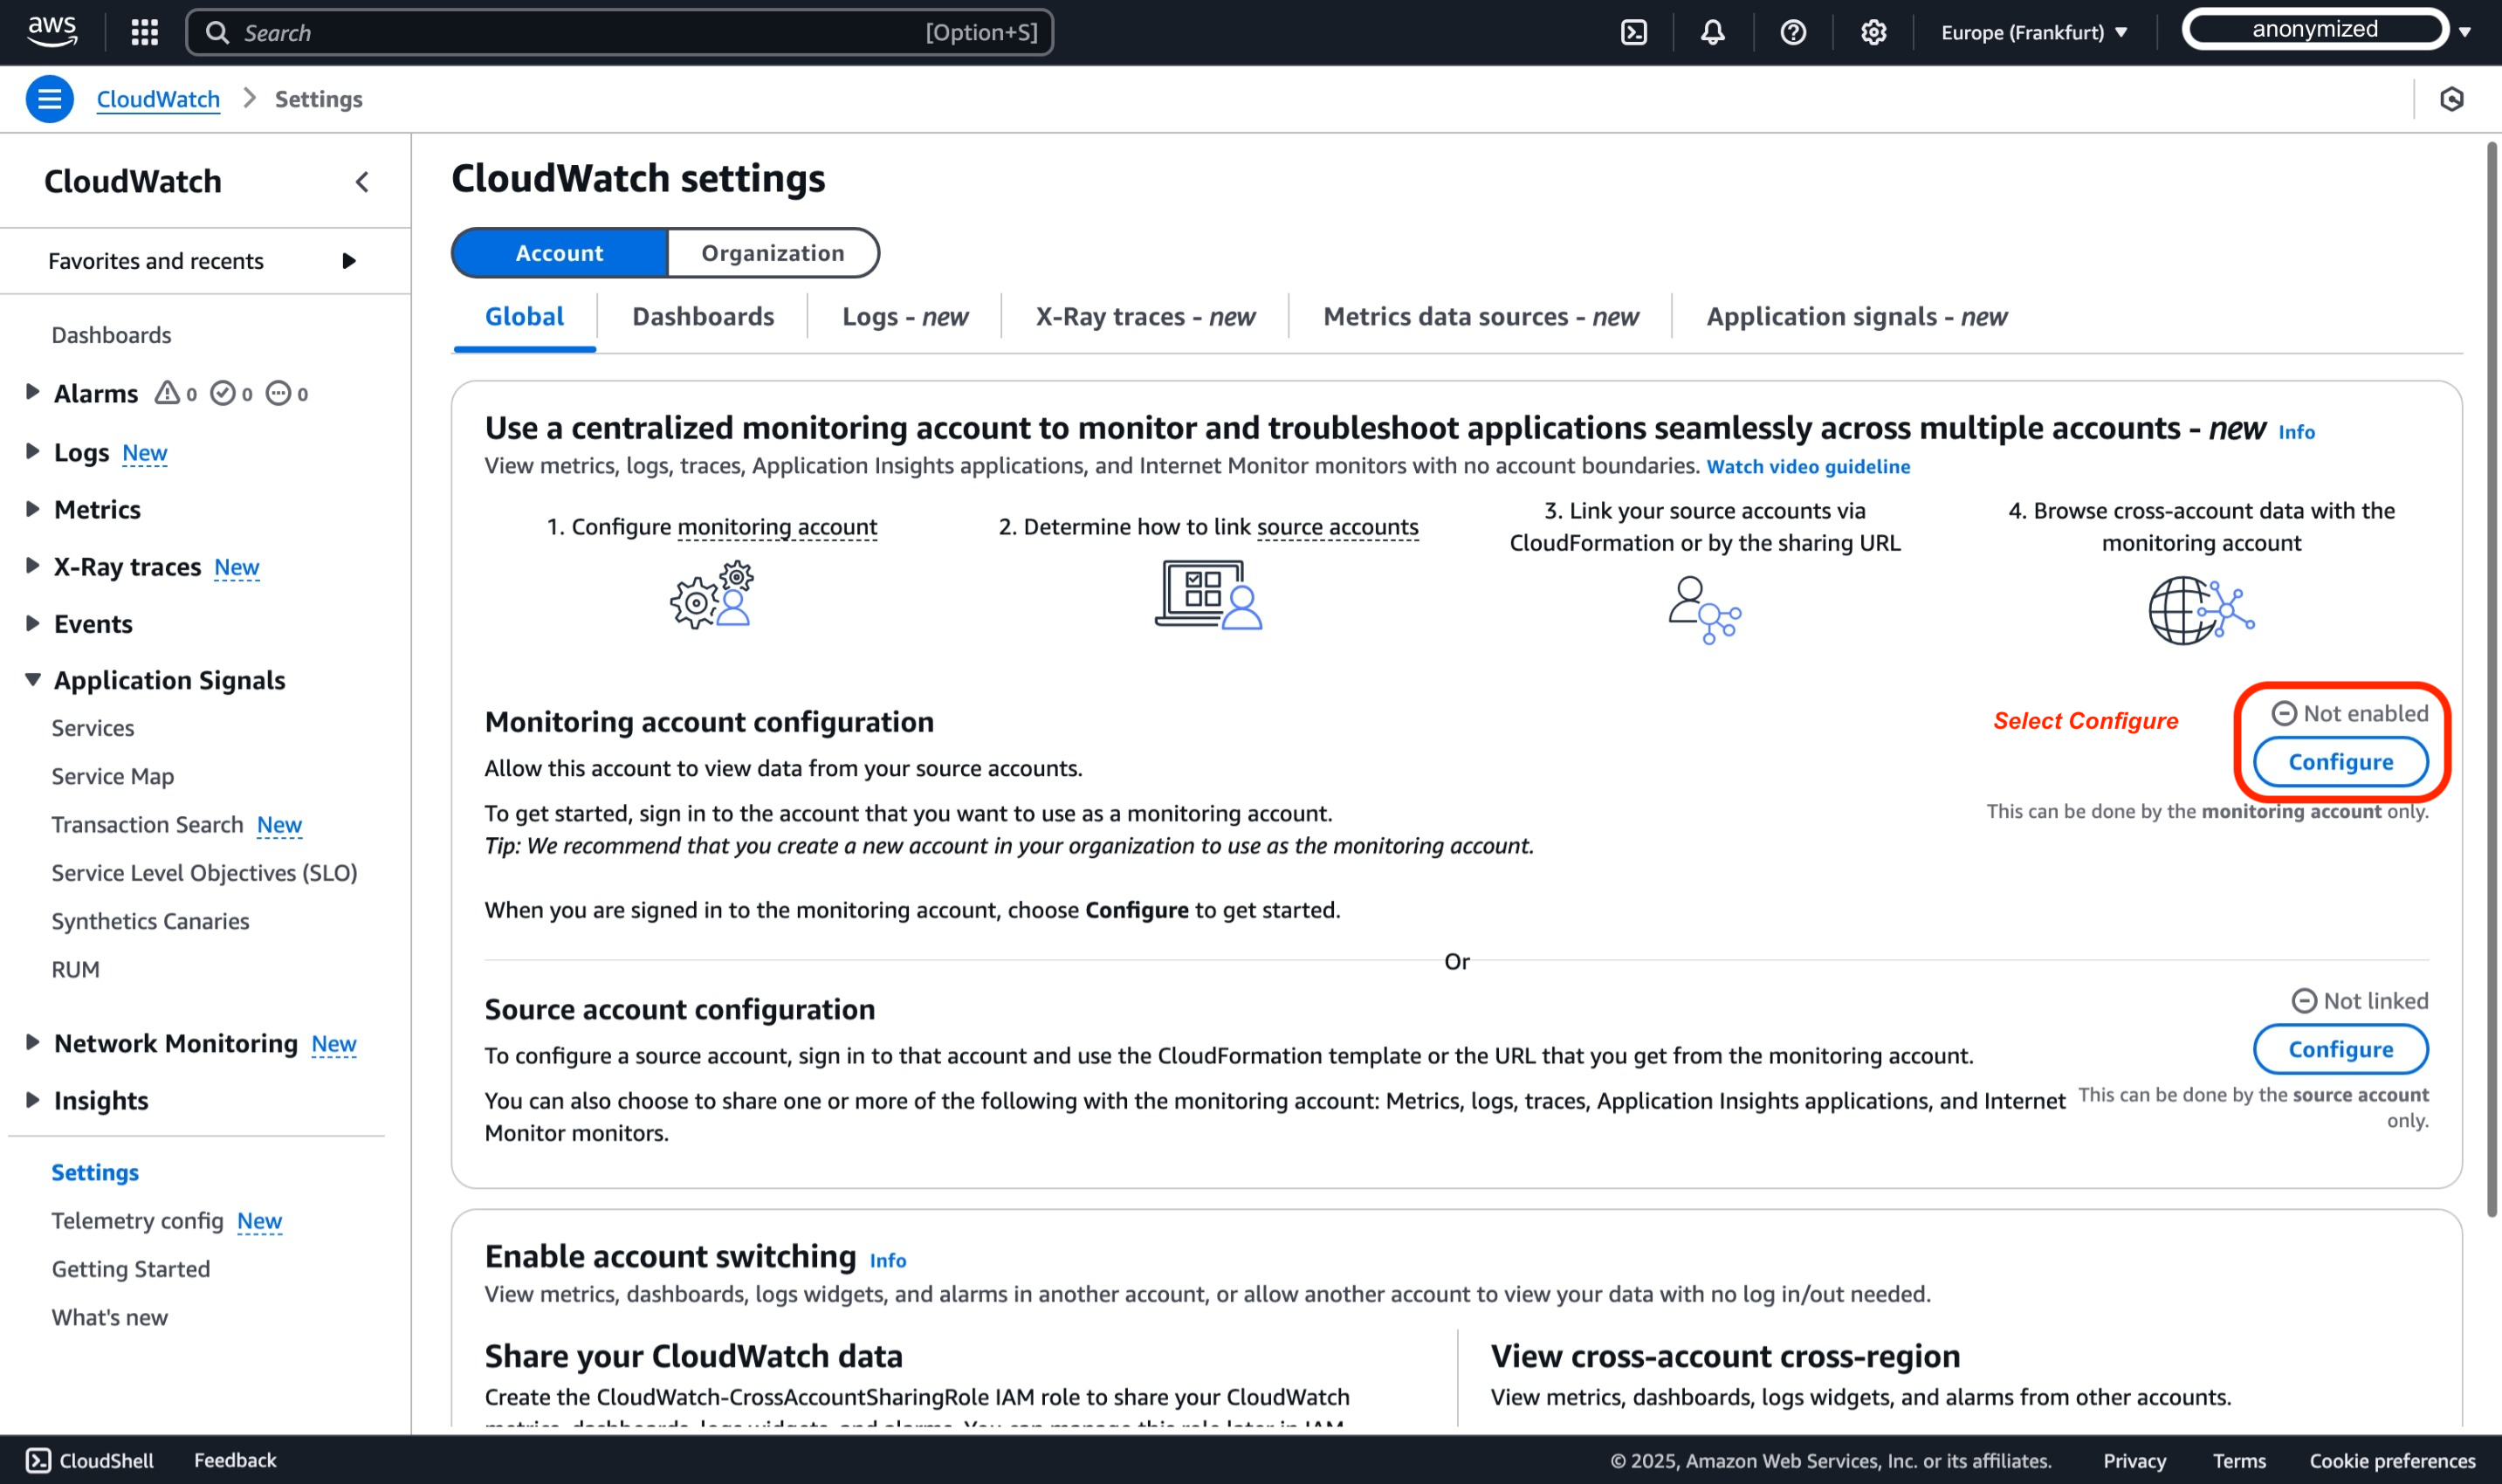
このデモでは、デフォルトのアカウントグローバル設定を使用し、モニタリングアカウント設定 セクション内の 設定 を選択します。
-
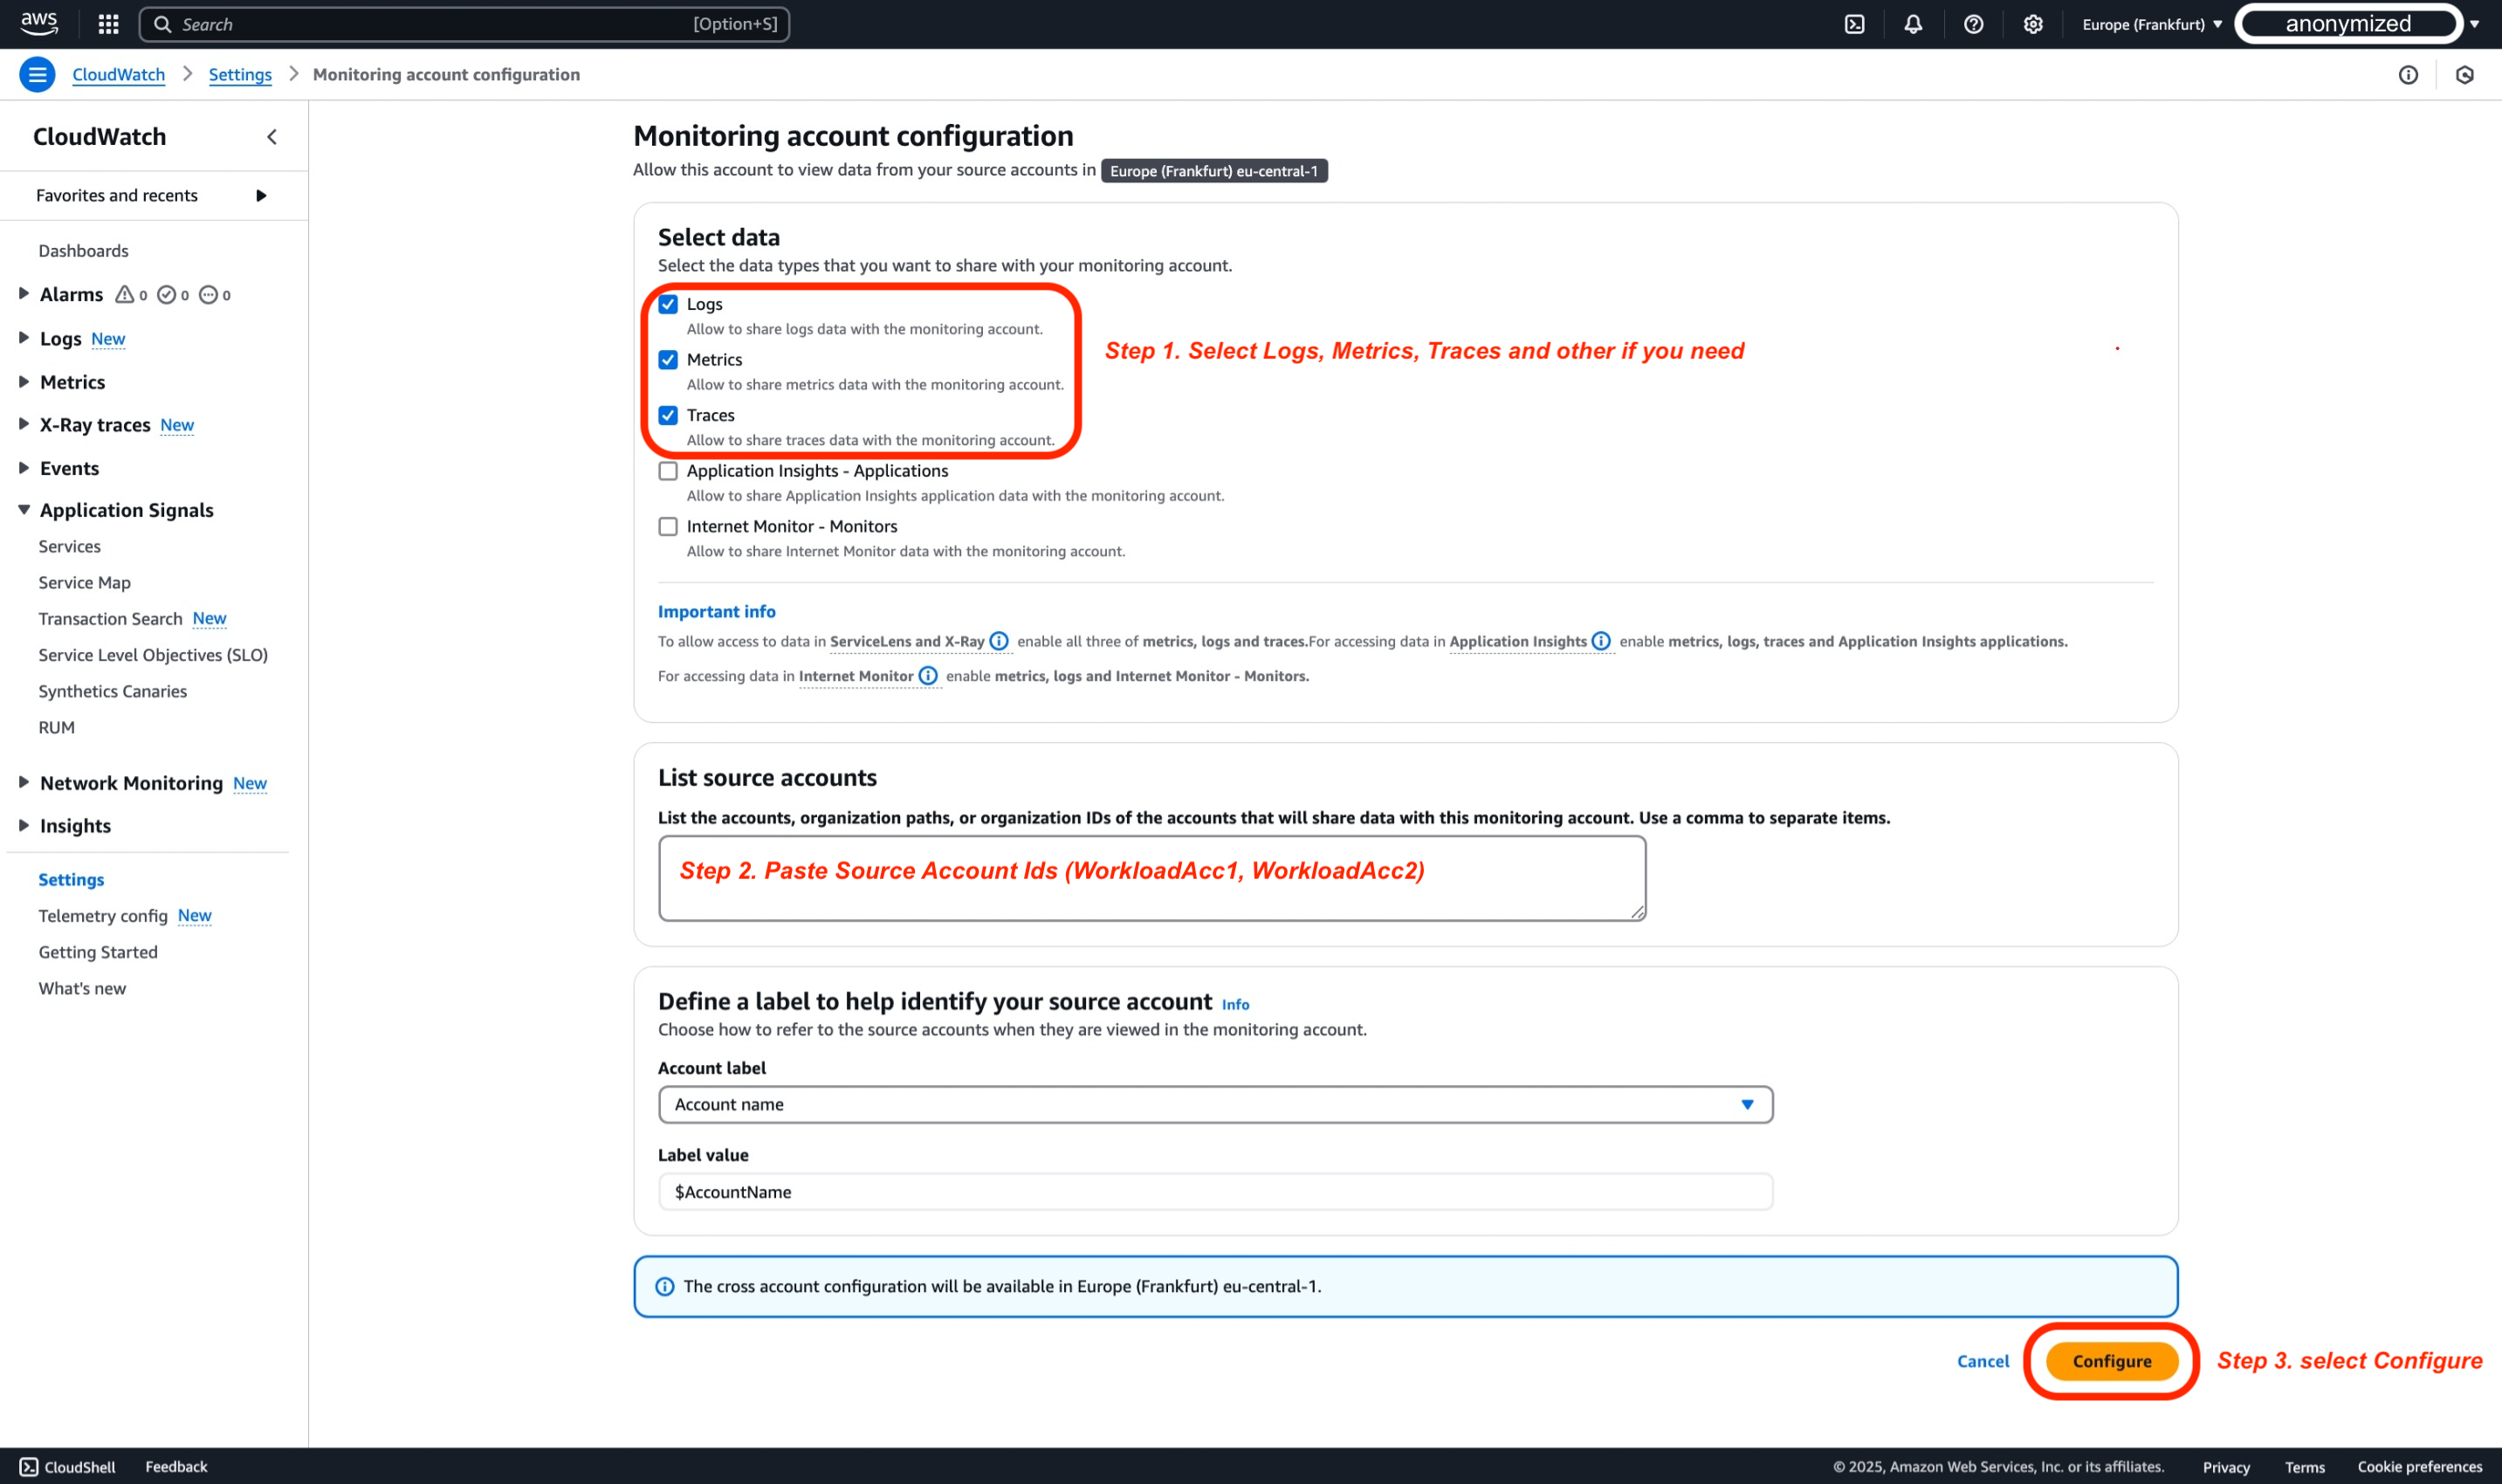
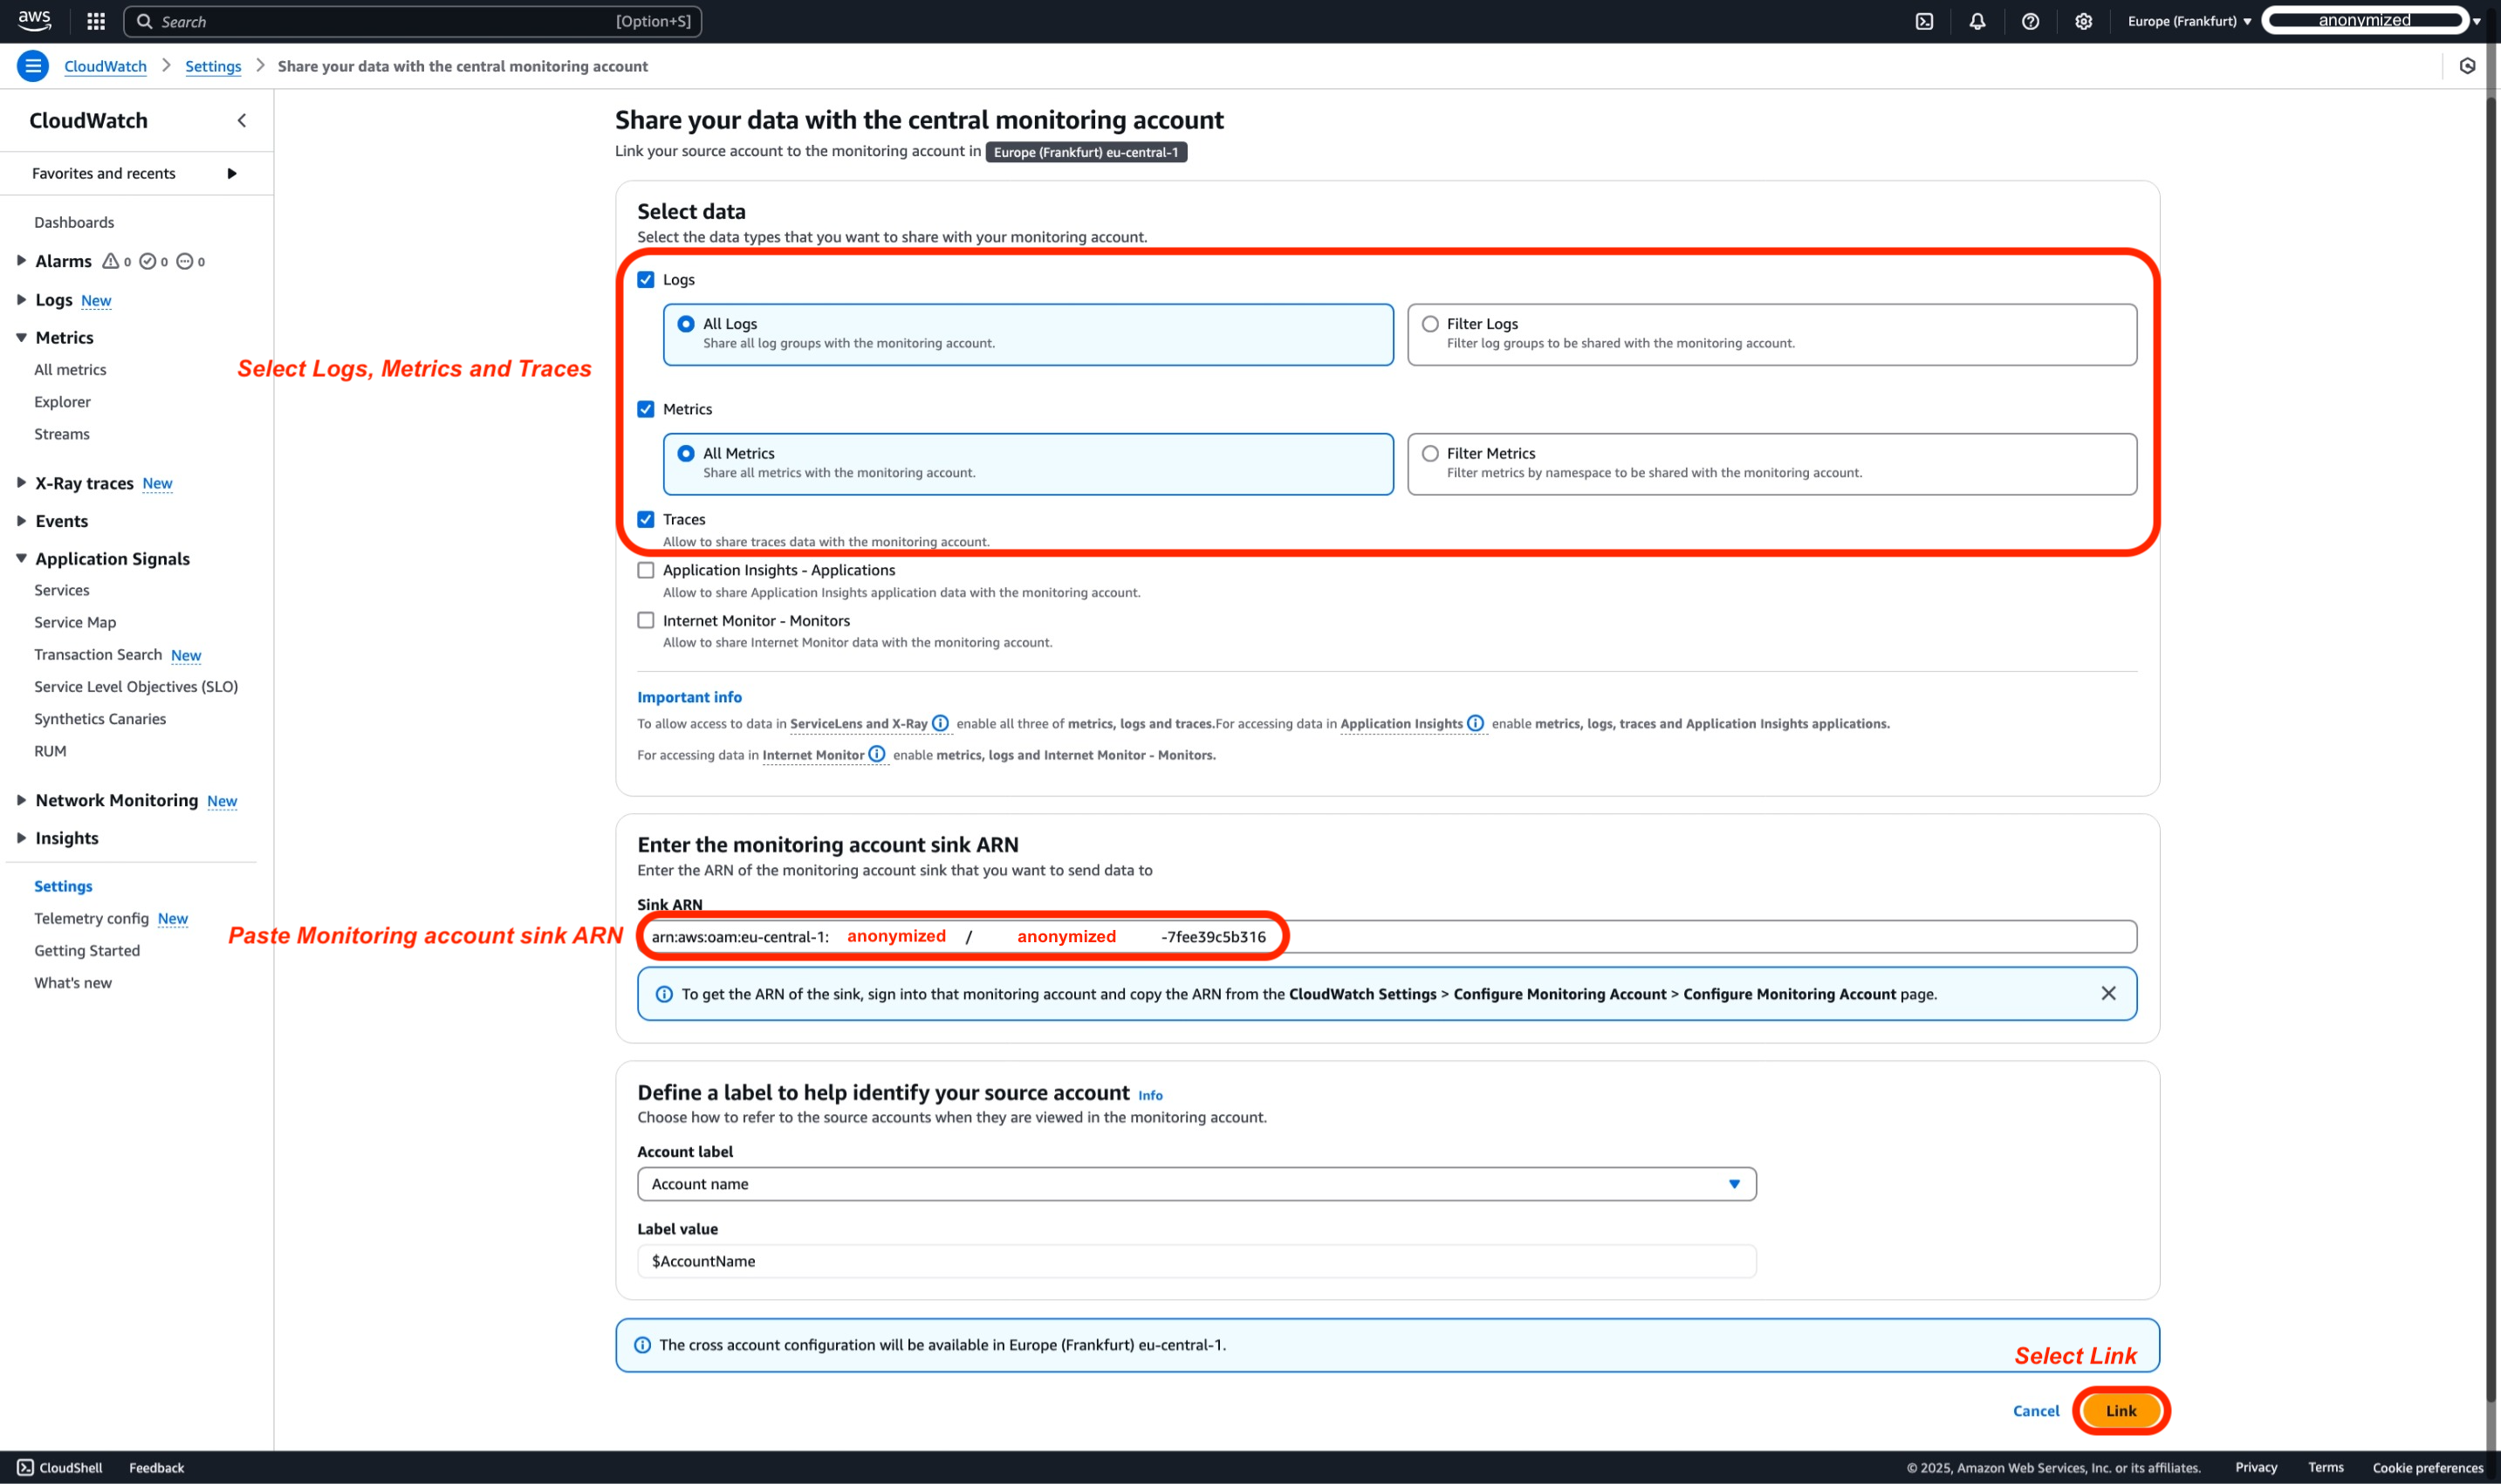
モニタリングアカウントと共有するデータの種類を選択した後、「ソースアカウントのリスト」ボックスにソースアカウント ID を貼り付けます。このデモでは、WorkloadAcc1 と WorkloadAcc2 の ID を使用します。メトリクス、ログ、トレースが選択されています。フィルタリングが可能なのはメトリクスとログのみで、その他は常に完全に共有されます。ServiceLens と X-Ray の場合、メトリクス、ログ、トレースを有効にする必要があります。Application Insights の場合は、Application Insights アプリケーションも有効にします。Internet Monitor の場合は、メトリクス、ログ、Internet Monitor – Monitors を有効にします。
CloudWatch クロスアカウントオブザーバビリティでテレメトリタイプを設定する際は、その依存関係を理解することが重要です。メトリクス、ログ、トレースは個別に設定できますが、他の CloudWatch 機能には特定の要件があります。ServiceLens と X-Ray の機能には、メトリクス、ログ、トレースの 3 つすべてが必要です。より高度なモニタリングのために、Application Insights ではメトリクス、ログ、トレース、および Application Insights アプリケーションを有効にする必要があります。同様に、Internet Monitor では、メトリクス、ログ、および Internet Monitor - Monitors を有効にする必要があります。以下の表でこれらの依存��関係を詳しく説明します:
| テレメトリタイプ | 説明 | CloudWatch クロスアカウントオブザーバビリティの依存関係 |
|---|---|---|
| Amazon CloudWatch のメトリクス | すべてのメトリクス名前空間を共有するか、サブセットにフィルタリング | なし |
| Amazon CloudWatch Logs のロググループ | すべてのロググループを共有するか、サブセットにフィルタリング | なし |
| ServiceLens と X-Ray | すべてのトレースを共有(フィルタリング不可) | ServiceLens と X-Ray にはメトリクス、ログ、トレースの有効化が必要 |
| Amazon CloudWatch Application Insights のアプリケーション | すべてのアプリケーションを共有(フィルタリング不可) | メトリクス、ログ、トレース、および Application Insights アプリケーションの有効化が必要 |
| CloudWatch Internet Monitor のモニター | すべてのモニターを共有(フィルタリング不可) | メトリクス、ログ、および Internet Monitor - Monitors の有効化が必要 |
- モニタリングアカウントの AWS コンソールで、以下の図が表示され、モニタリングアカウントが正常に設定されたことが確認できます。
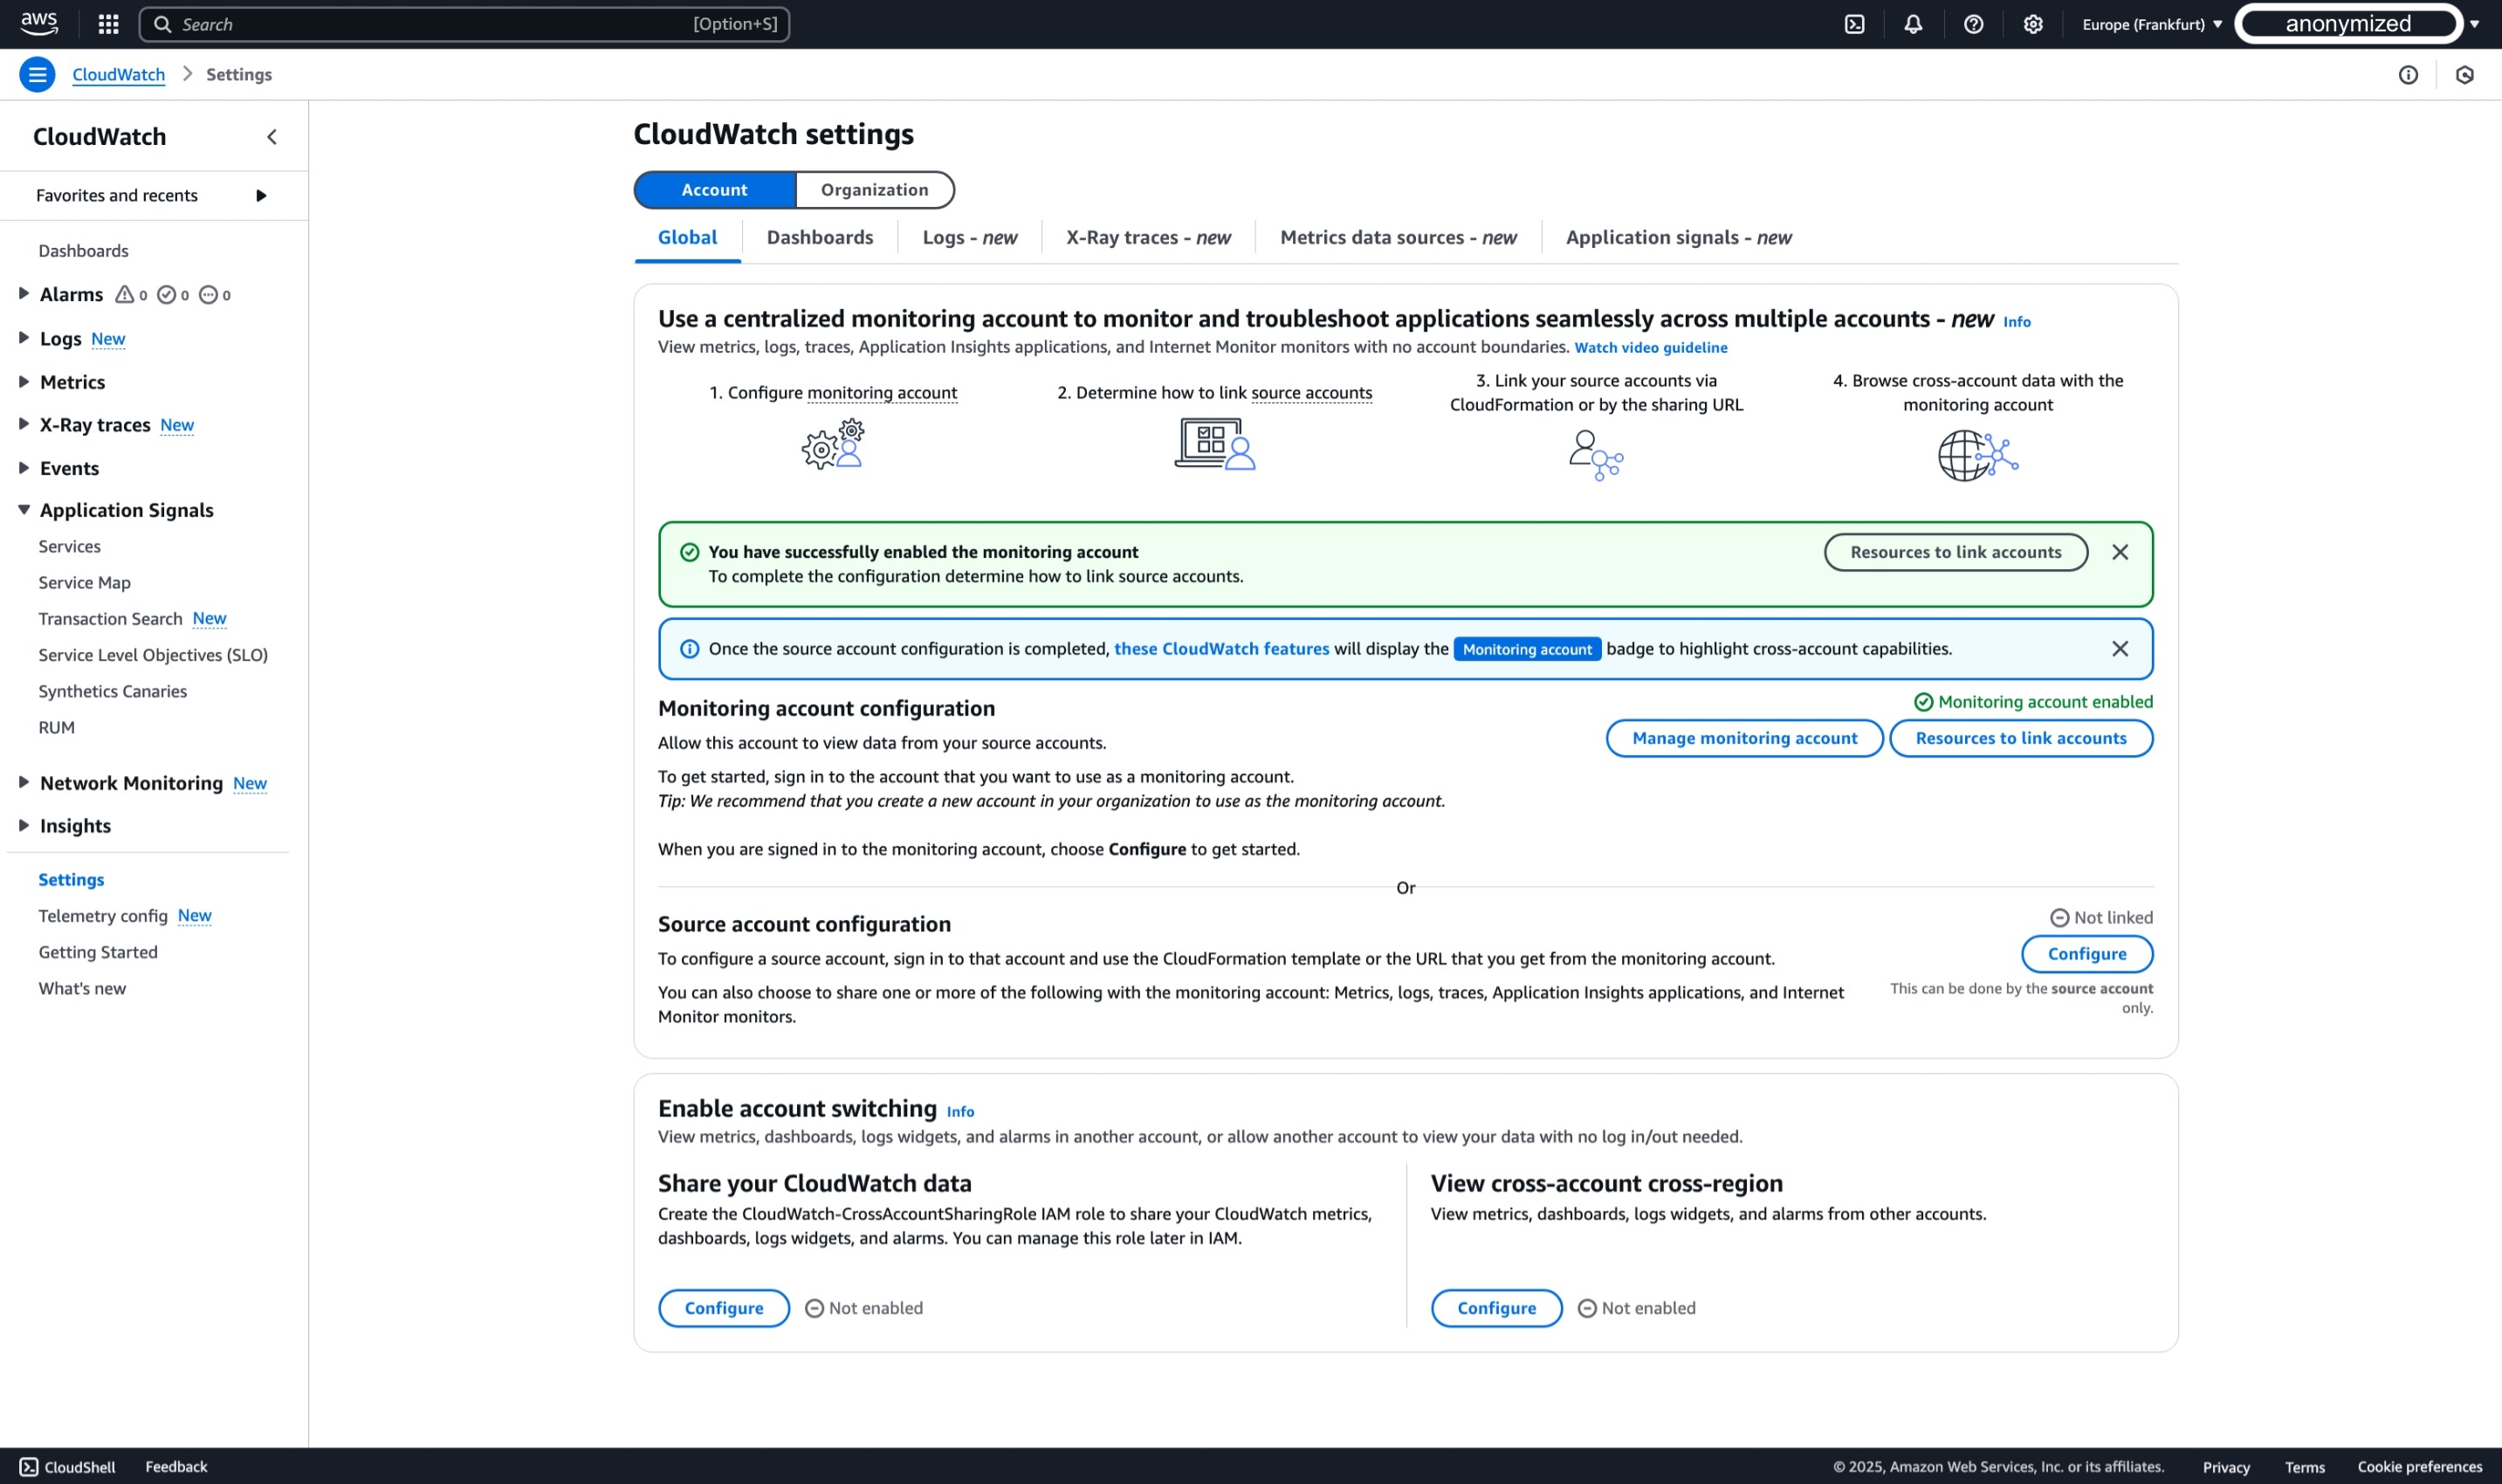
モニタリングアカウントの設定が完了したら、ソースアカウントをリンクする必要があります。ソースアカウントをリンクする方法には、AWS Organizations を使用する方法と個別のアカウントをリンクする方法の 2 つがあります。ステップ 2 では、個別のアカウントを設定するプロセスを説明します。ただし、ソースアカウントにログインして変更を加える前に、モニタリングアカウントシンク ARN などの、設定したばかりのモニタリングアカウントから情報を収集する必要があります。
-
モニタリングアカウントの AWS コンソールで前回停止した場所から、アカウントをリンクするためのリソース を選択します。

-
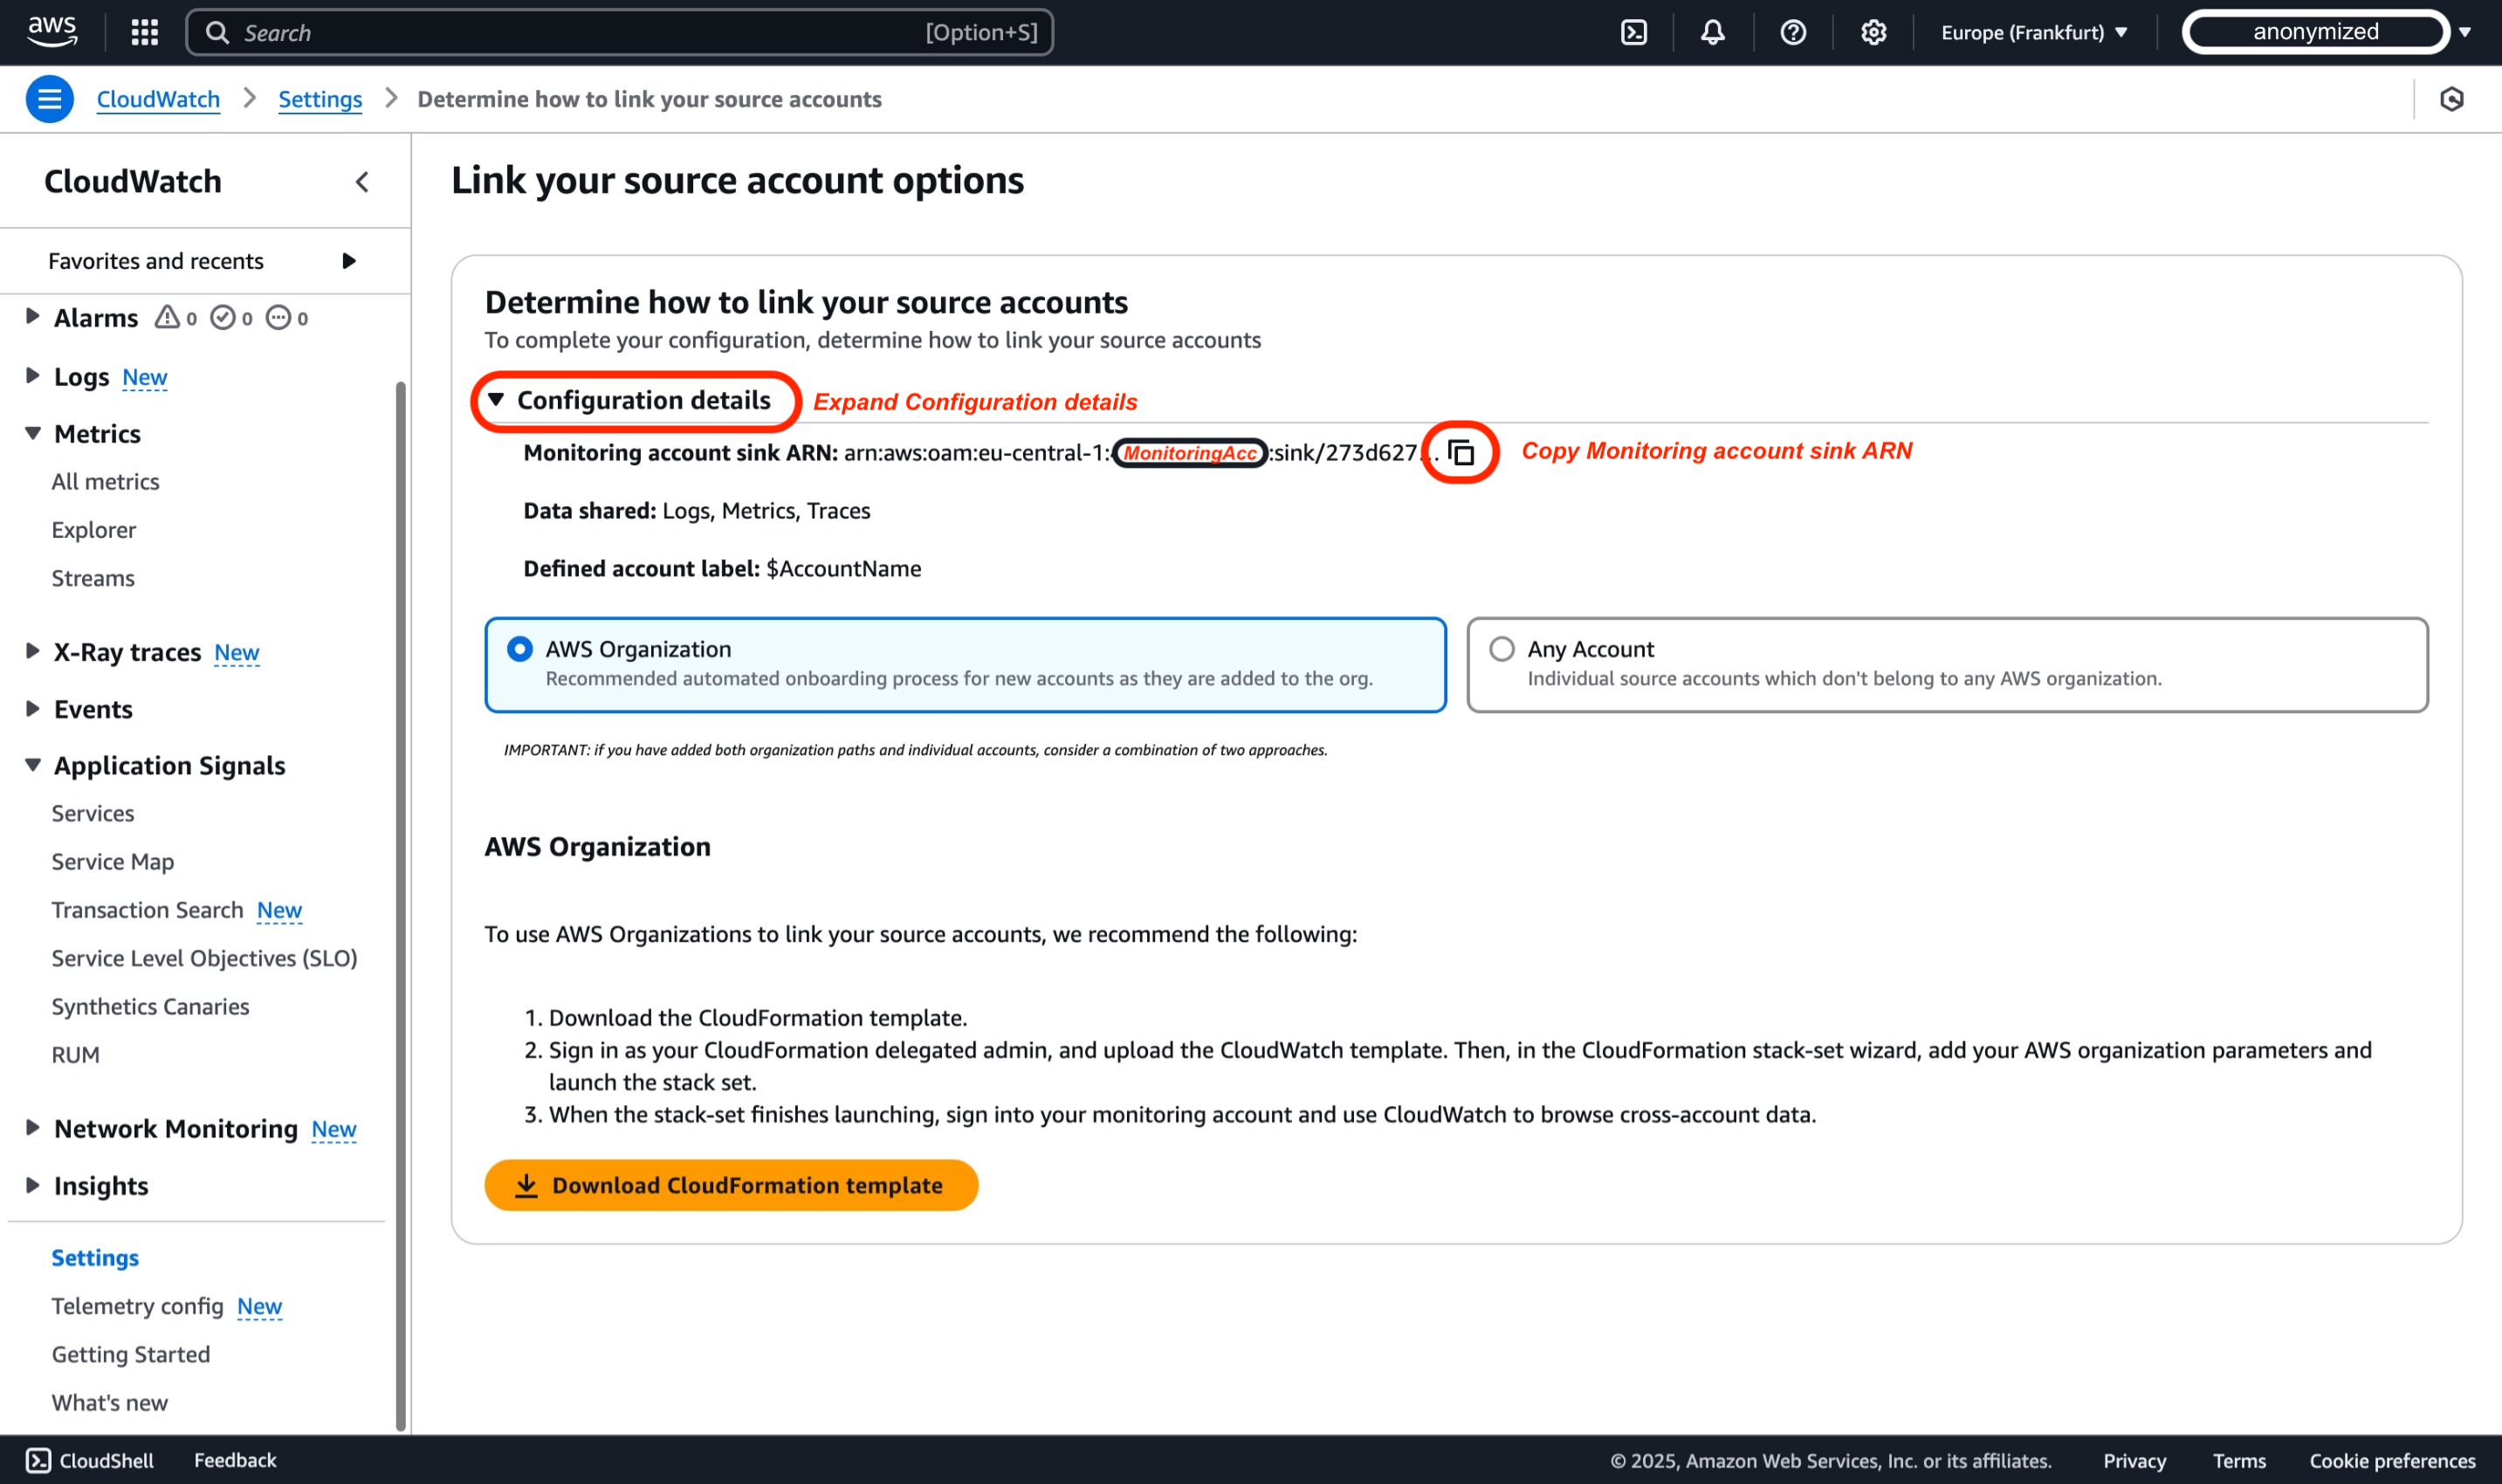
AWS コンソールで「設定の詳細」セクションを展開します。ここでコピーして保存する必要があるモニタリングアカウントシンク ARN が表示されます。この情報は、ステップ 2 でソースアカウントをリンクする際に必要になります。
まとめ
前のステップでは、モニタリングアカウントシンクを、スタンドアロンまたは組織の一部であるかに関わらず、ソースアカウントとリンクするように設定しました。基本的に、上記のステップでは、ソースアカウントの統合を許可するモニタリングアカウントシンクに設定ポリシーを作成しました。AWS コンソールの設定を通じて生成されたサンプルポリシーは以下の通りです:
{
    "Version": "2012-10-17",
    "Statement": [
        {
            "Effect": "Allow",
            "Principal": {
                "AWS": [
                    "${WorkloadAcc1}", // Workload Account
                    "${WorkloadAcc2}"  // Workload Account
                ]
            },
            "Action": [
                "oam:CreateLink",
                "oam:UpdateLink"
            ],
            "Resource": "*",
            "Condition": {
                "ForAllValues:StringEquals": {
                    "oam:ResourceTypes": [
                        "AWS::Logs::LogGroup",
                        "AWS::CloudWatch::Metric",
                        "AWS::XRay::Trace"
                    ]
                }
            }
        }
    ]
}
AWS Organizations を使用して設定する場合、PrincipalOrgID 条件に基づいて AWS 組織内のすべての AWS アカウントがリンクの作成や更新を信頼できるため、モニタリングアカウントシンクに適用される設定ポリシーはそれ以上の変更を必要としません。そのようなサンプルポリシーは以下の通りです:
{
    "Version": "2012-10-17",
    "Statement": [
        {
            "Effect": "Allow",
            "Principal": "*",
            "Action": ["oam:CreateLink", "oam:UpdateLink"],
            "Resource": "*",
            "Condition": {
                "ForAllValues:StringEquals": {
                    "oam:ResourceTypes": [
                        "AWS::Logs::LogGroup",
                        "AWS::CloudWatch::Metric",
                        "AWS::XRay::Trace",
                        "AWS::ApplicationInsights::Application",
                        "AWS::InternetMonitor::Monitor"
                    ]
                },
                "ForAnyValue:StringEquals": {
                    "aws:PrincipalOrgID": "${OrganizationId}" // AWS Organization as Condition
                }
            }
        }
    ]
}
ステップ 2: ソースアカウントをリンクする
個別アカウントのリンク
ステップ 1 でモニタリングアカウントを設定した後、個別の AWS ソースアカウントを設定します。このアプローチは、組織外のアカウントを扱う場合や、特定のスタンドアロンアカウントのモニタリングを確立する必要がある場合に特に有用です。AWS Organizations は複数のアカウントを管理するためのスケーラブルなソリューションを提供しますが、個別のアカウント設定では、より細かな制御と柔軟性を提供します�。
ソースアカウントの設定を進める前に、ステップ 1 で取得したモニタリングアカウントのシンク ARN をコピーしていることを確認してください。これは接続を確立するために必要となります。
個別のソースアカウントをリンクするには、以下の手順に従ってください:
-
https://console.aws.amazon.com/cloudwatch で CloudWatch コンソールを開き、クロスアカウントモニタリングアカウントを設定する AWS リージョンを選択します。このデモでは、ヨーロッパ (フランクフルト) リージョン (eu-central-1) を使用します。
-
ナビゲーションペインで、Settings を選択します。
-
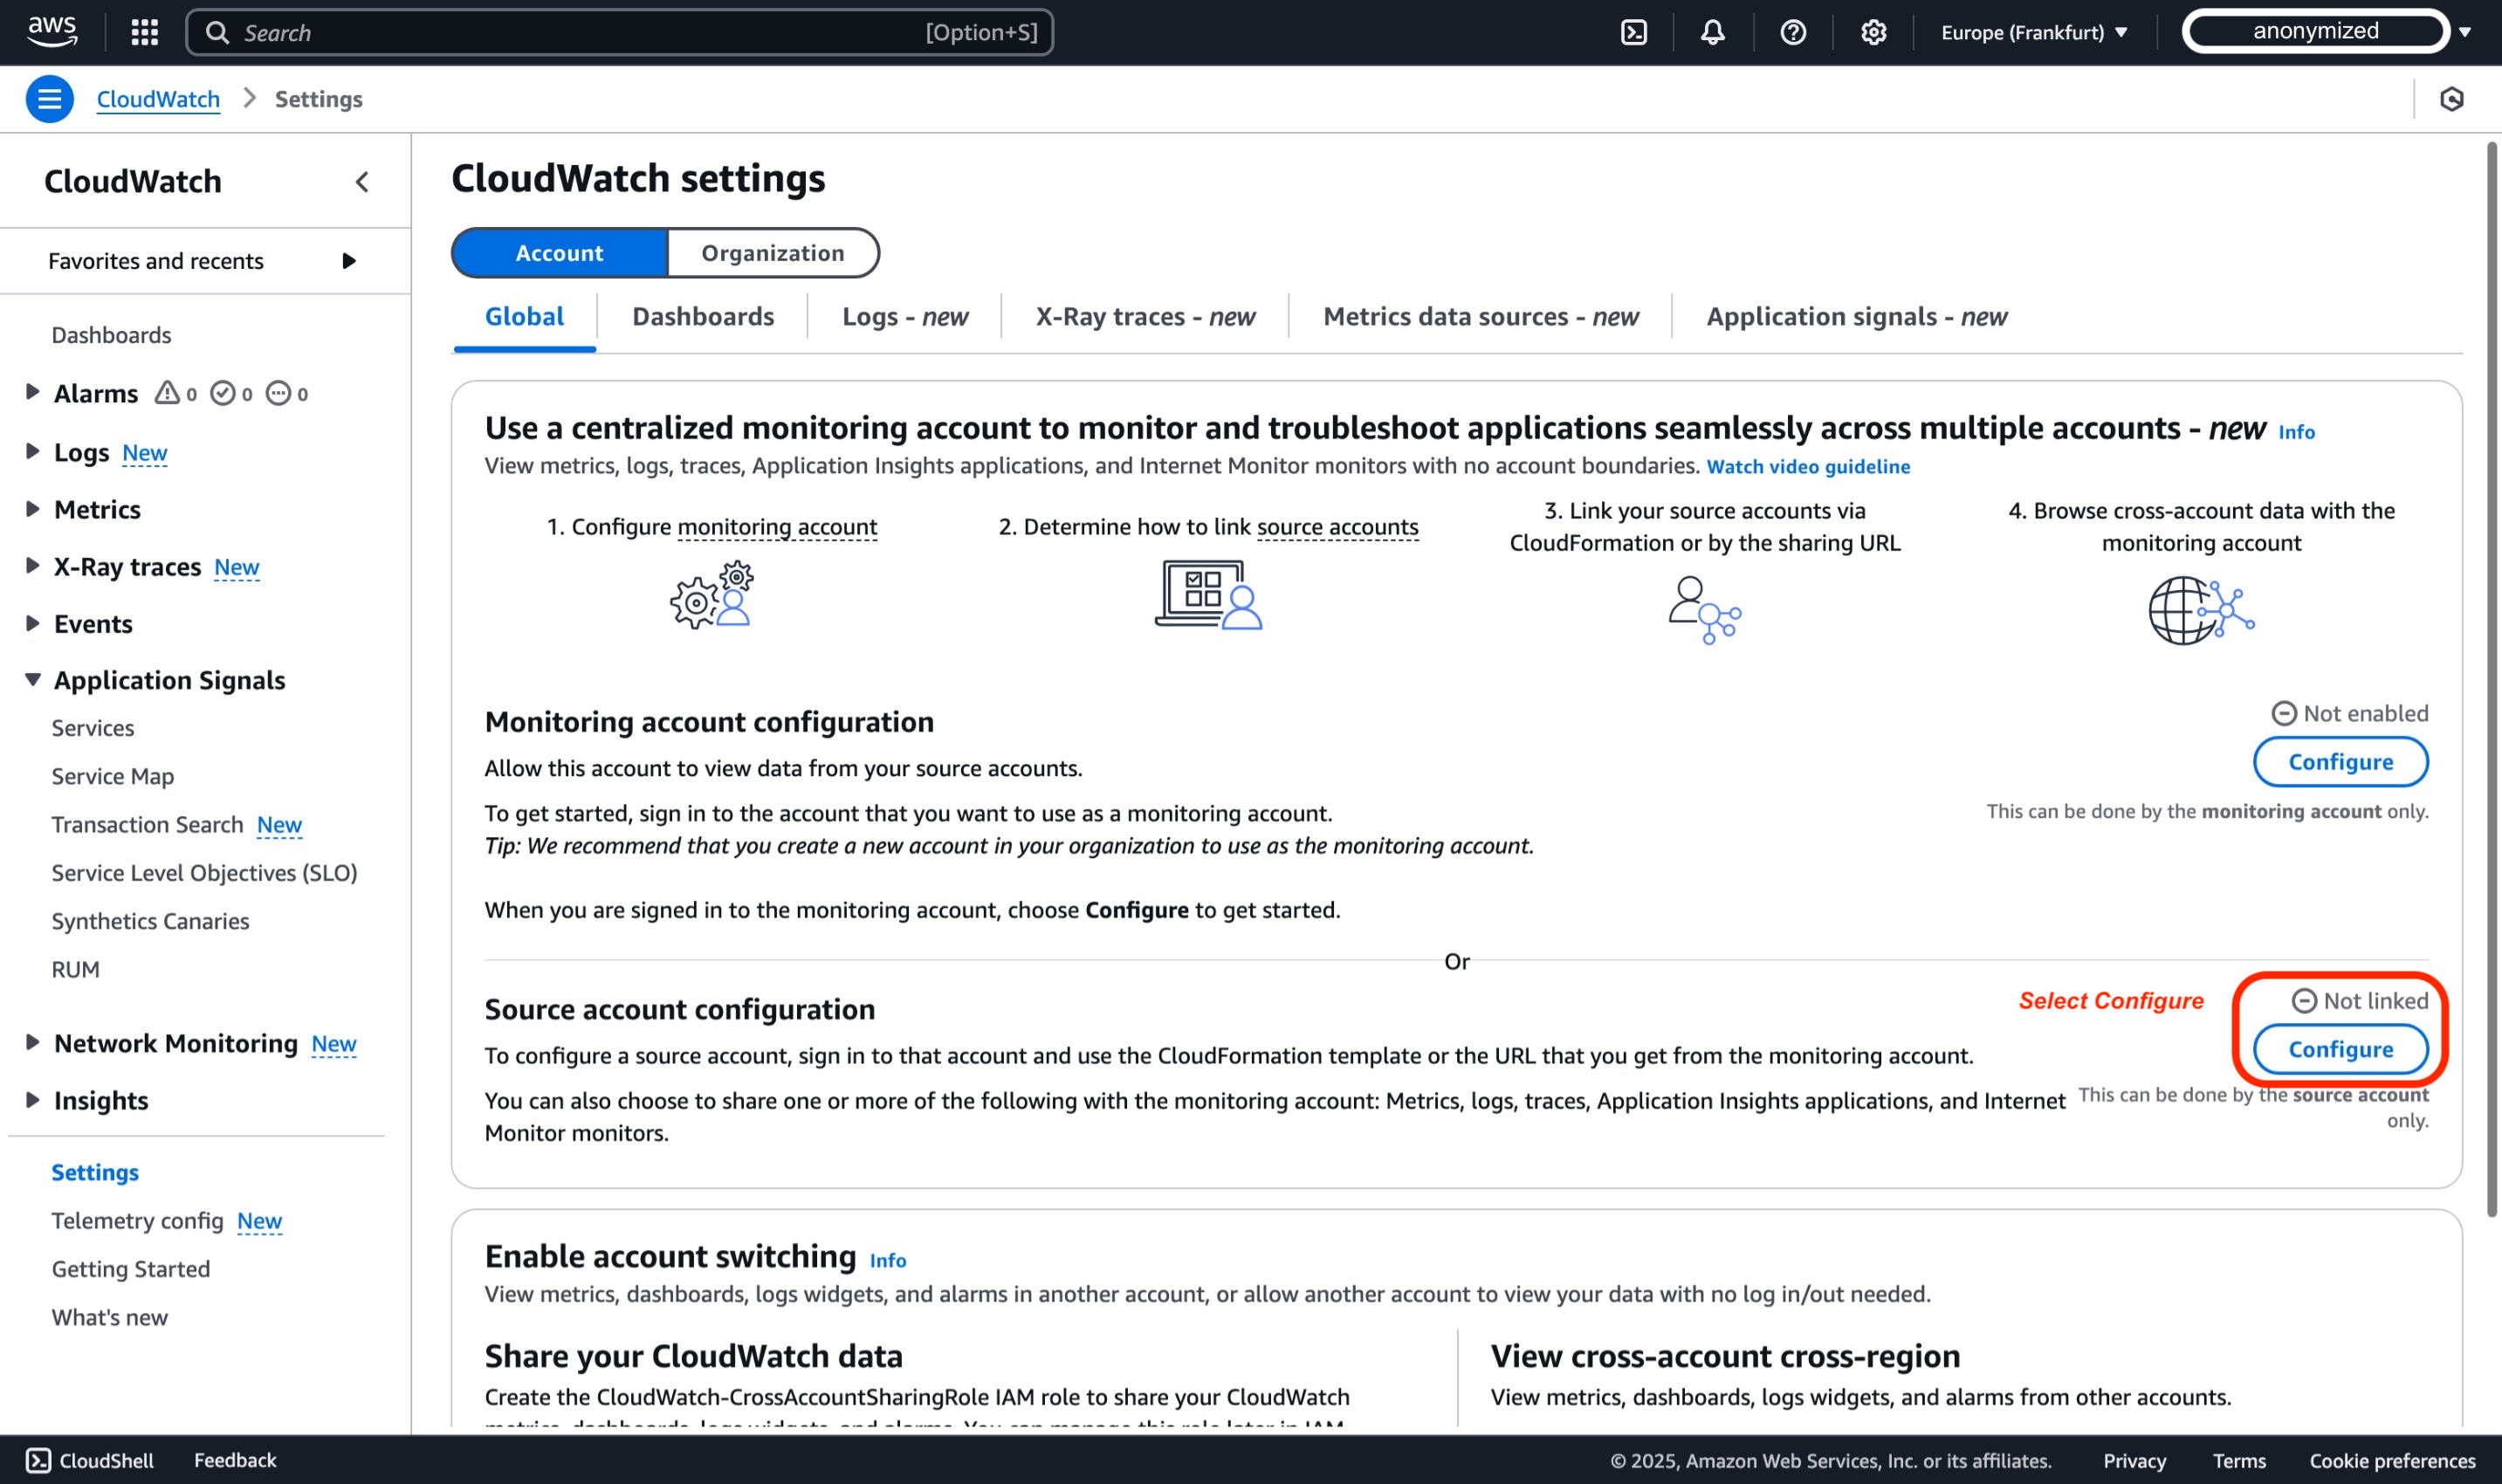
このデモでは、アカウントのグローバル設定のデフォルト設定のままにし、Source account configuration セクション内の Configure を選択します。
-
AWS コンソールで、データタイプとして Logs、Metrics、Traces を選択します�。デフォルトではすべてが共有されますが、モニタリングアカウントと共有したいログとメトリクスをフィルタリングすることで、より細かく設定することができます。リンクする前に必要な次のステップは、モニタリングアカウントの設定時にコピーしたモニタリングアカウントのシンク ARN を入力することです。
-
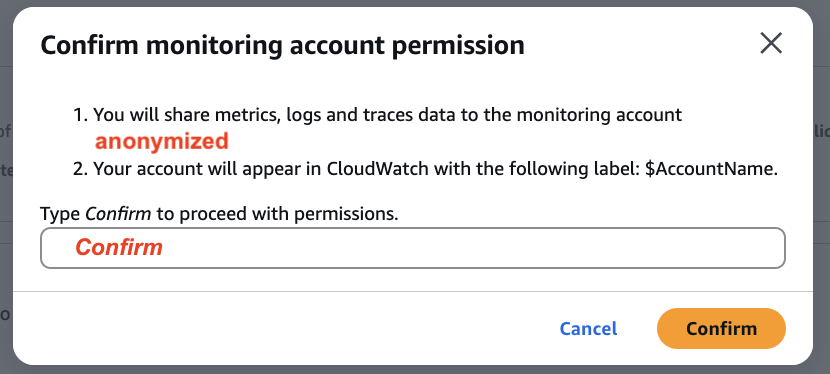
ソースアカウントの設定を完了する前の最後のステップは、ソースアカウントのデータがモニタリングアカウントと共有されることを確認することです。ポップアップボックスに「Confirm」と入力してこのアクションを確認します。
-
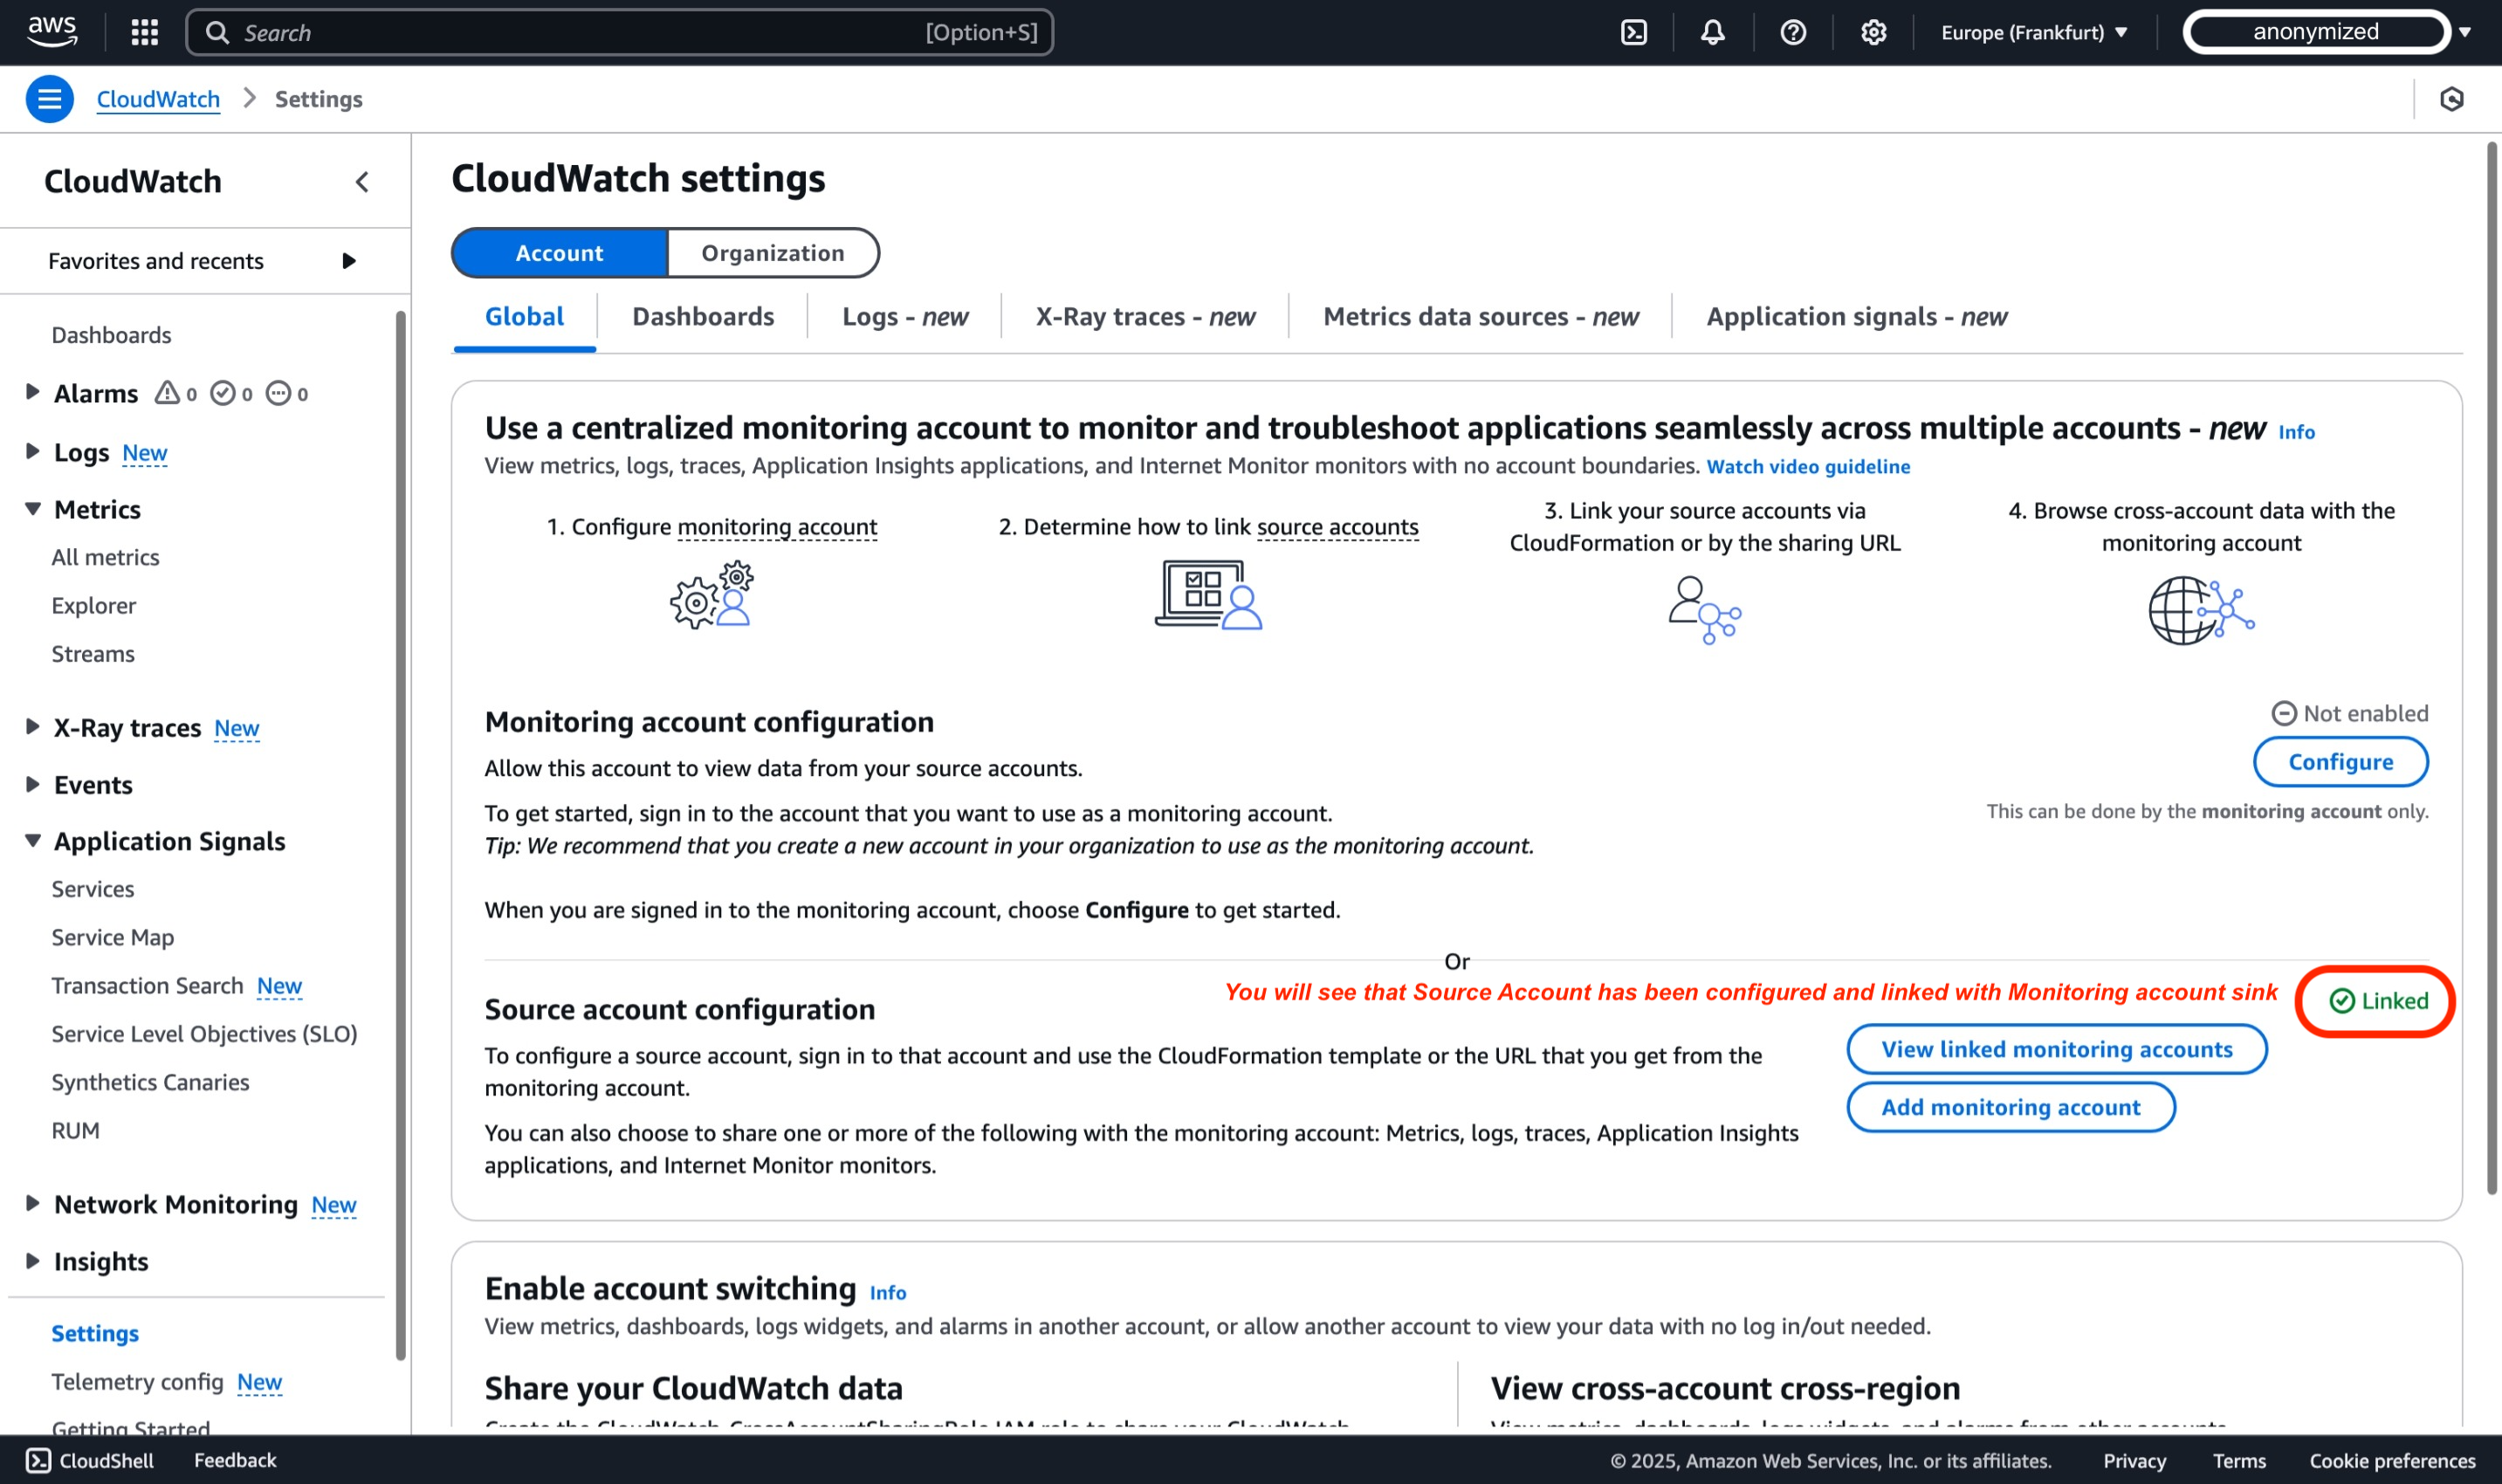
AWS コンソールの「Source account configuration」セクションで、アカウントが「linked」状態であることを示す緑色のステータスが表示されるはずです。
ステップ 2 を WorkloadAcc2 でも繰り返し、両方のワークロードアカウントからのオブザーバビリティテレメトリがモニタリングアカウントと共有されるようにします。
Step 3: 設定の検証
モニタリングアカウントにログインしていることを確認してください
-
https://console.aws.amazon.com/cloudwatch で CloudWatch コンソールを開き、Step 1 でクロスアカウントモニタリングを設定した AWS リージョンを選択します。このデモでは、ヨーロッパ (フランクフルト) リージョン (eu-central-1) を使用します。
-
ナビゲーションペインで、設定 を選択します。
-
モニタリングアカウントの設定 セクション内の モニタリングアカウントの管理 を選択します。

-
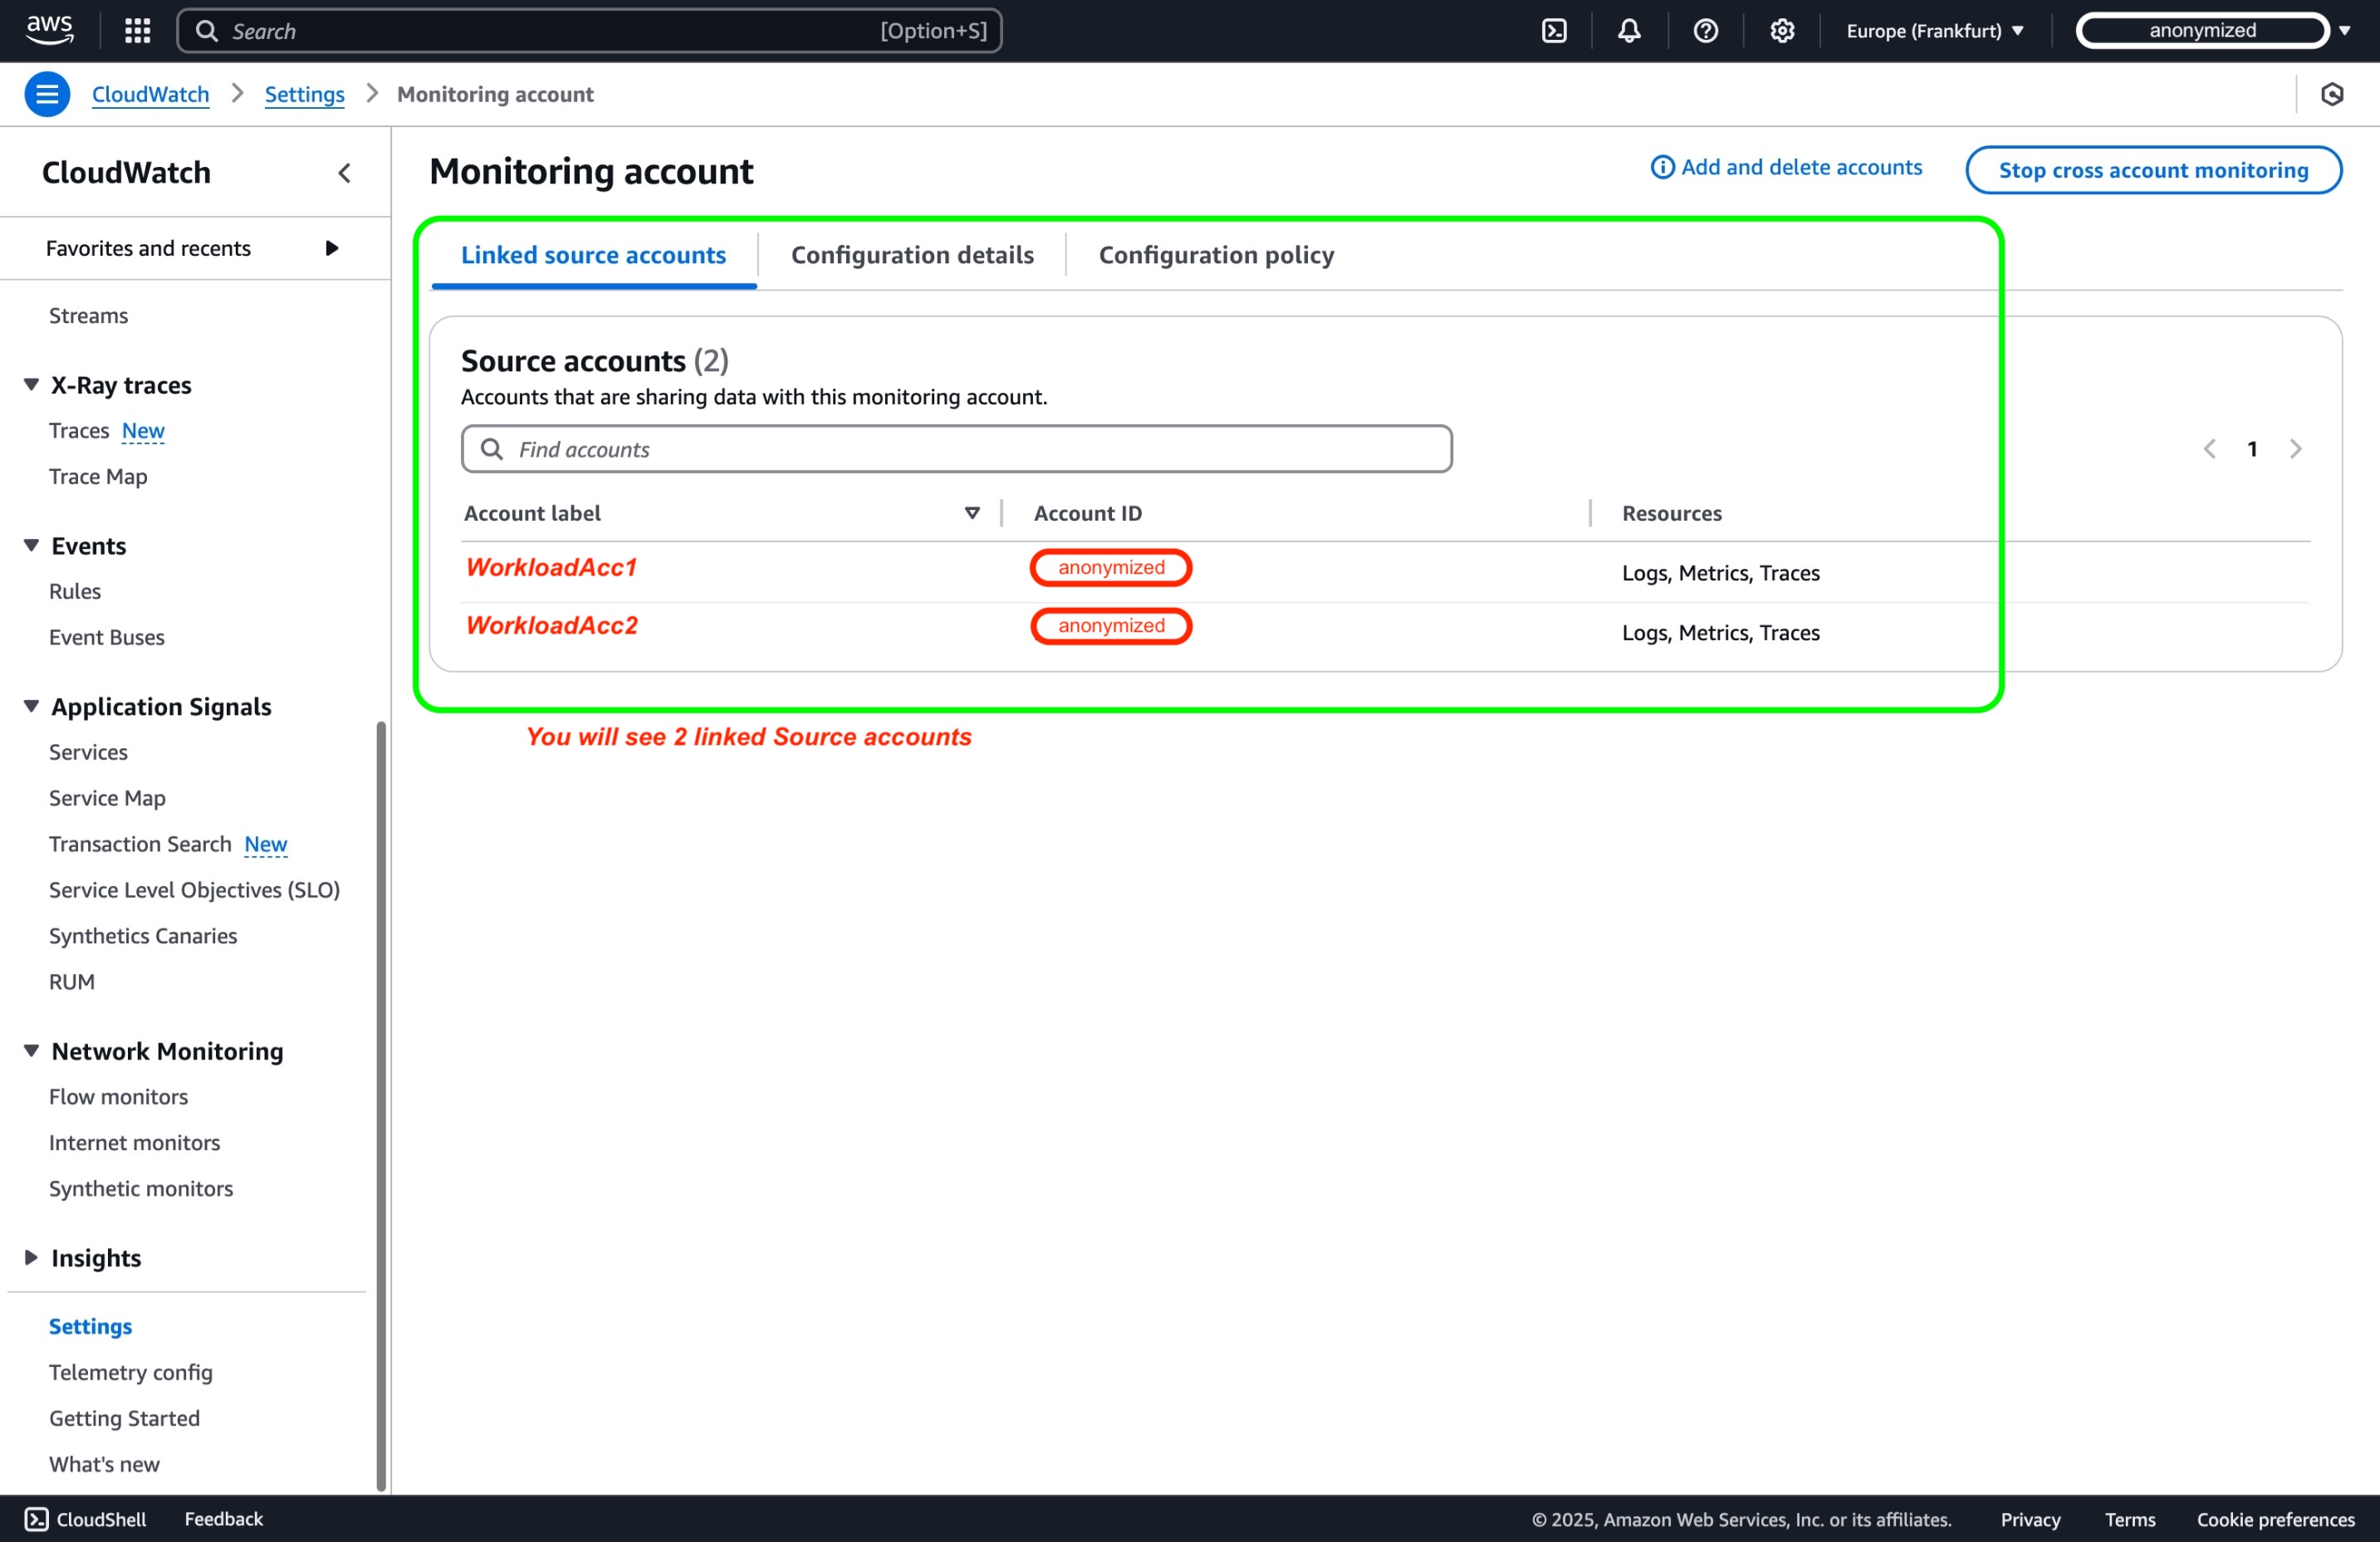
モニタリングアカウントの設定ページのリンクされたソースアカウントペインで、ソースアカウント としてリンクされた 2 つのワークロードアカウントが表示されます。
代替案: AWS Organizations の統合
AWS CloudWatch のクロスアカウントオブザーバビリティにより、リージョン内の複数の AWS アカウントにまたがるアプリケーションの一元的な監視とトラブルシューティングが可能になります。 AWS Organizations を統合することで、セットアップを効率化し、すべてのアカウントにわたる設定を自動化できます。 この方法により、組織内の多数のアカウントにわたるモニタリングを効率的に処理できます。
前提条件:
- AWS Organizations が有効化され、メンバーアカウントが適切に含まれていること4。
- リンクを作成するための適切な CloudFormation アクションを許可された IAM ロールを含む、子アカウントで AWS CloudFormation StackSets5 をデプロイする権限があること3。
- 組織内(または特定の OU)のソースアカウントがオブザーバビリティリンクを作成および更新することを許可するように設定されたモニタリングアカウントがあること6。
AWS CloudFormation StackSets は、すべてのメンバーアカウントで必要なサービスにリンクされたロールとオブザーバビリティ設定のデプロイを自動化します。 自動デプロイを有効にすると、新しく作成された AWS アカウントは必要なオブザーバビリティ設定を自動的に継承し、AWS 環境全体で統一されたモニタリング手法を維持しながら管理のオーバーヘッドを削減します。
IAM 権限、StackSet テンプレートのサンプル、モニタリングポリシーを含むステップバイステップの実装ガイドについては、AWS の公式ドキュメント7を参照してください。
ビデオチュートリアル
クロスアカウントのオブザーバビリティ設定の詳細な手順については、AWS の公式 YouTube ガイド「Enable Cross-Account Observability in Amazon CloudWatch | Amazon Web Services」もご覧いただけます。このチュートリアルでは、集中監視アカウントの設定方法、複数のソースアカウントのリンク方法、CloudWatch コンソール内での共有オブザーバビリティデータの探索方法を視覚的に説明しています。
クロスアカウントのテレメトリーデータのクエリ
モニタリングアカウントにログインしていることを確認してください
Observability One Workshop8 の PetAdoption アプリケーションを再利用します。このデモでは、クロスアカウントのオブザーバビリティを説明するために、両方のワークロードアカウントにデプロイされています。
メトリクス
複数のアカウントのメトリクスを一元的な場所でモニタリングするには:
-
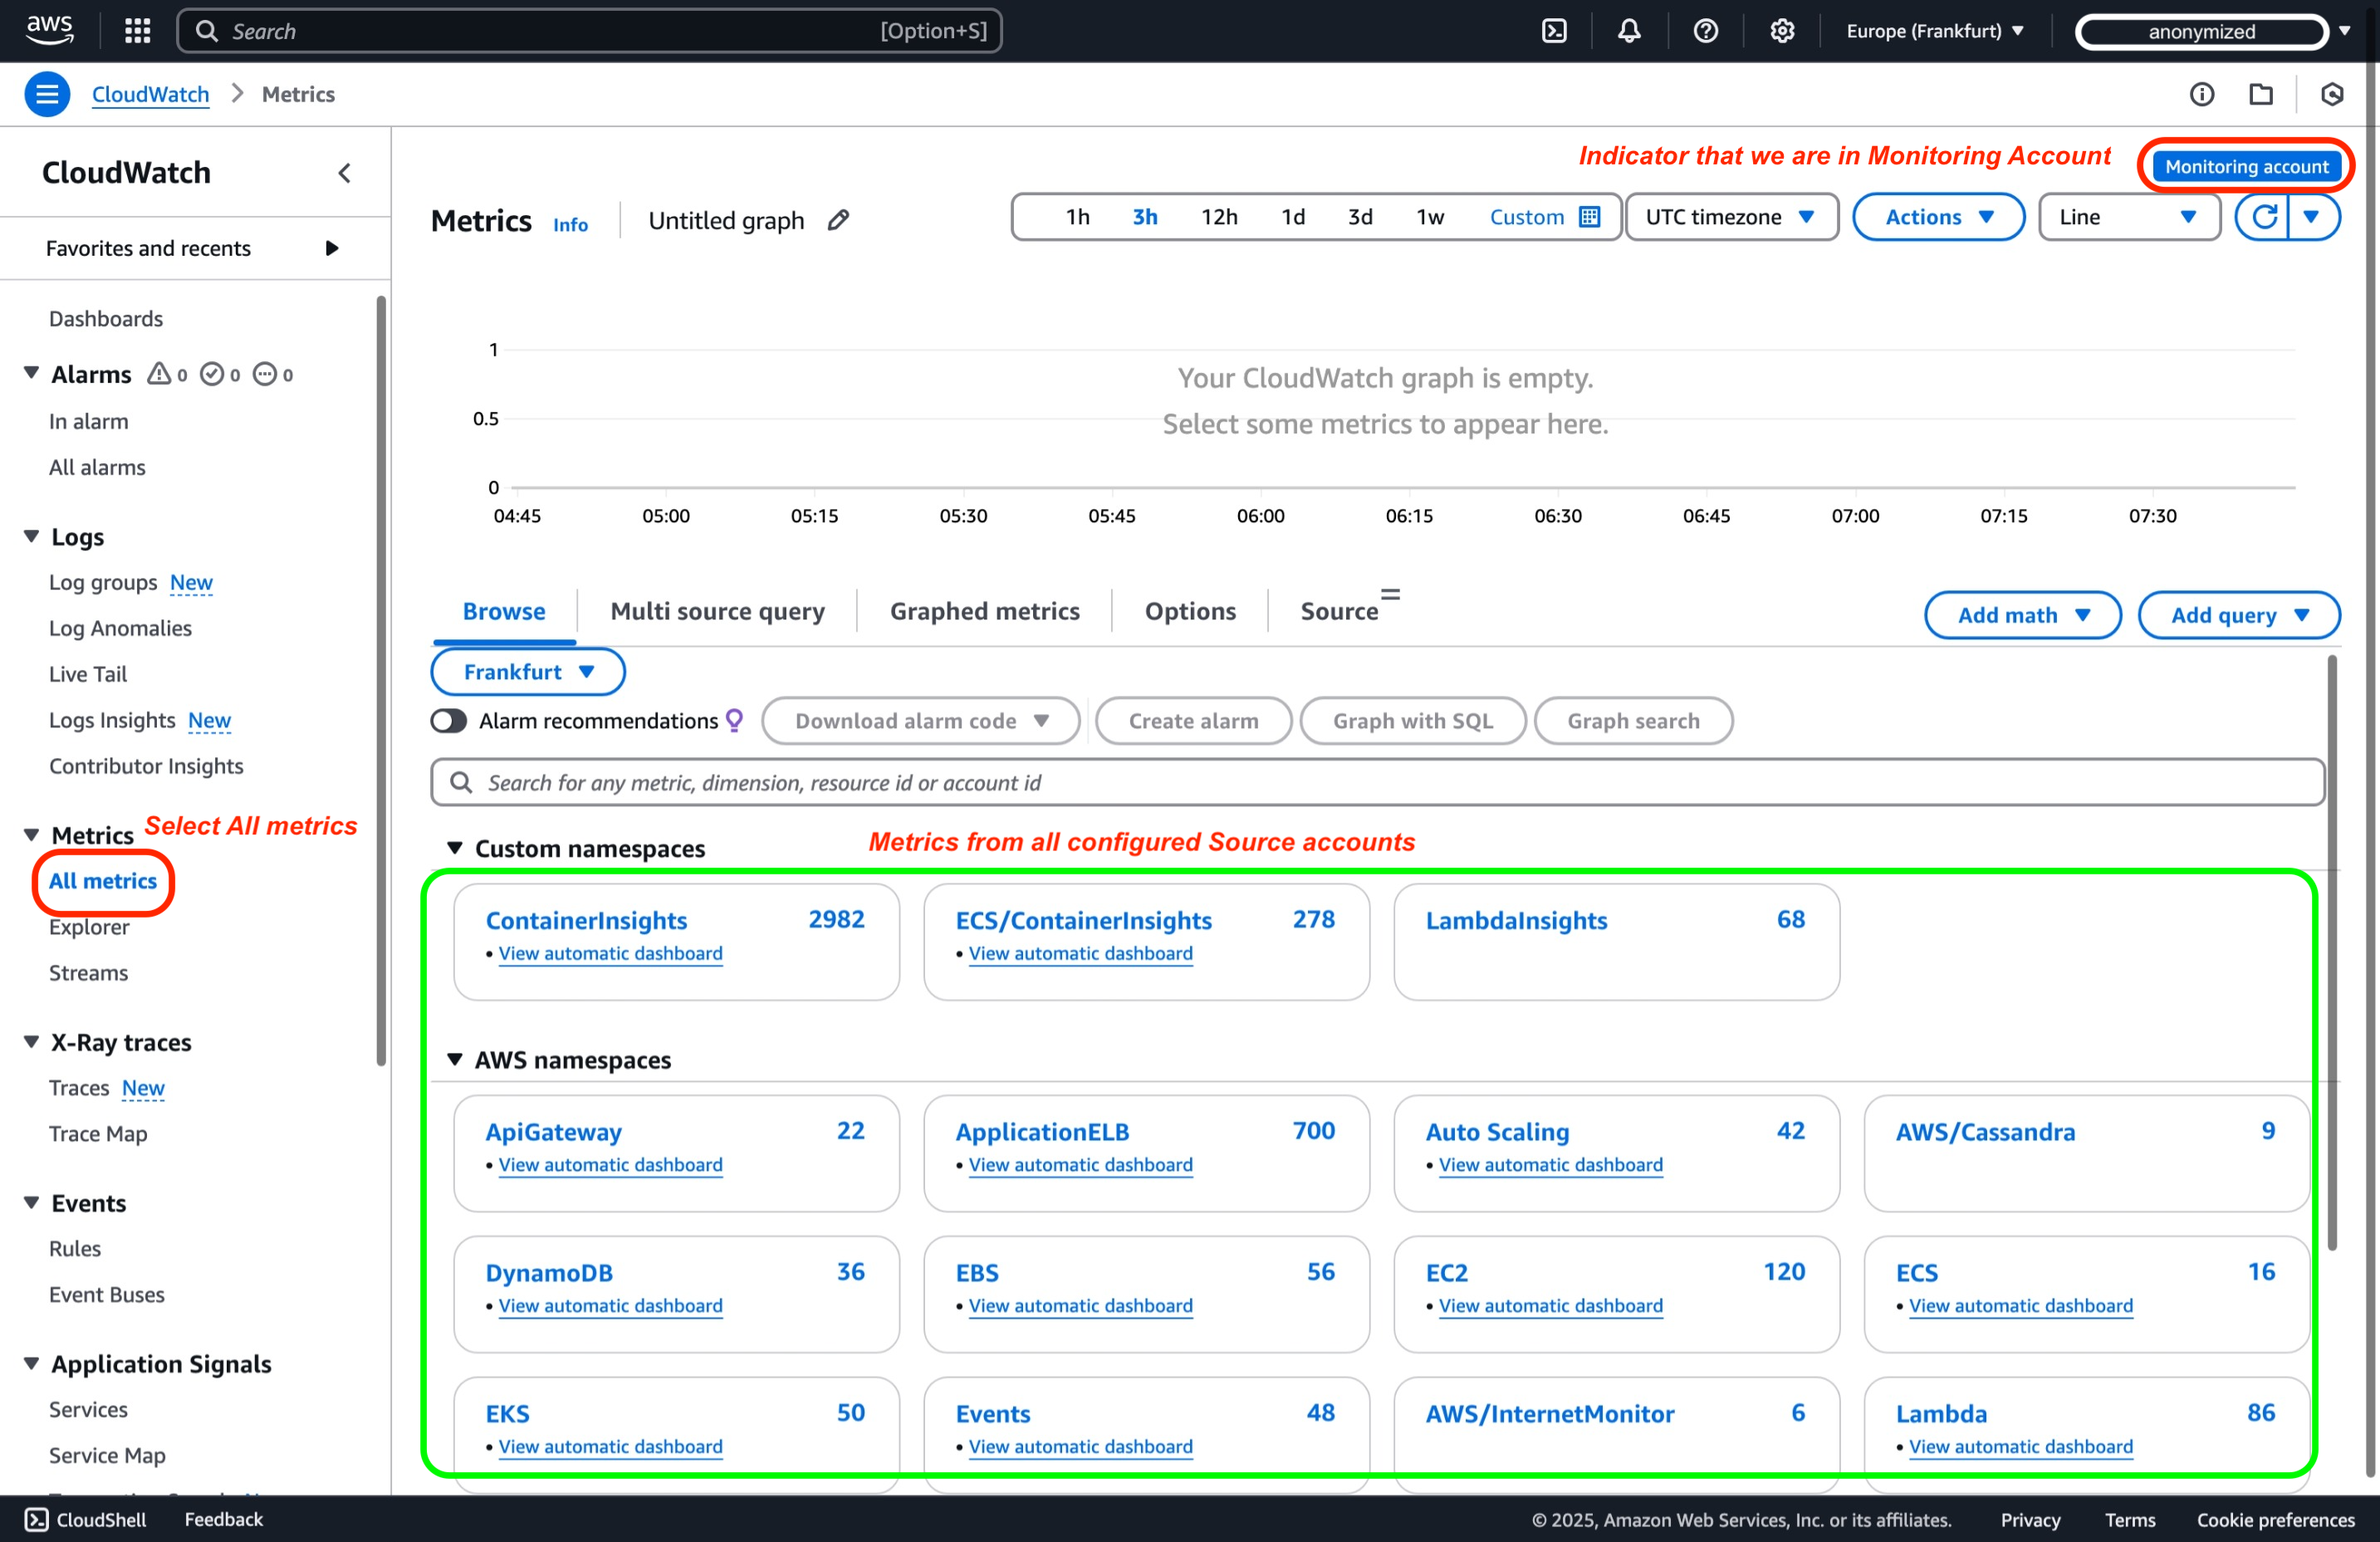
モニタリングアカウントの CloudWatch コンソールで、左側のナビゲーションペインの「すべてのメトリクス」に移動します。これにより、リンクされたすべてのソースアカウントのメトリクスを表示できます。
-
アカウント ID フィルター
:aws.AccountId=を使用して特定のアカウントのメトリクスをフィルタリングするか、名前空間とディメンションを選択して詳細を確認できます。このデモの範囲では、View Metrics in Observability One Workshop8 のガイドに従いましょう。ContainerInsights 名前空間を選択し、ClusterName、Namespace、PodName のディメンションを選択します。次に、メトリクス名 pod_cpu_utilization でフィルタリングします。グラフ化できる両方のワークロードアカウントからのメトリクスが表示されていることがわかります。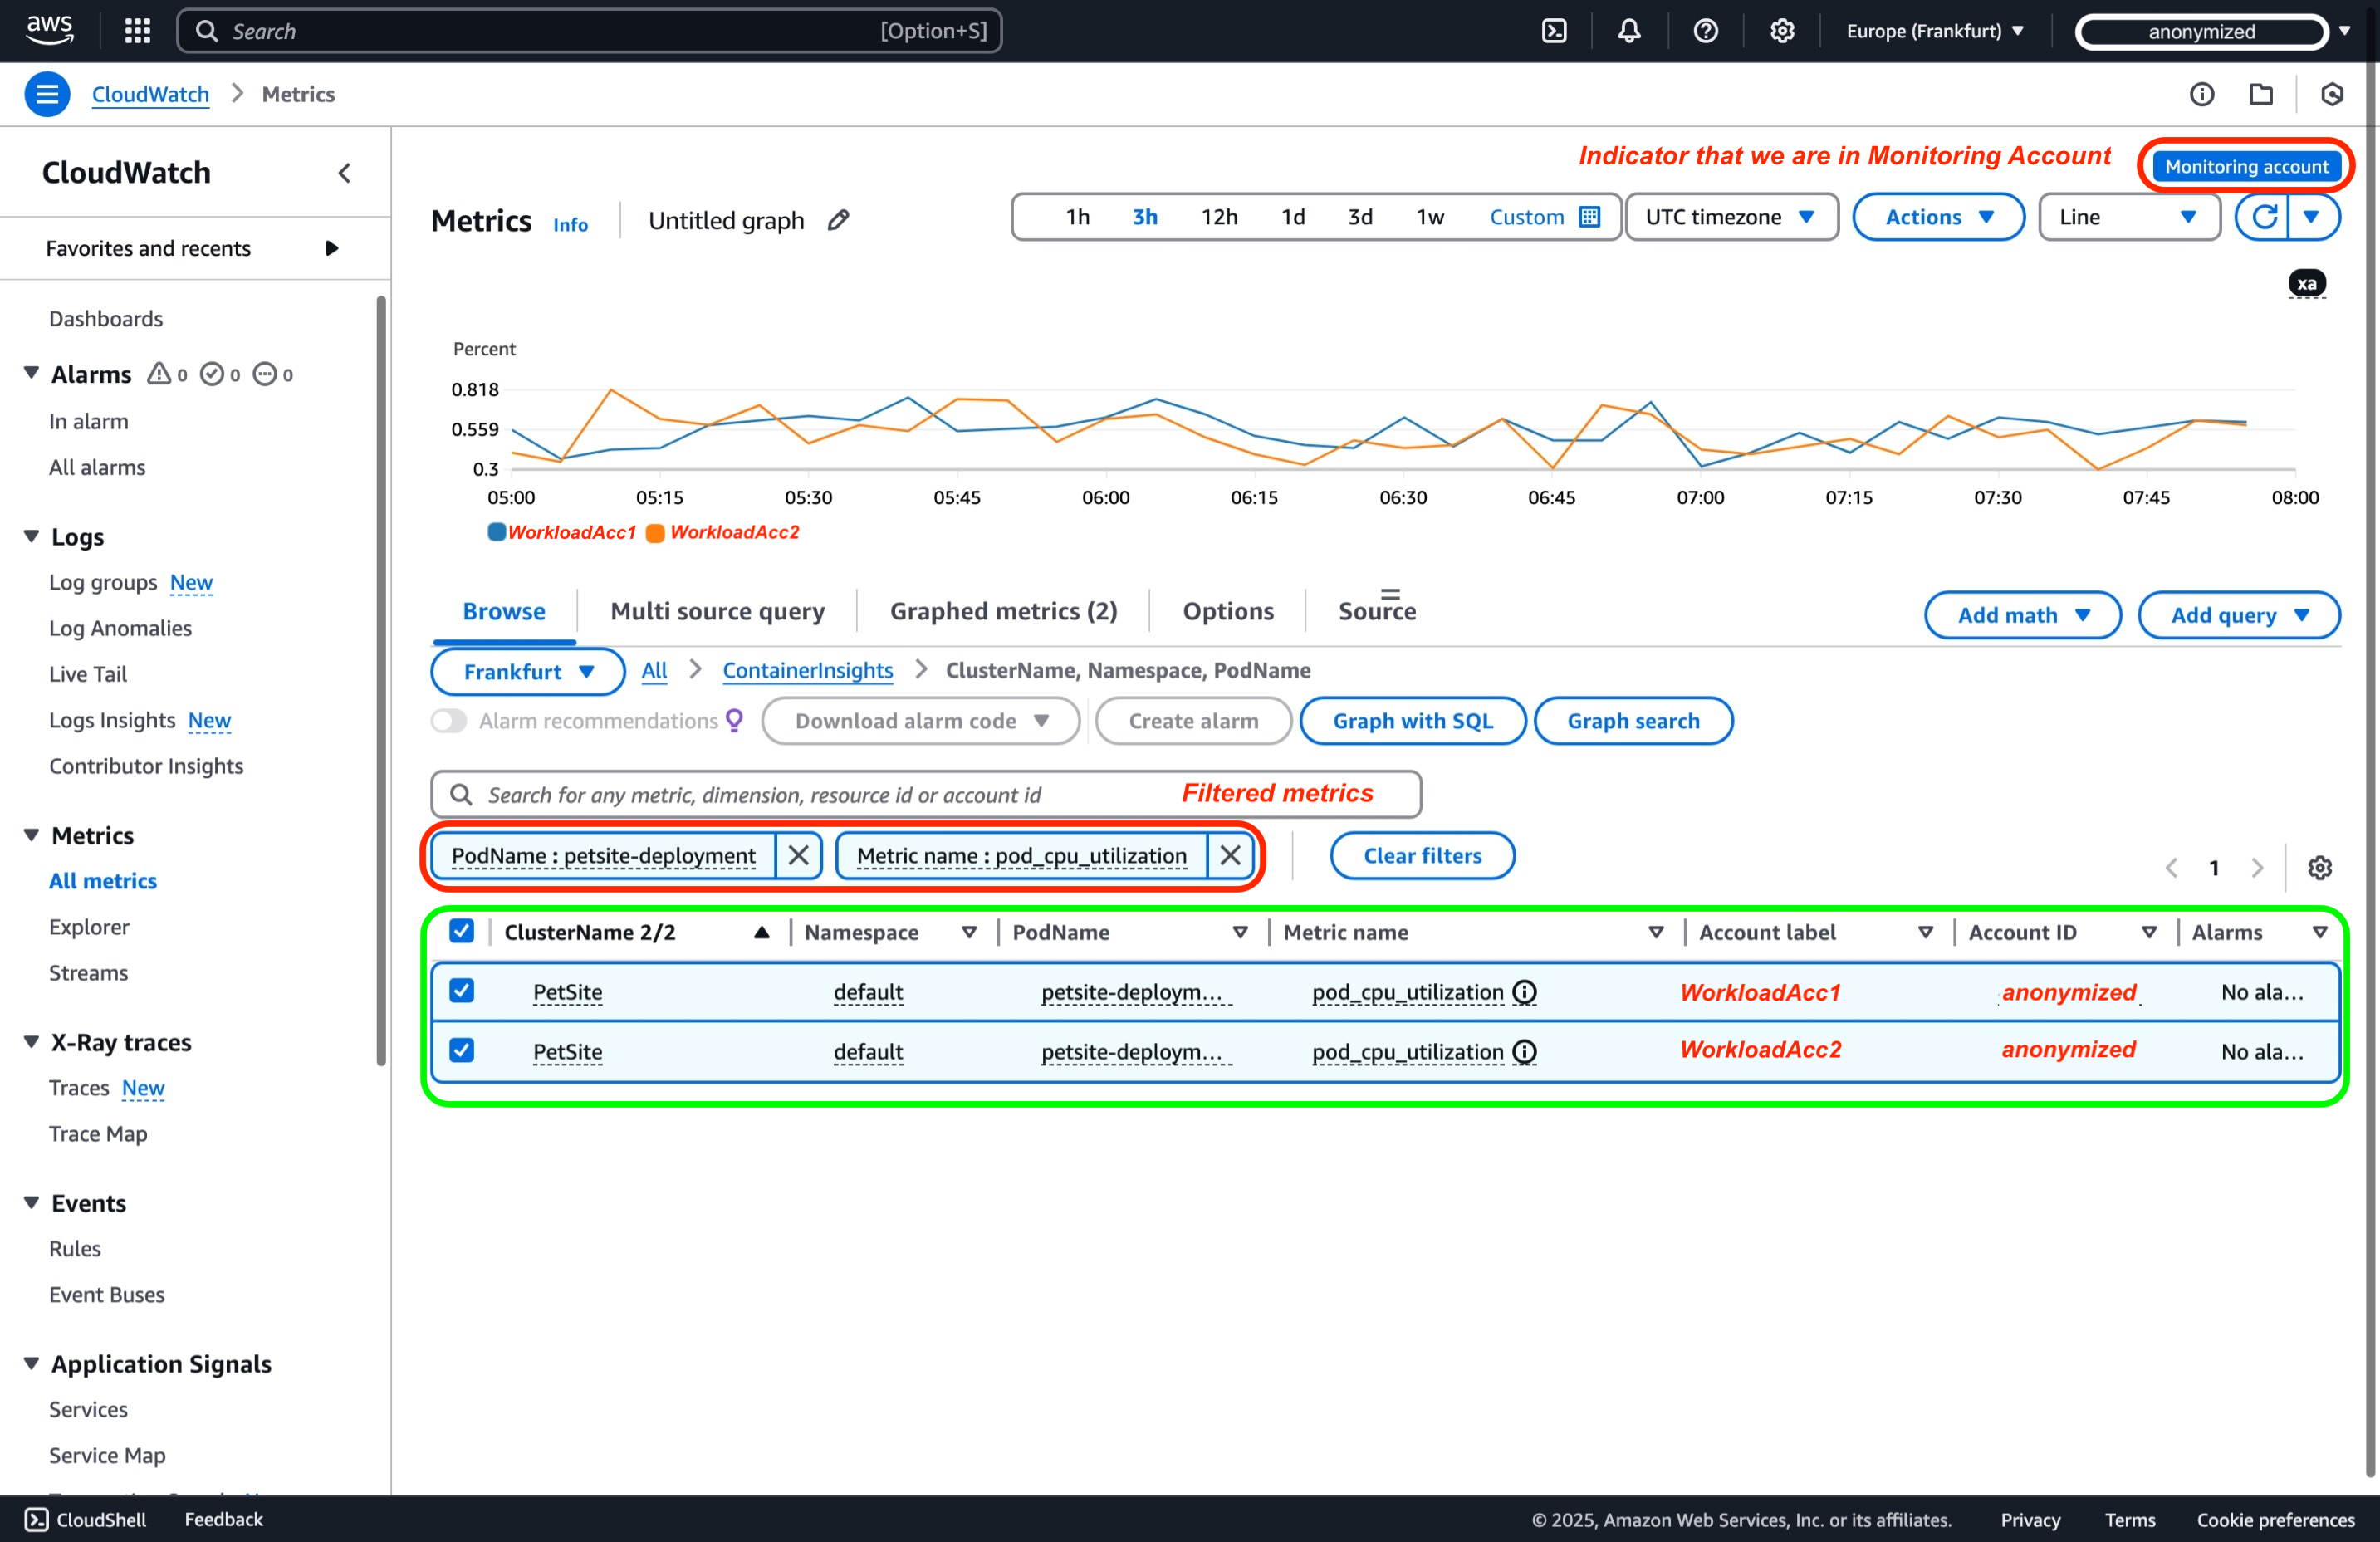
アラーム
Amazon CloudWatch クロスアカウントアラーム9 を使用すると、モニタリングアカウントから複数の AWS アカウントにまたがってメトリクスを監視できます。
単一のメトリクスや数式の出力を監視するメトリクスアラームと、複数のアラーム(他のコンポジットアラームを含む)の状態を評価するコンポジットアラームを作成できます。
例えば、本番環境のすべてのアカウントで CPU 使用率が 80% を超えた場合にアラームをトリガーするように設定できます。
アラームがトリガーされると、Amazon SNS 通知の送信や AWS Lambda 関数の�呼び出しなどのアクションを実行でき、タイムリーなアラートを受け取り、事前に対応することができます。
モニタリングアカウントでアラーム作成を一元化することで、アラートを効率化し、ワークロードの統合された運用ビューを得ることができます。
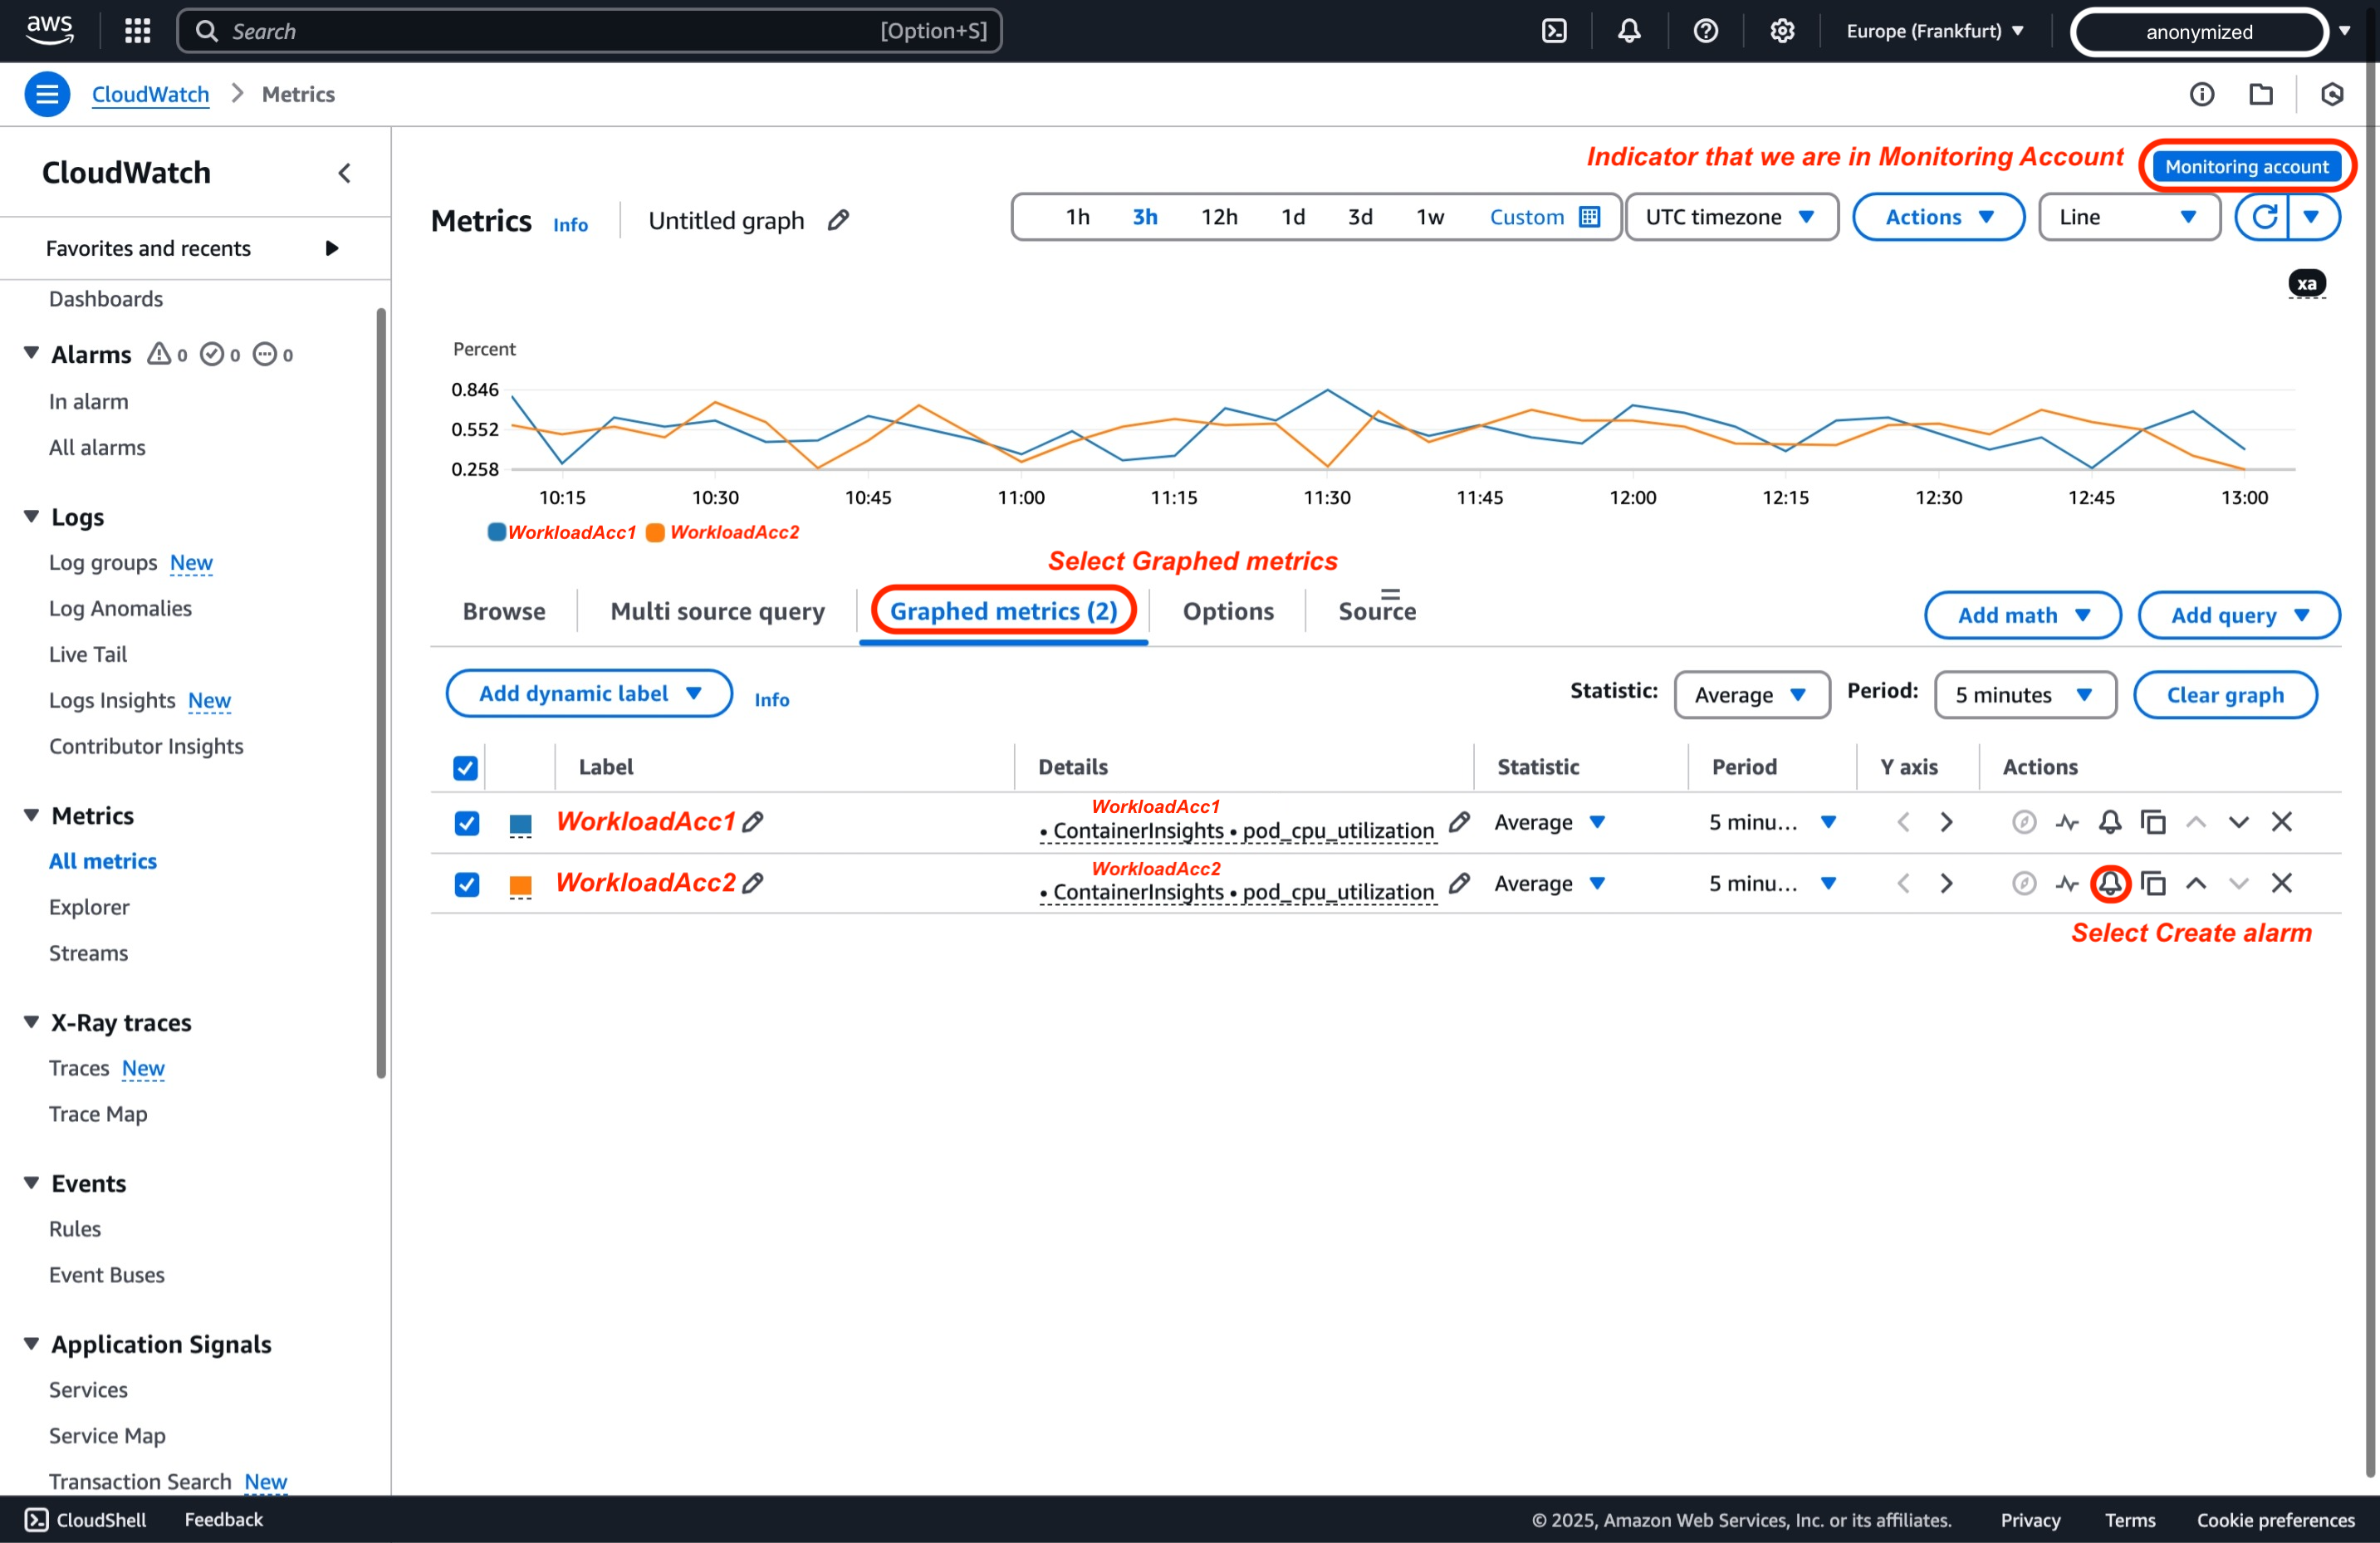
メトリクス の前のステップから続いて、「グラフ化されたメトリクス」を選択し、「アラームの作成」を選択することで、特定のメトリクスのアラームを作成できます。
ログ
Logs Insights を使用すると、複数のアカウントのログを単一のインターフェースで照会および分析したり、ライブテイルでログを確認したりできます。以下は、Logs Insights を使用してアカウント間でログを照会する方法です:
-
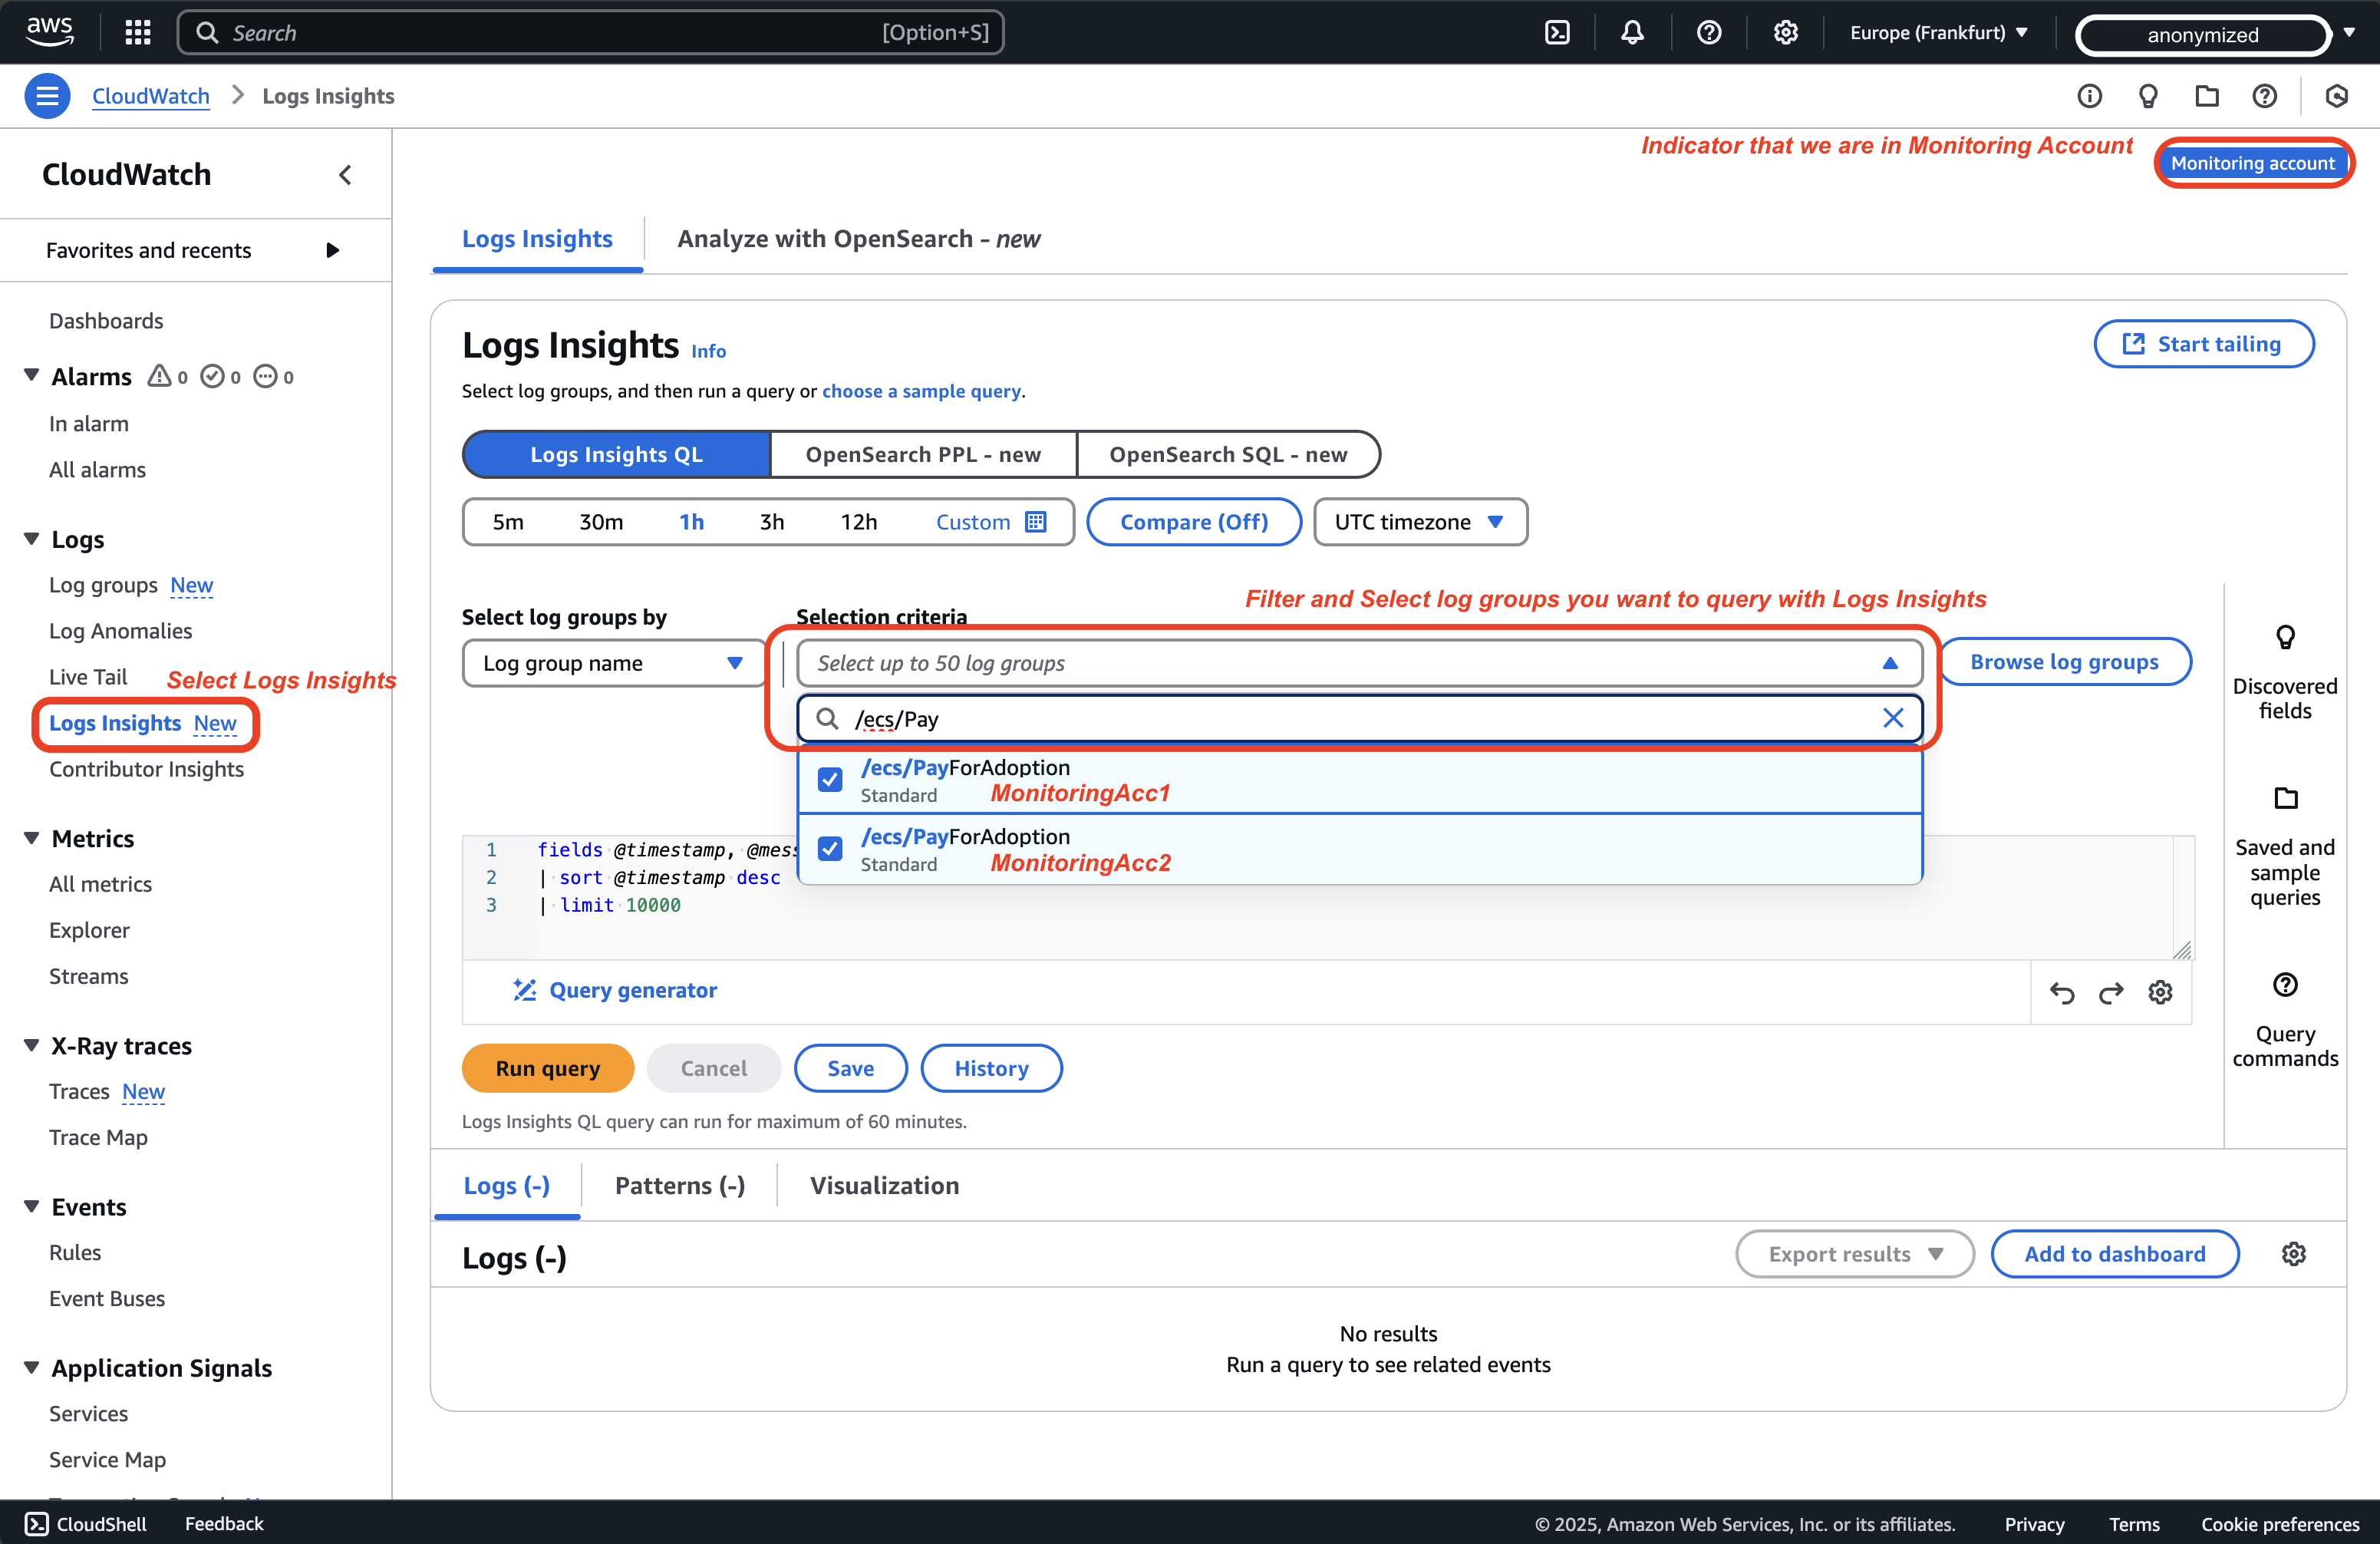
CloudWatch コンソールで「Logs Insights」に移動し、ロググループセレクターを使用して異なるアカウントからロググループを選択します。
-
次のステップは CloudWatch Logs Insights クエリを作成することです。このデモでは、One Observability Workshop8 の AWS ネイティブオブザーバビリティのサブセクション Logs Insight からクエリを取得し、少し修正します。過去数時間で、ワークロードアカウントごとに何種類のペットが採用され、その数がどれくらいだったかを確認します。
filter @message like /POST/ and @message like /completeadoption/
| parse @message "* * * *:* *" as method, request, protocol, ip, port, status
| parse request "*?petId=*&petType=*" as requestURL, id, type
| parse @log "*:*" as accountId, logGroupName // Modified to parse accountId from @log information
| stats count() by type,accountId // Modified to group by previously parsed accountId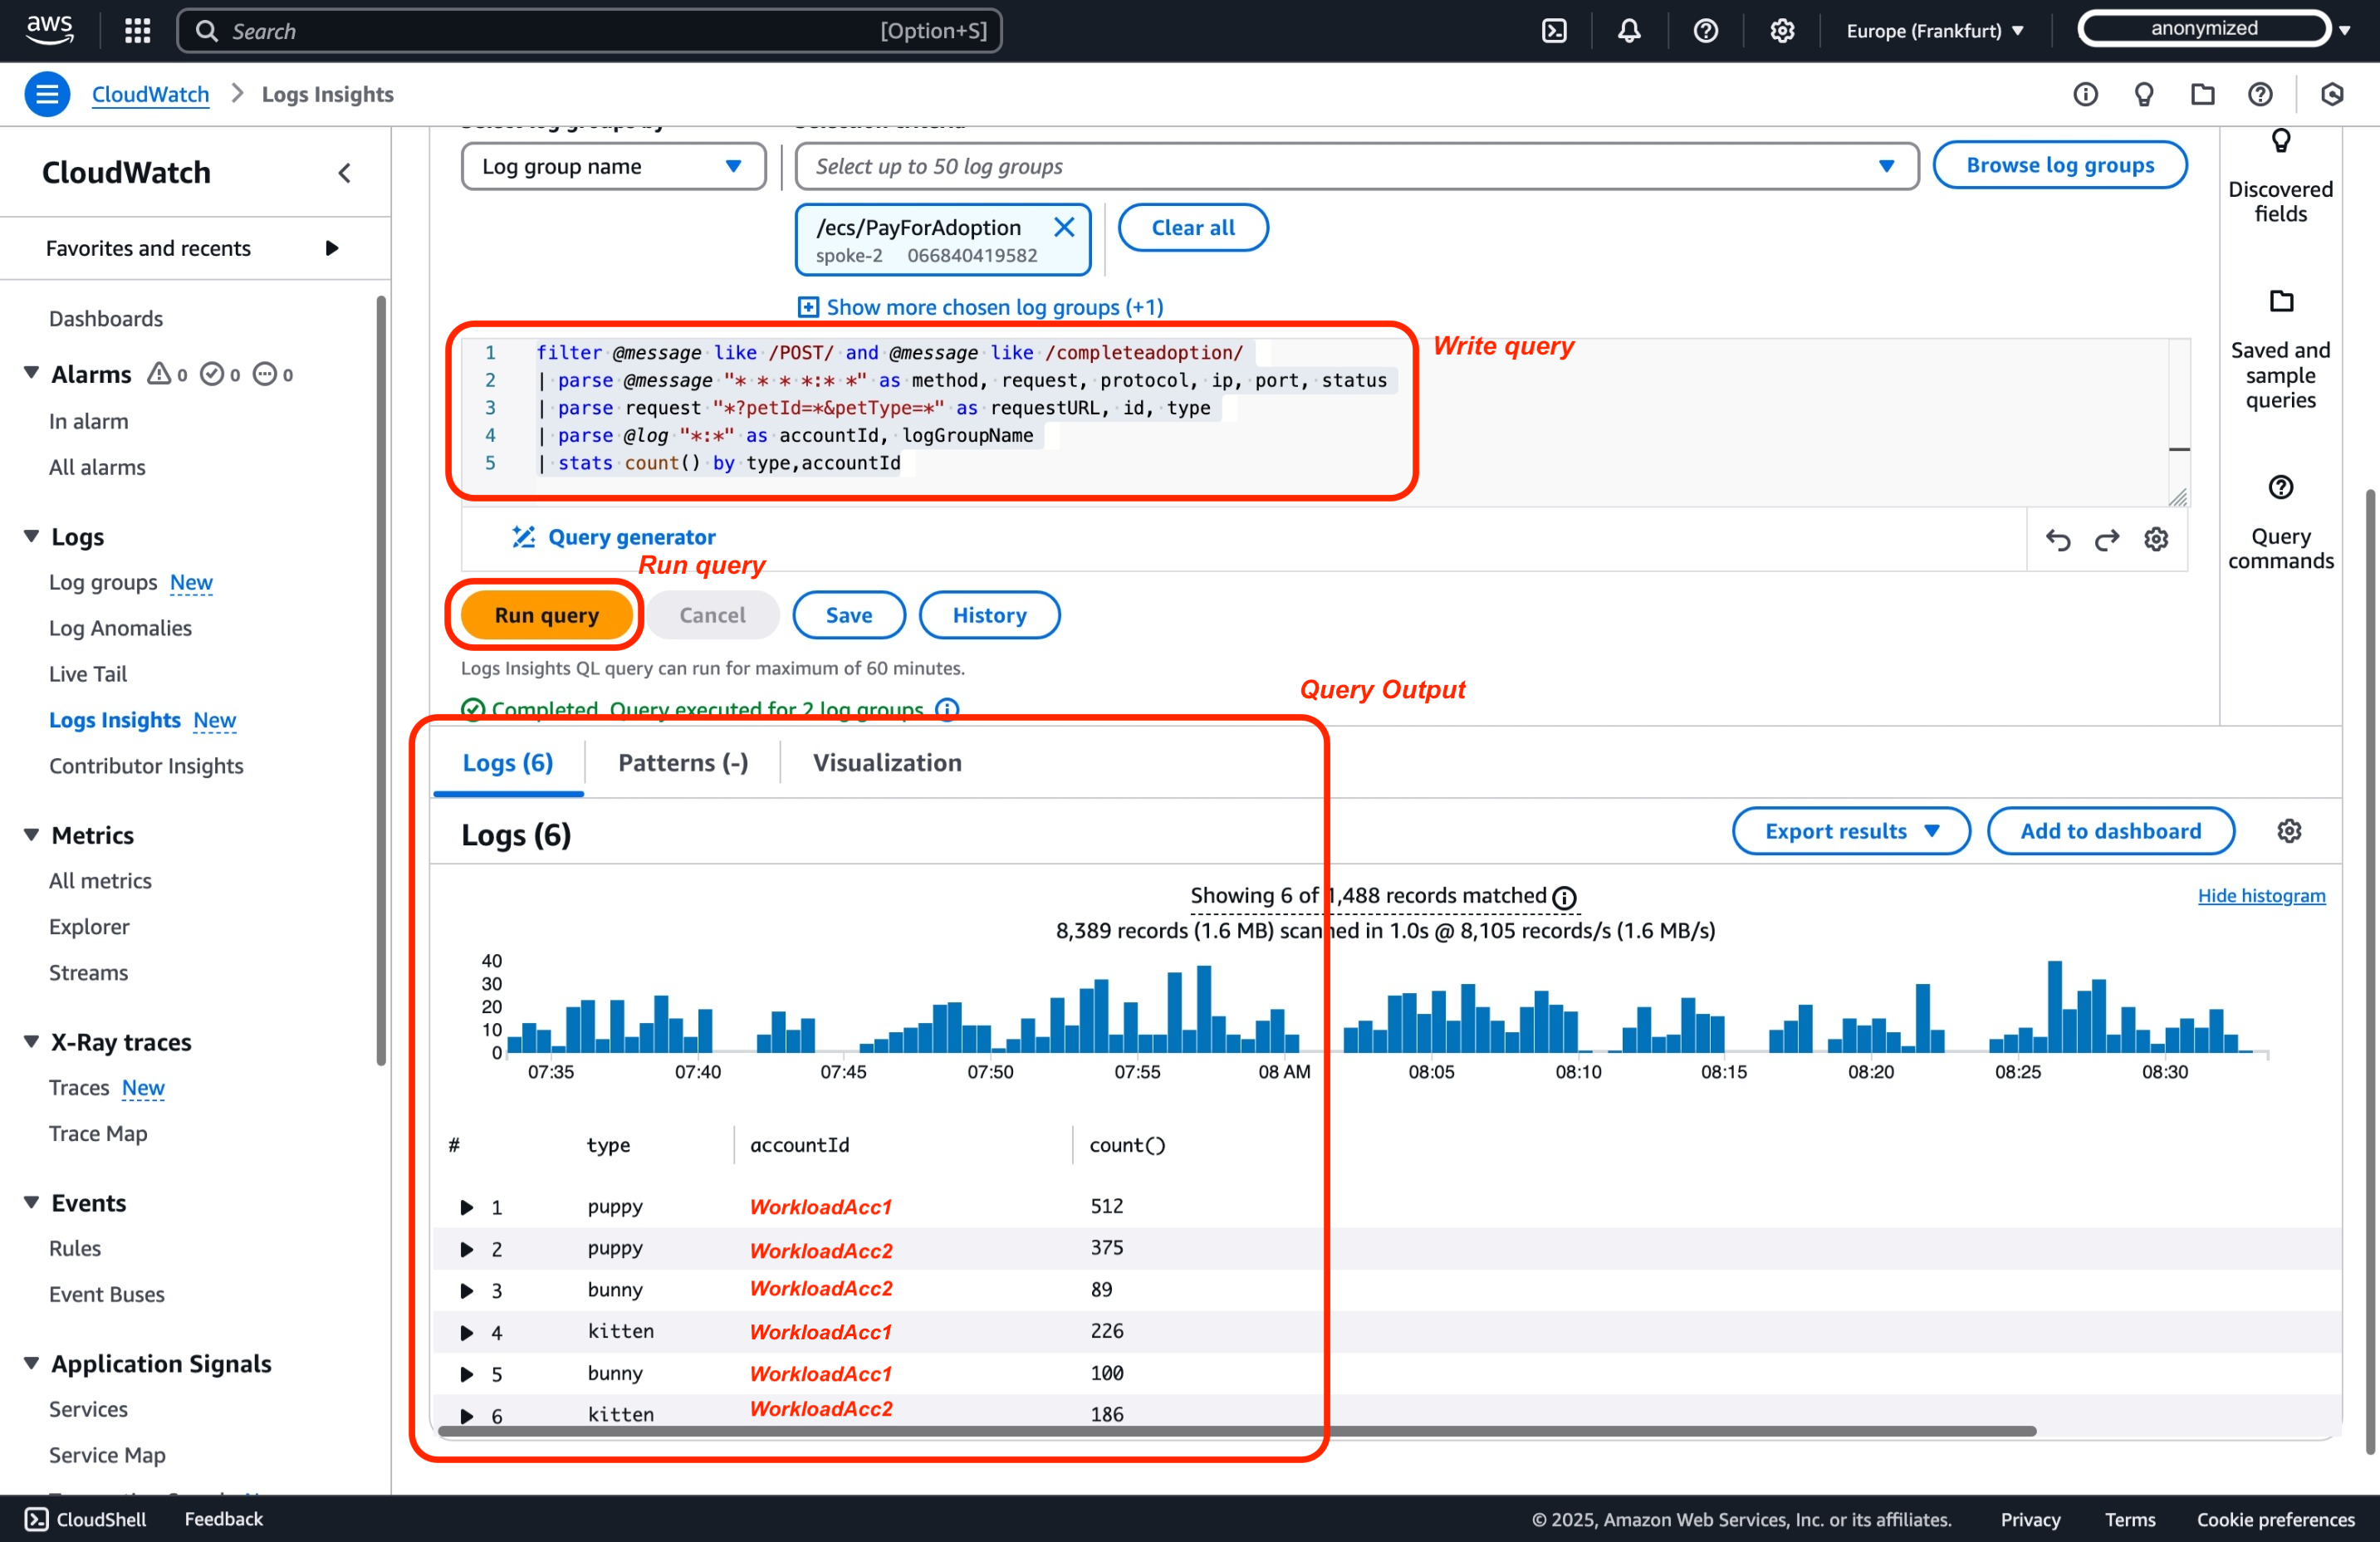
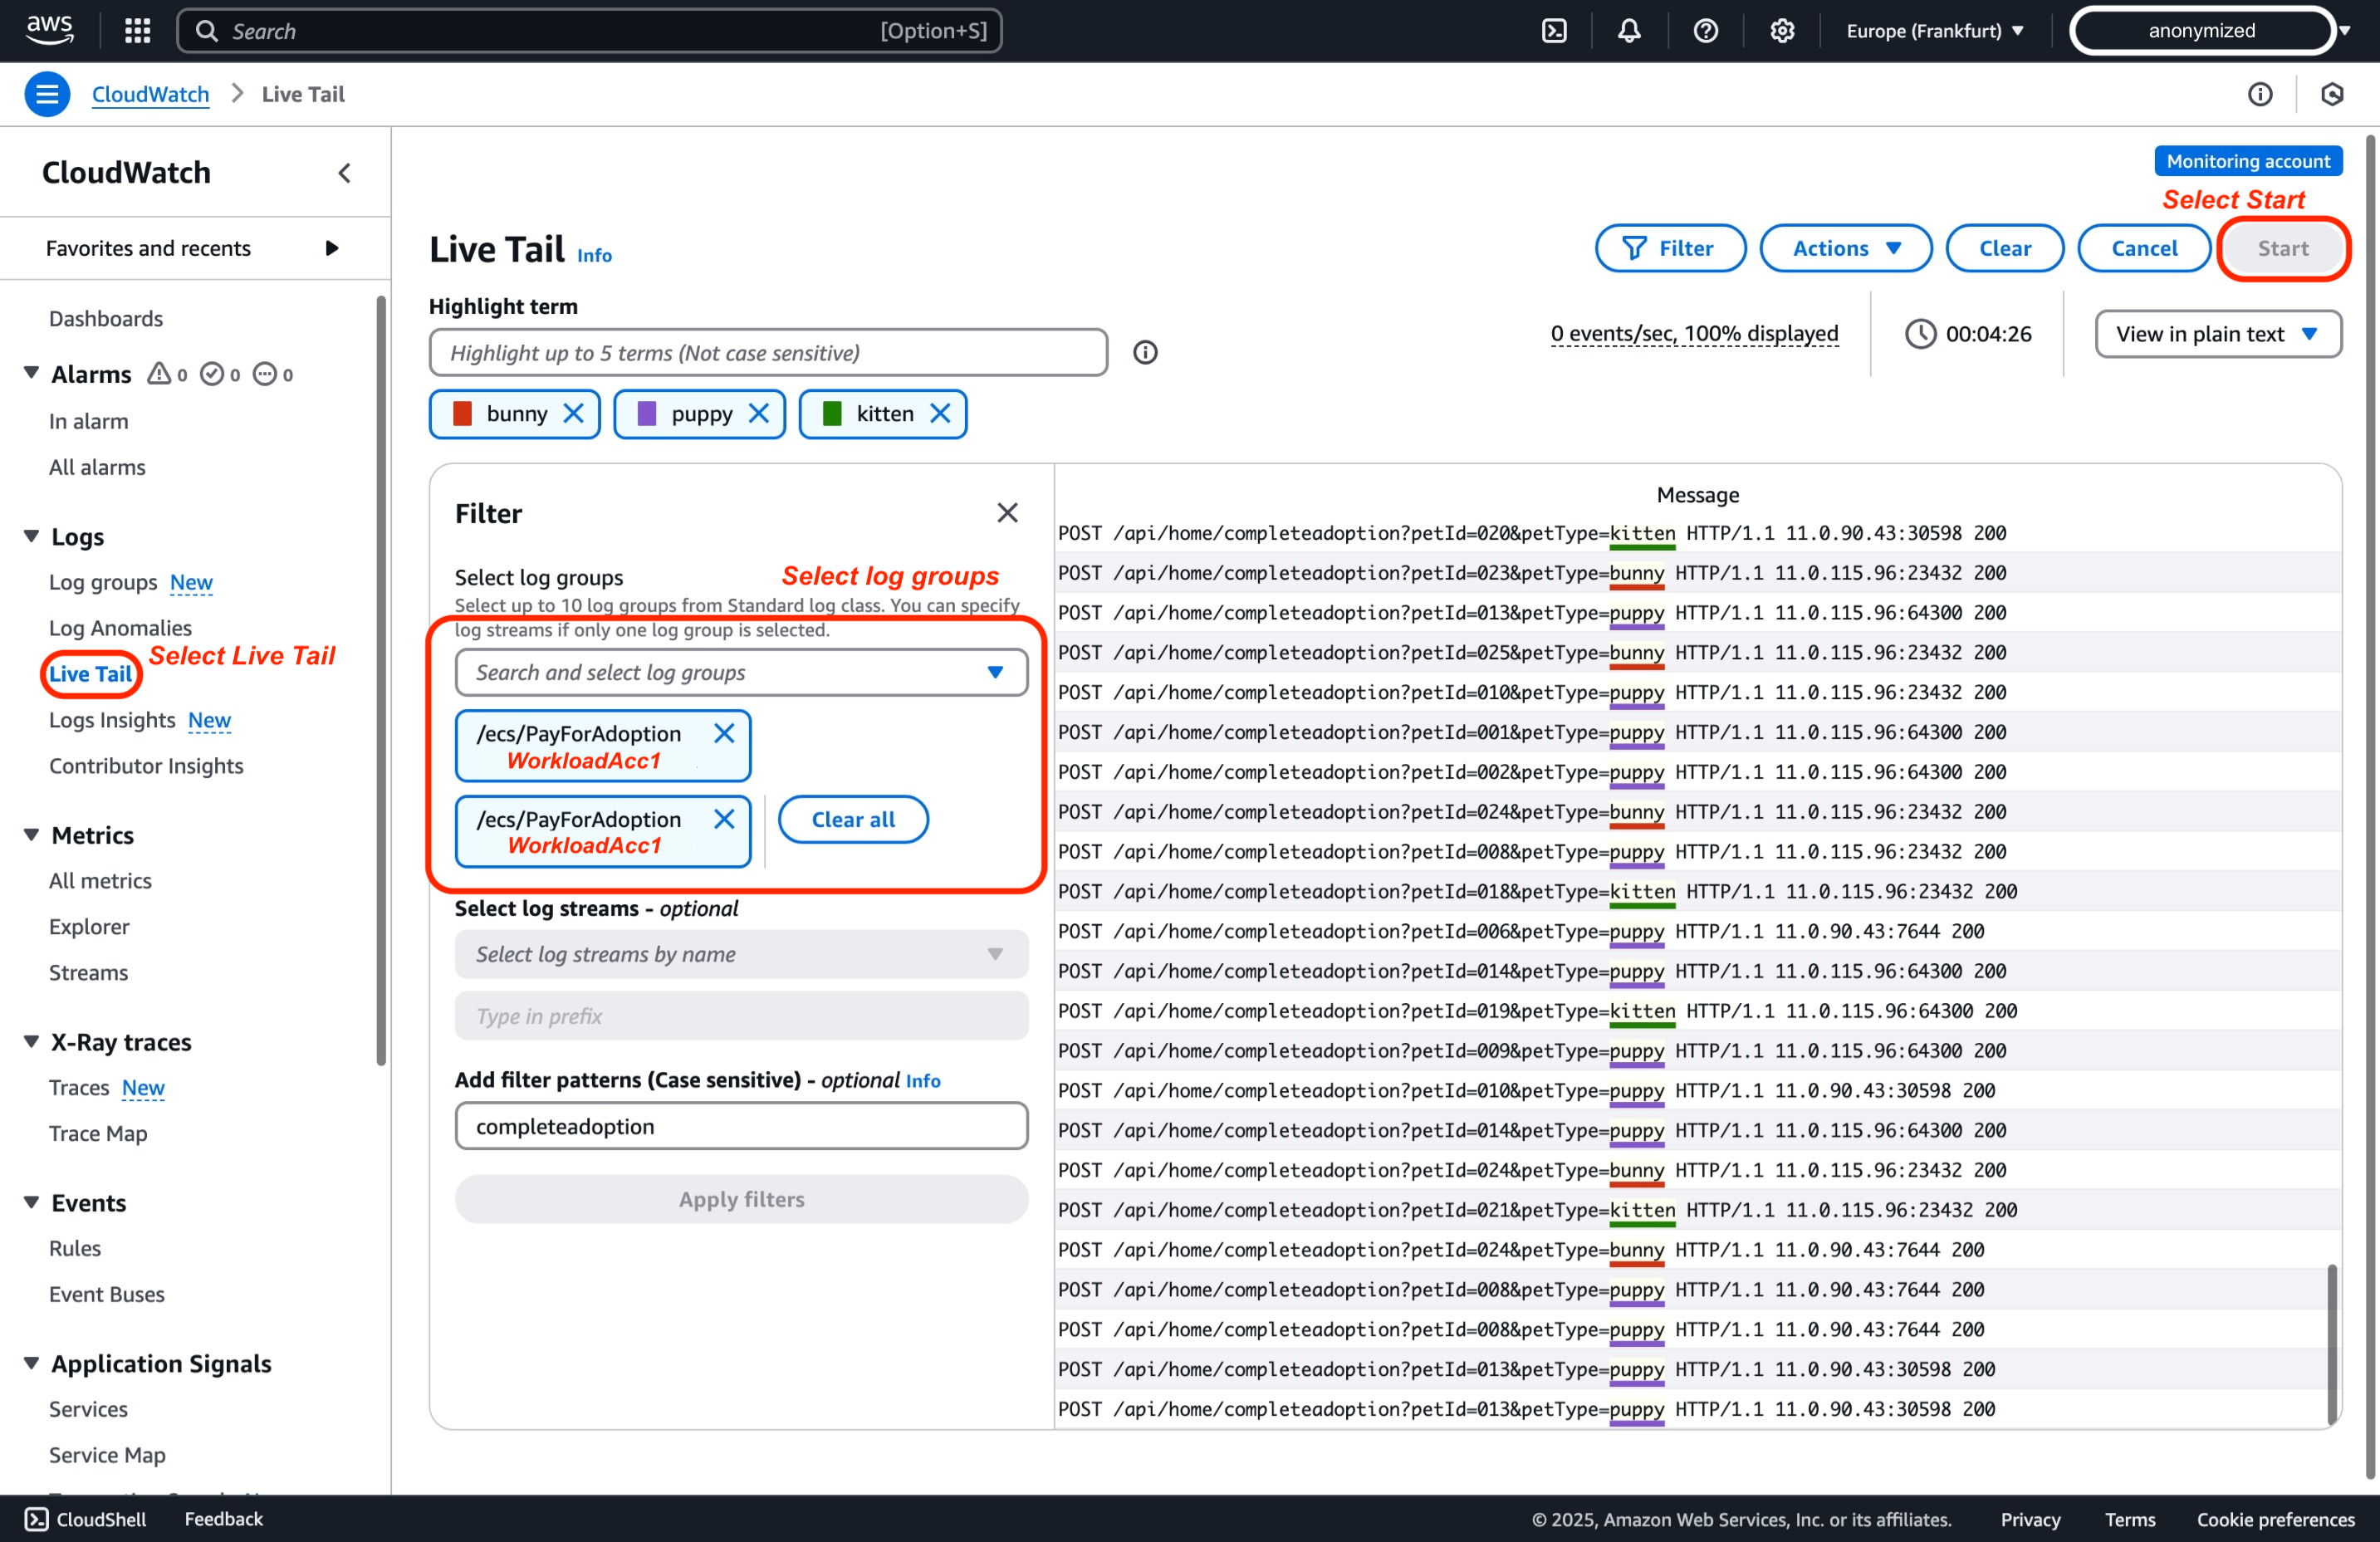
以下は、アカウント間でログをライブテイルする方法です:
- CloudWatch コンソールで Live Tail に移動し、フィルターペインで、ロググループセレクターを使用して異なるアカウントから ロググループを選択 し、開始をクリックします。
トレース
-
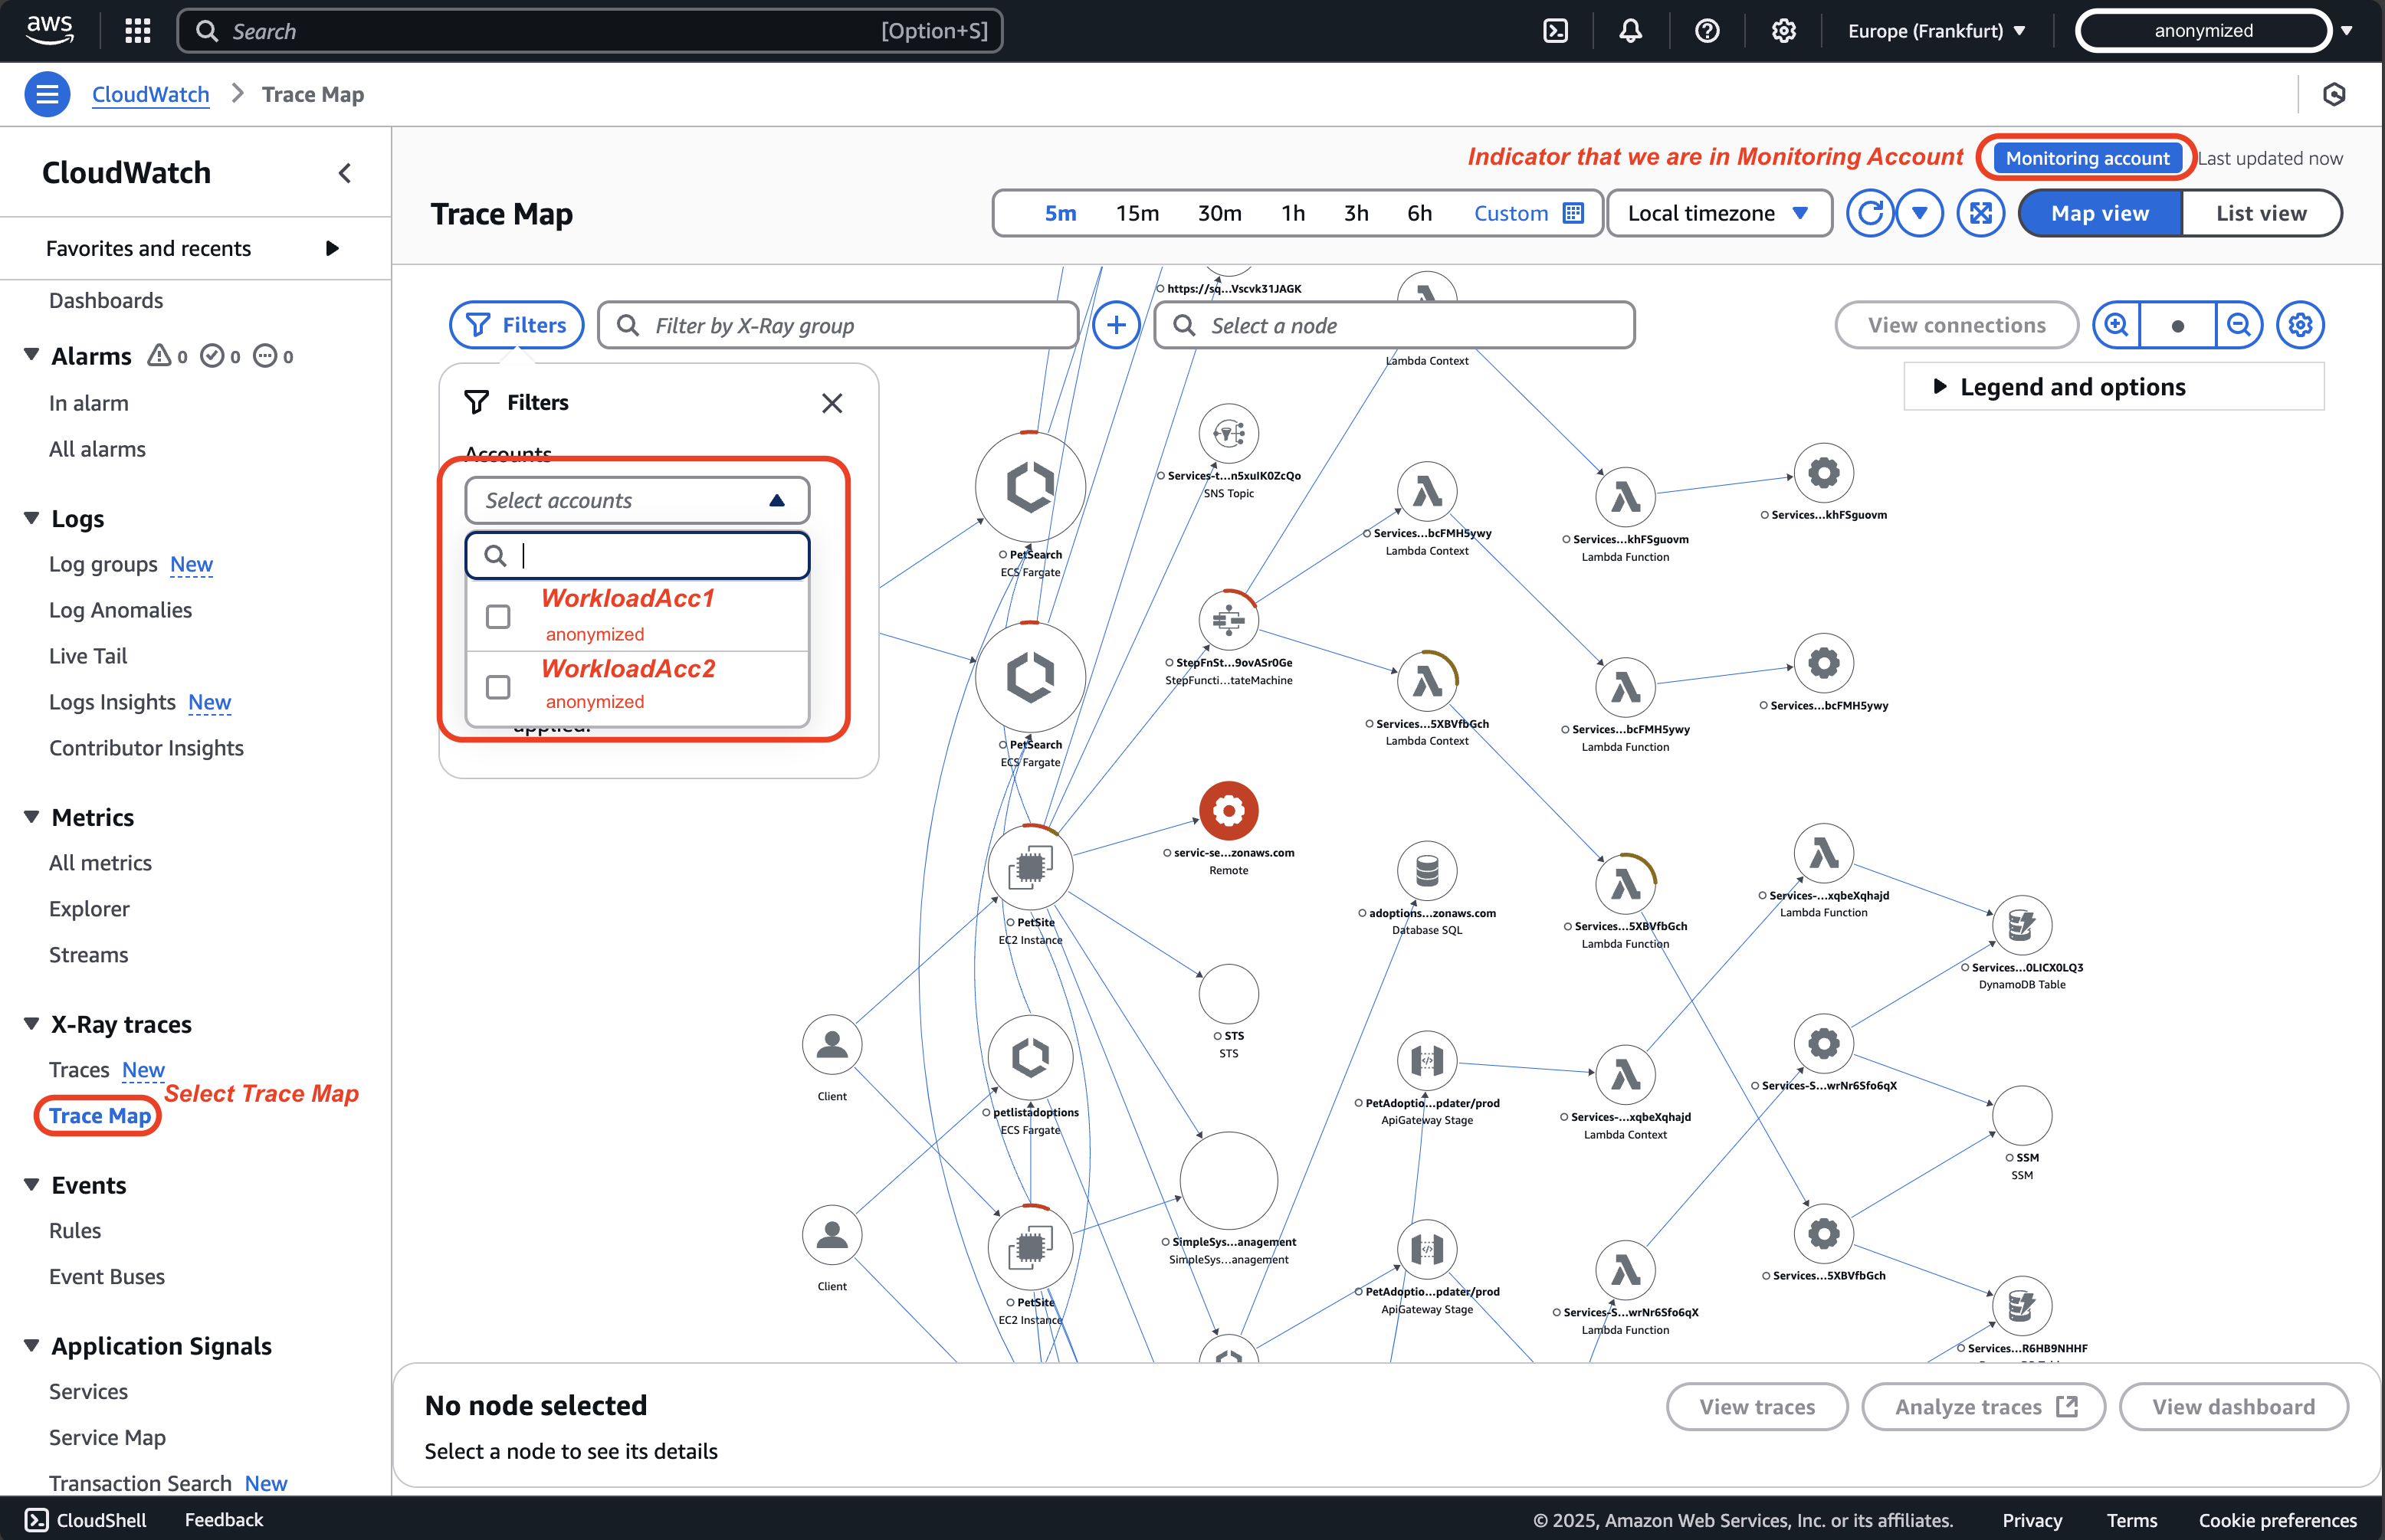
モニタリングアカウントの CloudWatch コンソールで、ナビゲーションペインの X-Ray トレースから「トレースマップ」を選択します。トレースマップには、リンクされたすべてのソースアカウントからのデータが表示されます。必要に応じて、アカウントのフィルターを使用してください。
-
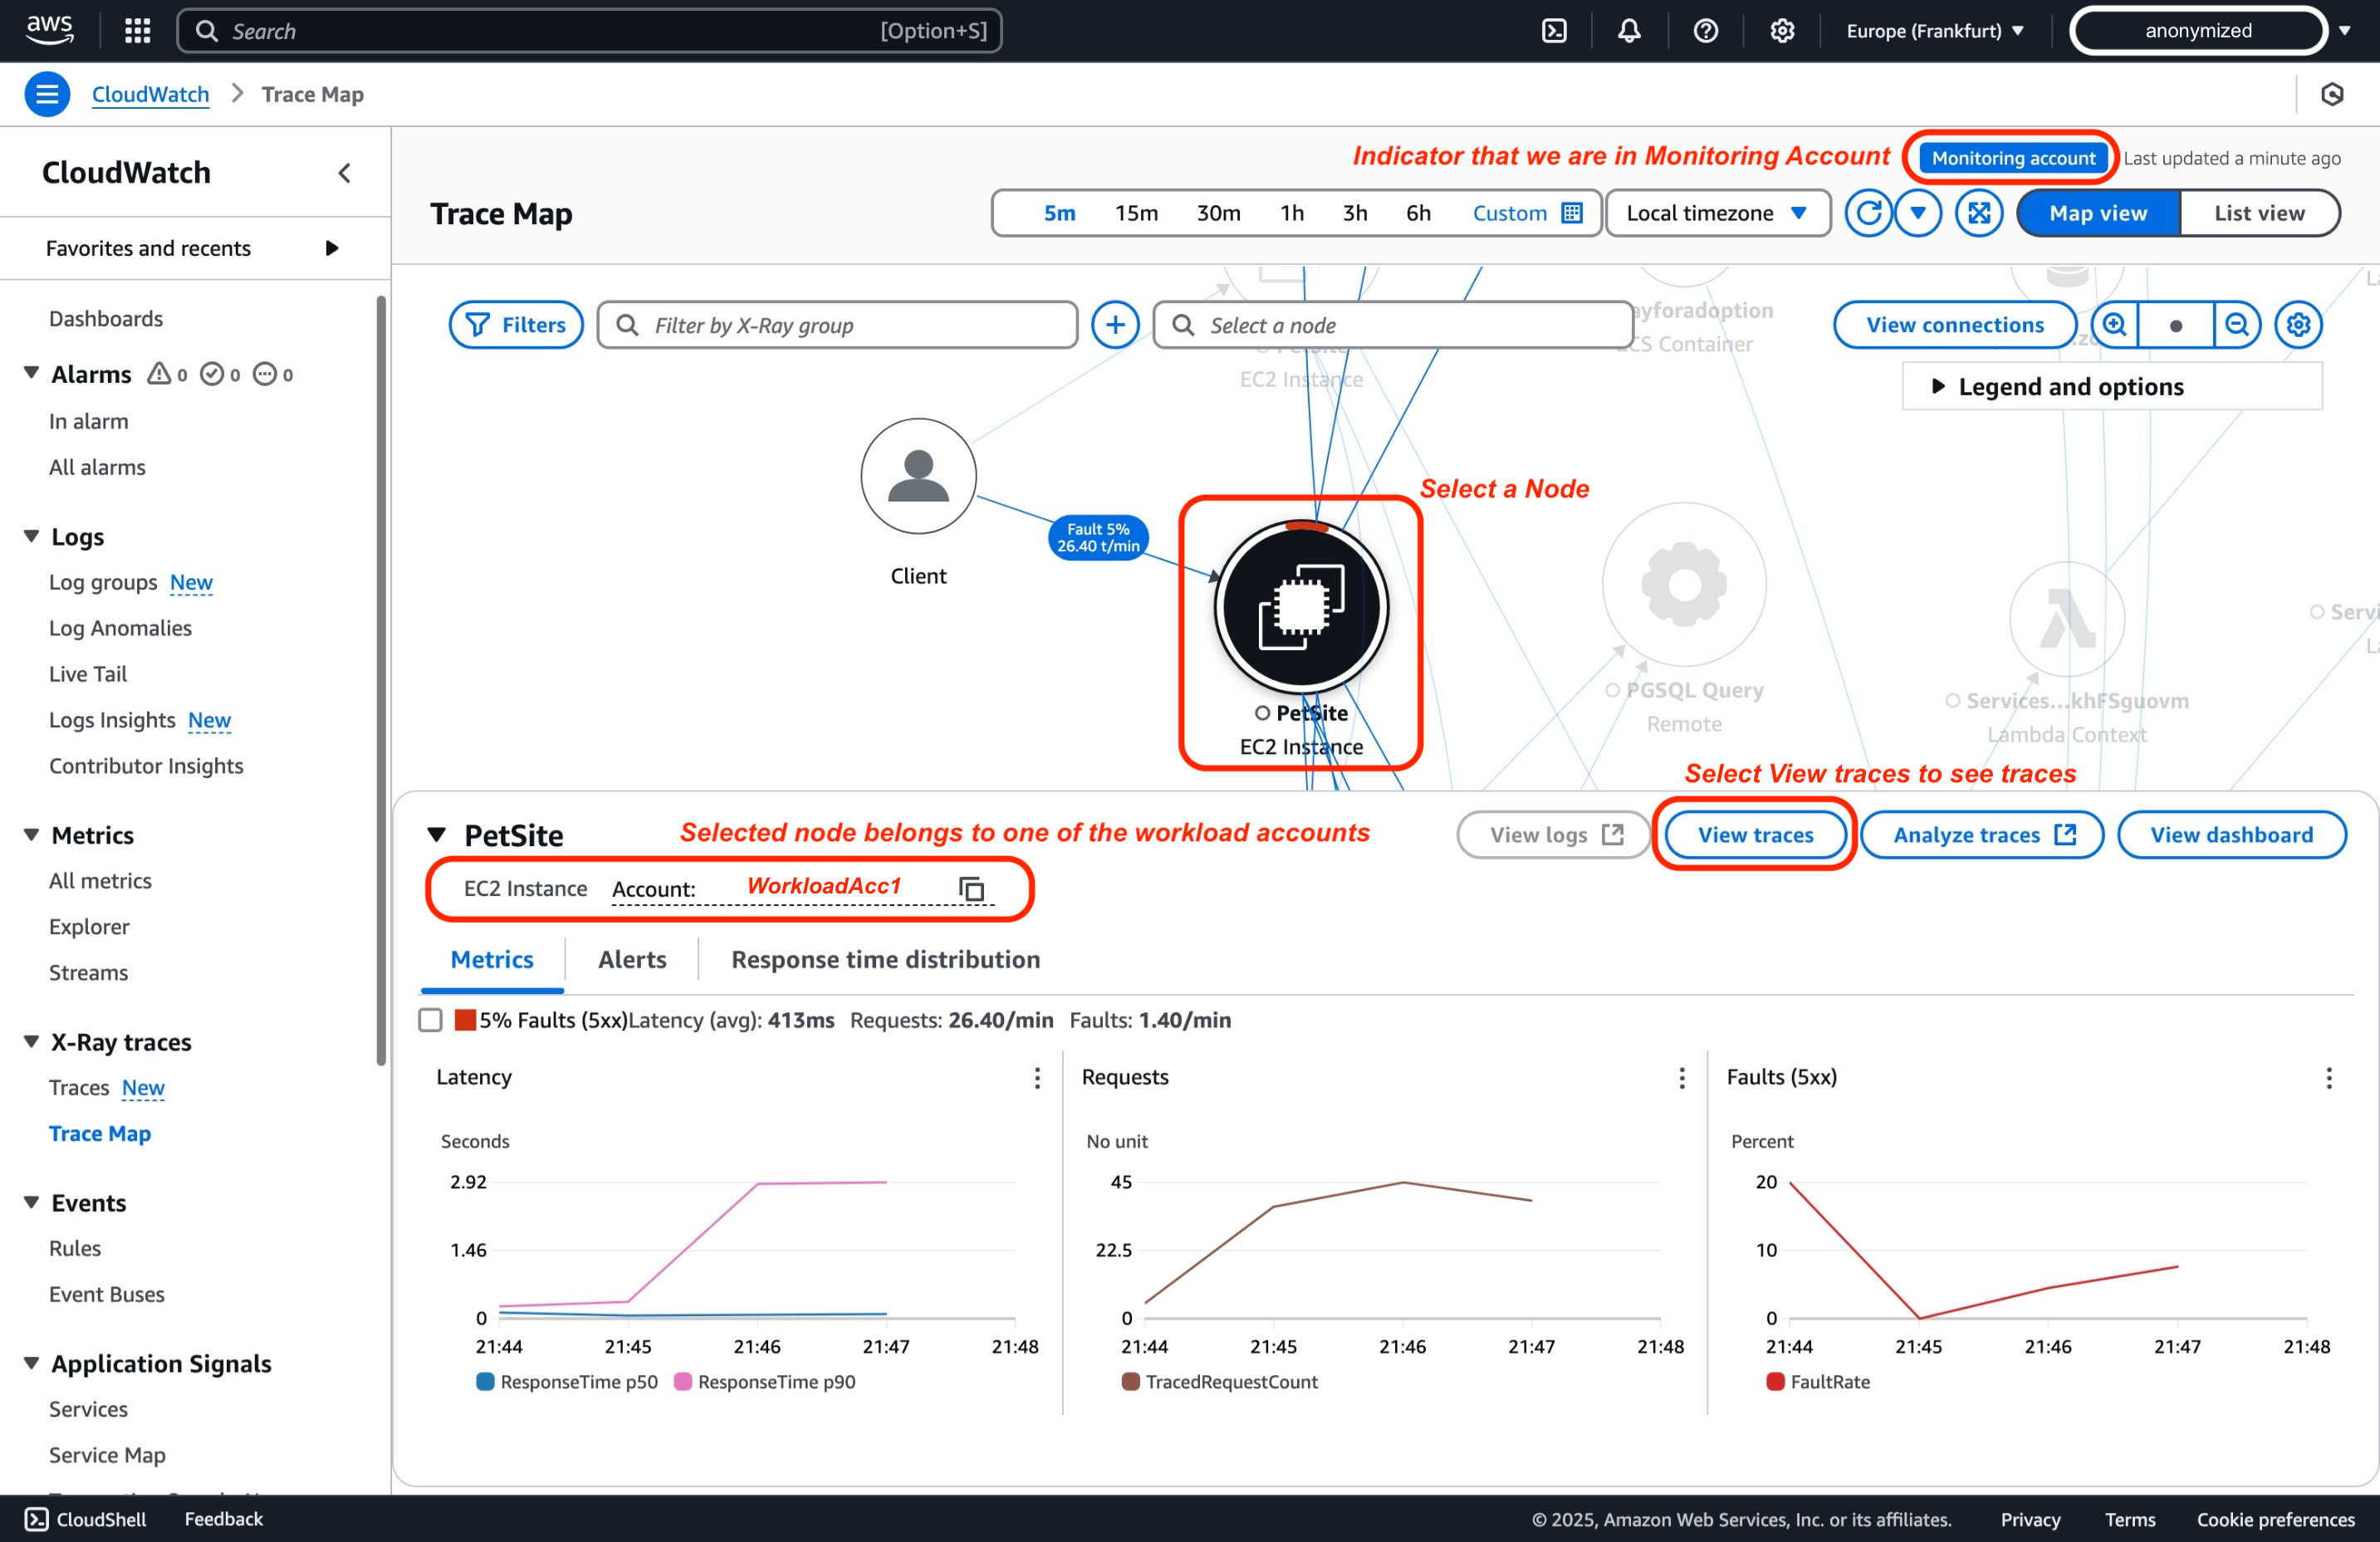
トレースマップ上の各ノードは、それが属する AWS アカウントを示しています。特定のスパンをより詳しく分析するには、「トレースの表示」を選択してください。
-
個々のセグメントについてより詳細な情報を得るには、特定のトレースを選択します。
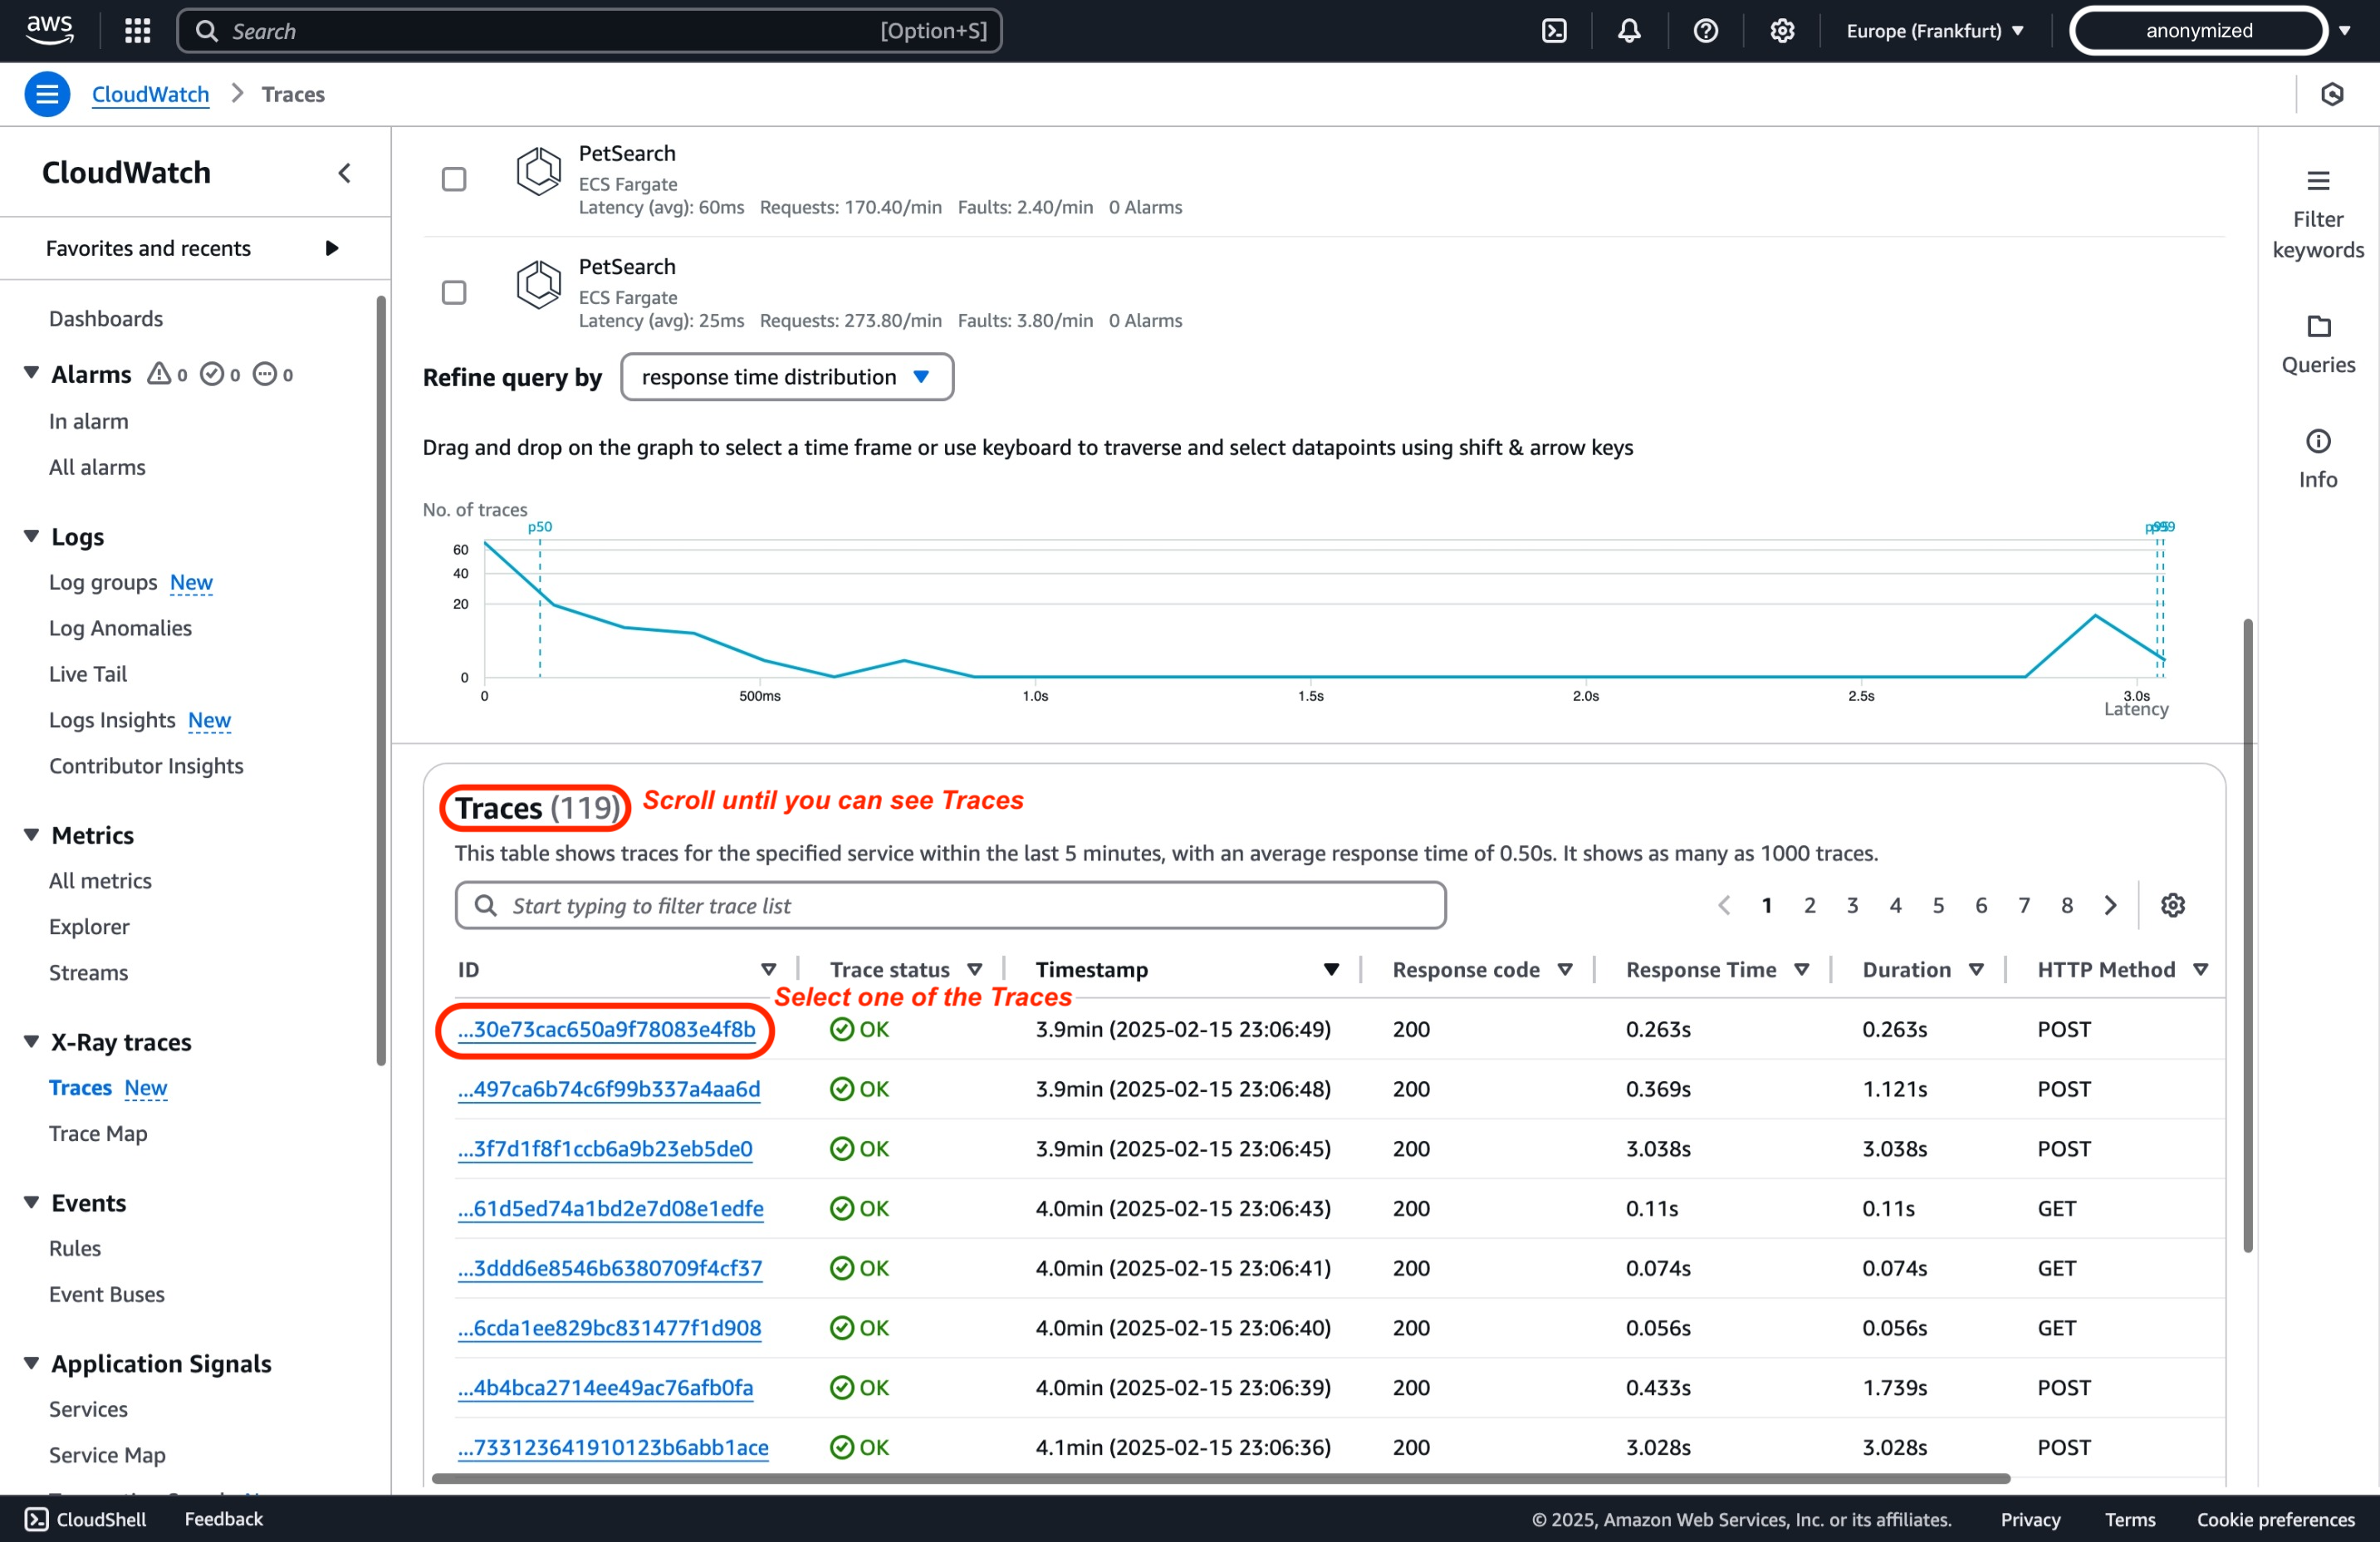
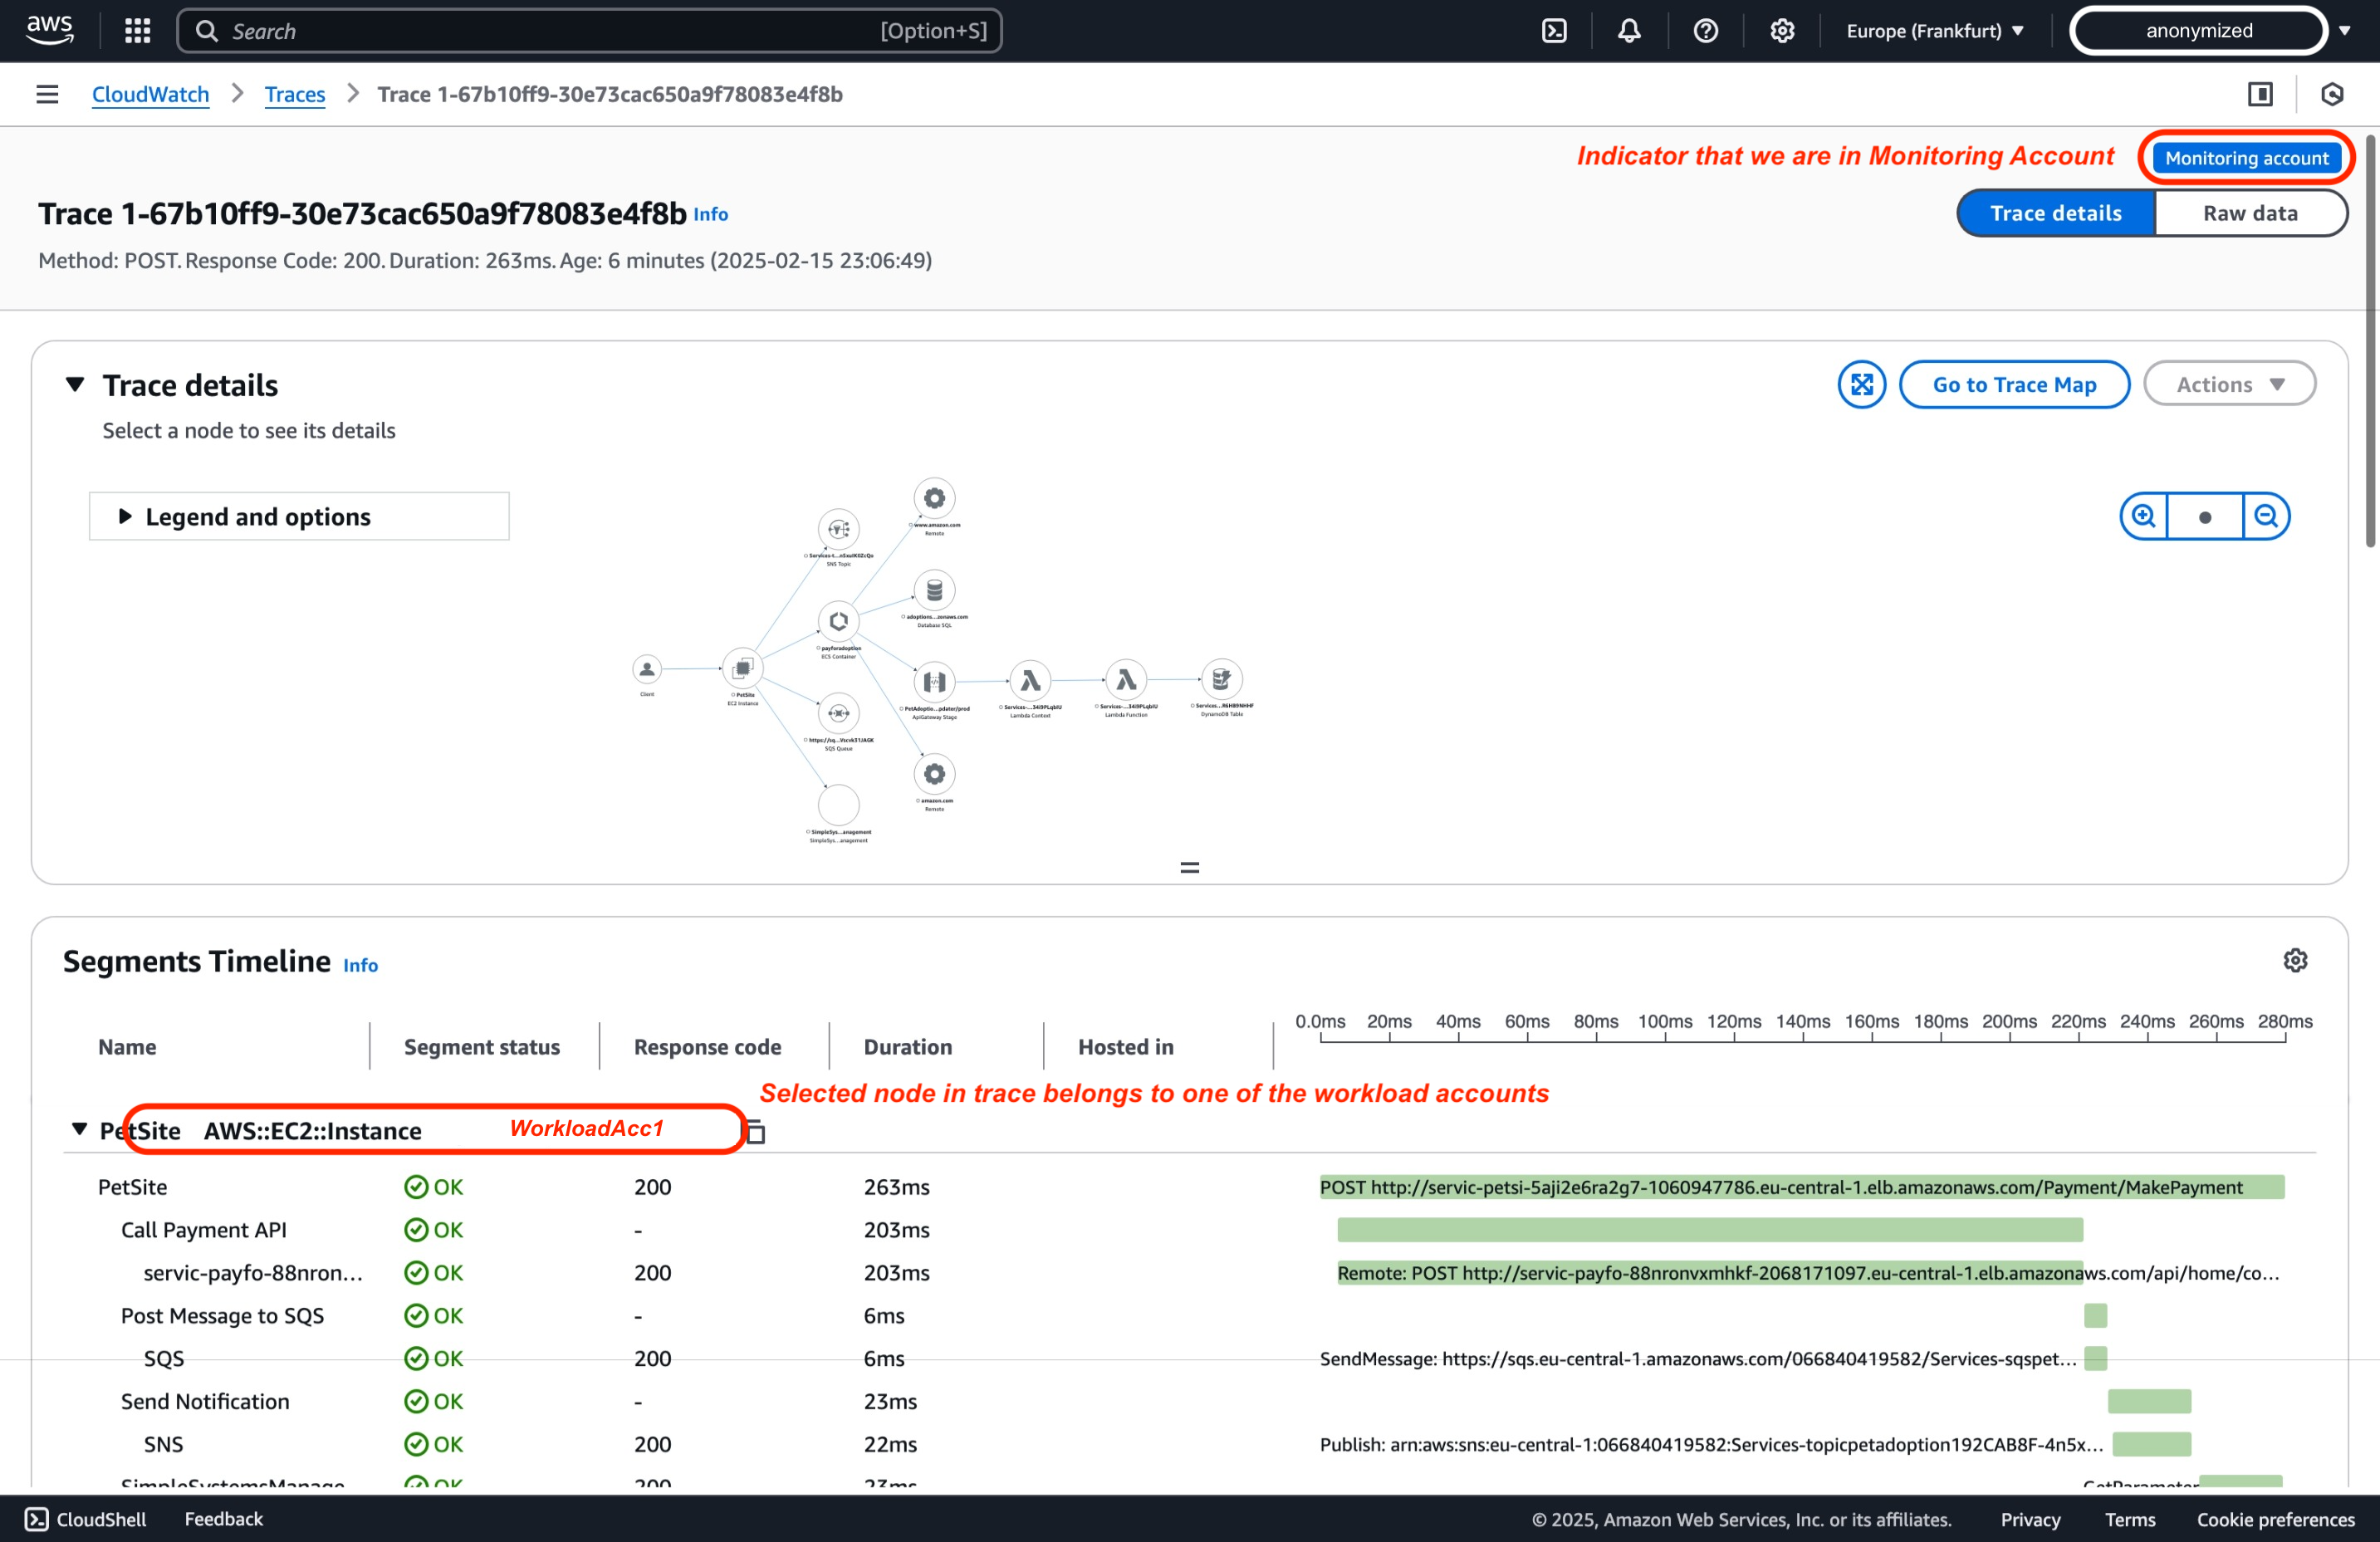
-
トレースされた各パスのコンポーネントについて理解するには、エンドツーエンドのトレーススパンをより深く掘り下げてください。
まとめ
Amazon CloudWatch のクロスアカウントオブザーバビリティを設定することで、複数の AWS アカウントにまたがるアプリケーションのパフォーマンスと健全性を一元的に把握できます。 これにより、アプリケーションが存在するアカウントに関係なく、モニタリング、トラブルシューティング、分析が簡素化されます。 このチュートリアルで説明した手順に従うことで、モニタリングアカウントを効果的に設定し、AWS Organizations または個別のアカウントリンクを使用してソースアカウントをリンクし、設定を確認できます。 これで CloudWatch コンソールを使用して、複数のアカウントにまたがるアプリケーションをモニタリングおよびトラブルシューティングできるようになりました。
クロスアカウントモニタリング機能をさらに強化するには、ダッシュボード、アラーム、ログなどの CloudWatch の各種機能を活用してください。 これらの機能により、アプリケーションのパフォーマンスと健全性についてより深い洞察が得られ、潜在的な問題を事前に特定して対処できるようになります。